Trying to create skin textures for specific output
 leo04
Posts: 325
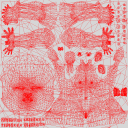
I am trying to create a skin texture but having some trouble with my output. I have a template or UV map example of how the texture should look like unwrapped.
What I don't know is how do I get this.
I am including an attachment of the UV map. This is what the final output should look like layout wise.
I have the body mesh and I can get the skin textures on it that I want I think what I need is the way to unwrap it to this kind of UV map.
Or I don't know what I am talking about and maybe someone can set me on the right path?
Do I use Hexagon? Maya LT or DAZ or Blender? and how do I do it? what the step by step process to get there?
I appreciate any help anyone can provide.
Thanks.


UV - Copy.png
1024 x 1024 - 319K
Post edited by Chohole on


Comments
Are you wanting to create a UV map for a new model, or are you wanting to create a texture to go on an existing, already mapped model?
I have the body mesh and have generated the skin on it using a product called Skin Builder Pro. It creates the texture maps but in separate files. I need the output to be in one image file or texture map.
What I think I need to do is unwrap it from the model and have a UV file or texture file that would look like the image, but would have the skin textures organized on the image inplace of the wiremesh on it now.
Skin Builder makes the texture files or image such as Head, arms legs, torso, all separate files instead of the one all together.
What I am asking is can I export this into one of the programs I mentioned and then unwrap it as just one image...
Thanks.
That's how the figure's UVs are laid out, nothing to do with Skin Builder. Why do you need them on a single map?
I want to create a skin for a character in a game.
This is the what the UV map looks like with the textures and how they are laid out in the image.
The file needs to look like the example attached.
The first file I attached is the UV map.
I guess I don't know how to get my skin texture into that format from my character.
I know that the prefered platform for making the meshes is Maya. I have Maya LT.
I am not creating this for DAZ. I am using DAZ to create the skin.
@leo04 From what it sounds like, you want to unwrap figure B to match what the unwrapping looks like in your screenshots, which are from figure A, is that right?
Assuming you have the correct licenses you'd probably want to do soemthing fairly simple like use a modeller or UV editor to move entire blocks around (say scale to 33% centred on the origin and then move by 33% or 66% to arange them in a single square), then you coudl do the same to the textures in an image editor to make a combined map that would fit. More elaborate schemes might be more efficient, but woudl be fiddlier. A complete remap loaded as a UV set and then using Map Transfer to covnert the maps would be more awkward.
@leo04
The UVmap layout you've posted isnt that bad, but still some parts are overlapping. I see the typical face, torso, limbs and mouth parts of the mesh are seperated and layed out side by side but some other parts that look like the eyes and the lashes are not just overlapping but also seems to not fit into the 1 to 1 UV-space.
On Daz figures the surfaces seperates the diffrent areas / texture maps to apply all the diffrent textures. I know that for a game engine its more efficent to have just one surface / material zone / texture map for the figure, but maybe its not that bad to have at least two texture maps so you get more high resolution details in the textures. In DazStudio there is a tool called Texture Atlas to create a single texture map but the result is not a good UV layout, it can only arange the square texture maps side by side scale it and stretch it.
Otherwise if you have to fix something on the UV layout I would recomend you to load an OBJ of the figure into Blender. You can open the UV/ImageEditor go to Edit Mode and take a look at the Vertex Groups and see what elements of the figure geomerty still overlapping or are outside of the UV-space square box and select them.
As I sayed its propably the eyes and the lashes. If you dont bother you can have it on a seperated texture map - just define a surface for them in DS an you can load a different texture map even if the UVs are overlapping.
Next you can try to use Seams From Islands and Unwrap just for these parts. Since you still have the selection highlighted after that you can grab [G] them aside, [S] scale them down and try to fit them in between the other parts - but the smaler the UV island the less pixels you will get for details on the texture. Or you can try to select all [A] and try Average Islands Scale to have the texture details (texel densety) based on the size of the geomerty parts and then use Pack Islands to rearange the whole UV-Layout to fit into the 1 to 1 UV-space. With this you have to redo the whole texture map.
BTW you can save UV space if you overlay the left and the right side eye and lashes UV there is a Mirror UV function then select one side [B] for box selection or [L] select linked/UV-island [S] for scale [X] for x-axis then enter [-1] and you fliped the UV in place - now [G] grab it and move it over the other side. Also the Constrain To Image Bounds setting can help to place and overlay UVs precisely within one corner of the UV-Space.
Then export this OBJ go back to DS and load your new UV with Load UV Set found in the options Menu within the Surface pane.
Then you have to setup the surfaces in the Geometry Editor. I wouldnt merge all to one because you may need to have different shader settings for the eyes, lashes and everything inside the mouth.
As you may noticed I've done this before.
Yes that is correct. Sorry for the delay in getting back to you.
Thanks. That is what I did and it did work well, I mapped the skin onto my character, then found and repainted the places that were not covered by my map, it worked but not sure this is how to get to the end result.