Texturing Xurge3d for Iray
 cclesue
Posts: 420
cclesue
Posts: 420
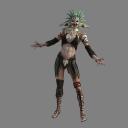
I have a bunch of great Xurge3d stuff for V4 none of which is optimized for Iray. I thought I’d try to fix that but when I open the surfaces tab I get a menu long enough and so esoteric as to scare the bejesus out of anyone with less than an Iray degree. So let me tell what I think I understand and maybe somebody can help me with a few things I don’t. Assuming that I’m working with fully textured but not ready for prime time Iray, the first thing I do is apply th Uber base. This as I understand it applies a “coating” that makes all of the stuff in the surfaces tab usable. From there I know how to make things less glossy and make things disappear. Now what I need to know referring to the image below. How do I change some of the surfaces to look more gold (or any color and/or material for that matter). . . look more gold without losing the surface figure or pattern. How do I add grime or blood to any surface? I’m sure over time I will have a lot more question on Iray but for now I think this will help me a lot.
I see where Dreamlight has a bunch of tutorials on Iray, mostly about lighting. Most of which cost too much for my fixed income. Does anyone know of some free or inexpensive tuts on Iray stuff?
Also.
When I open the texture files for this product I find DIFF., a DISP, and a NORMAL files. I’m assuming the DISP is a displacement map but I’m not sure what a Normal map does. As far as Iray is concerned do I have to worry about any of these?
Daz 3D is part of 
Connect
DAZ Productions, Inc.
224 S 200 W, Suite #250
Salt Lake City, UT 84101
Licensing Agreement | Terms of Service | Privacy Policy | EULA
© 2024 Daz Productions Inc. All Rights Reserved.
Comments
Normals are similar to bumps in that it makes the surface appear to have 3D details but there is no real mesh distortion going on. Displacement maps DO distort the mesh and in order to use disp maps in Iray you will need to increase the level of subdivision of the mesh surface until the displacement looks right - there is a way to do that right in the shader itself in the displacement section. In order to make something look metallic and still show the texture details, make sure the texture image is in the base color and if there is a glossiness map for the metal material (a black and white image), put that in the metalicity section and adjust the slider to the level of metalicity you want (in my experience, it's better to just slide that all the way to 100% and adjust glossy layered weight for dullness or sharpness of the highlight). Because metals color their own reflections you can also try putting the base color texture in the Glossy Color as well.
Laurie
SickleYield has a great run down of each Iray surface on DeviantArt. https://sickleyield.deviantart.com/journal/Iray-Surfaces-And-What-They-Mean-519346747 it doesn't include the newer settings but it's a great place to start.
The first thing you need to do is find the DS Iray uber shader and hold down the Ctrl key and apply it to every surface selecting ignore under the images dialogue. That way you don't lose your textures and Iray settings are now applied to them.
Actually, you don't need to hold down control when you apply the Iray Uber Shader...the shader is already set to ignore any texture maps.
Laurie
True, but most other Iray shaders need this which is why I mentioned it. I find it quicker to apply a similiar shader, say metal to armor instead of the base Uber shader and then adjusting sliders to get a good metal look.