Service Required : Guiding Textures from MD to Daz3d Correctly
 juzduit
Posts: 33
juzduit
Posts: 33
Hi guys,
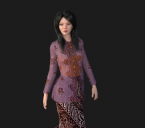
So i created an outfit using MD . It's an embroidered dress
However, since rendering isn't optimal in MD , i decided to texture and render them in DAZ3D for optimum results.
The upper part of the outfit is made of thin bridal fabric with embroidery. So I have a displacement map created for this texture. However, i cant seem to add that embroidery "bump" in the object.
I tried tweaking the materials displacement strength , and bump strength but i still could not get it to work.
Could someone lend a helping hand here?
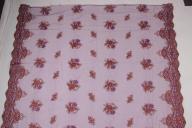
I have an example of the actual fabric , and the fabric taken in a photograph format fit to be mapped into the pattern, and the fabric rendered in MD. They all loose their quality as they get to each stage.
Is there something i am doing wrong?
Thanks!
Daz 3D is part of 
Connect
DAZ Productions, Inc.
7533 S Center View Ct #4664
West Jordan, UT 84084
Licensing Agreement | Terms of Service | Privacy Policy | EULA
© 2025 Daz Productions Inc. All Rights Reserved.
Comments
Do you have bump/displacement maps? Is this a 3Delight or Iray render - Iray uses displacement only to move actual or SubD vertices, unlike 3Delight it doesn't generate the needed mesh resolution on the fly (bump should work, though normal maps are more predictable).
Also bump/displacement/normal maps are unpredictable if the item is not UV unwrapped.
If you're rendering in iray then you might need to subdivide it, and add a level of subdivision under the material's displacement settings.
As another MD user, it's often worth adding subdivision to an MD output mesh anyway. It seems to bring back the detail you see in the MD interface and the clothing subdivides very nicely.
I am rendering in iRay, and with suggestions above, i sub-divided it, and increased the level of subdivision.
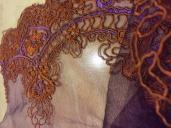
This is the result . I do see very little improvement. The embroidery (purple and orange) don't seem to "bump" out of their shell, which is odd.
This is odd as i can directly see results, although they dont render well , in MD.
For a clearer perspective, i am also attaching what i wish to accomplish below.
If anyone can be of help - i do not mind paying for their services.
The maps don't appear to have a lot of contrast, judging by the little thimbnails in the Surface pane. The positive/negative values are in cm, so your bump range is .35cm or about .1 inch but that is from black to white - if the map is mostly middling greys then you will use very little of that range.
I know lots of people here who are passionate in rendering for DAZ3D Characters . However mine is a little bit different.
I am a fabric developer, and what i actually want is to create a catalogue of dresses without actually making the garments in real life, to show them to my clients. Since 3D has come this far in terms of technology, i thought i'd give it a shot. For this to happen, the garments should be AS REALISTIC as possible.
My plan is to initially take out a picture of the fabric in RAW, simulate them in MD with the fabric properties, and then render them in DAZ. I choose DAZ because it was the most user friendly. If there is a better renderer out there to get the results that i want , then i wouldn't mind upgrading into it *no offense to DAZ users out there *
We strive for the best results. We have been using OPTITEX for our garments, but we still feel MD does the simulation job BETTER than Optitex's PR3D. However NEITHER of them have good renders.
It gets more complicated since the fabric we are working is an embroidered fabric with a semi transparent background, so we do need to get the bumps of the embroidery, the bumps of the sequins, and the specularity of the fabric as close as possible.
I am posting the raw image , the actual fabric, and what i am trying to acheive below, perhaps that would give a better representation of what we need.
We need someone who could guide us to provide this service.
Thanks!
Threads merged. Rather than posting a new thread on a basically equivalent topic, you may change the name of the thread to indicate the change in direction you wish to take with your topic.
There are various tools, such as Allegorithmic's B2M or the stand-alone CrazyBump, which claim to be able to extract bump detail from an image though I can't say I've had much joy of the ones I've tried.
For transparency, one option might be to attach a sample of the fabric to a piece of glass, take it (with a tripod mounted camera to keep everything in register) once against a dark background and once with a lit white surface behind, then layer the two images in Photoshop with the top set to Difference blend mode, add a levels adjustment layer and use that to drive the differences to white and black, add an invert adjustment layer (since it will be the sheer areas that are white and the opaque that are black initially) and save as an image to use as an opacity mask with one of the photos.