How Can I Make My Iray Renders Look Less . . . Cartoony?
 SubGeniusZero
Posts: 61
SubGeniusZero
Posts: 61
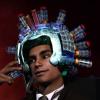
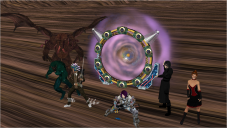
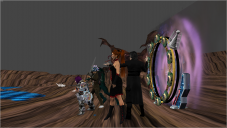
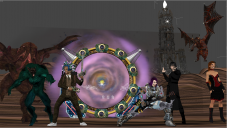
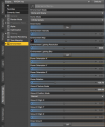
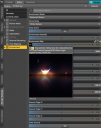
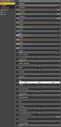
Hi. I'm new to the realm of IRay Rendering, as I'm a longtime 3Delight user, and I just got over the hump of making my IRay renders less "grainy" — I finally learned how to use IRay light "Lumen" values and I learned how to manipulate a few of the settings in the "Render Settings" tab just the other day — and now I have a new question for the hive mind: How the frak do I make my IRay renders look less like living cartoons and make them look more Photorealistic? I'm dealing with some fairly cartoony, comicbook-like subject matter, I grant you, but still, I'd like to get more Photoreal results.You can see my current lighting setup in the screenshots I've posted in the attachments. I'm using three ambient lights arranged in a three-point configuration (keylight, highlight, and rimlight, with the keylight positioned on the right side of the characters and set), and a point-light in the center of the large prop in the center. Any suggestions would be magnificiently appreciated!
—Andy H.
Daz 3D is part of 
Connect
DAZ Productions, Inc.
224 S 200 W, Suite #250
Salt Lake City, UT 84101
Licensing Agreement | Terms of Service | Privacy Policy | EULA
© 2024 Daz Productions Inc. All Rights Reserved.
Comments
Do your characters and clothes all have Iray textures? Some look like they are 3Delight textures; they need a bit of extra-love to shine in Iray.
Also, switch "Draw Ground" to "on" in the render environment settings, so that the characters throw shadows on the floor.
Lighting large group scenes can be really tricky; I usually don't use point lights, but directional lights, and emissive plains to give extra light in some cases. Use Depth of Field to make the background a bit blurry. Also, the clothing is not properly posed for the dude in all black, and him and the girl in the mini skirt have foot pose problems...
Thanks Bee. I'll work on their poses and clothing, and will turn on Draw Dome and Depth of Field. (I'm leery of doing that, though, as I want the dragon to show up, and he's WAY in the background, like twenty squares away. What settings can I use to ensure that he shows up but I still get a "proper" depth of field "look?") I don't know what to do about the textures. Yes, many of them are 3Delightt textures that I've converted to Iray using the procedure of: (1) Click on texture using the Surfaces tool, (2) Find Shaders > Iray > Daz Uber > Iray Uber Base, (3) Double click on it. That's what I've been doing, but it doesn't seem to do much good with them. What else can I do?
—Andy
I'm currently not at my render PC, but I can cook up a few examples later, if you want. Humans and hair are really tricky in Iray, clothes usually are not that difficult.
There was a thread about the topic a few pages back: https://www.daz3d.com/forums/discussion/211501/making-legacy-outfits-look-real#latest
I usually use https://www.daz3d.com/v3digitimes converters as a starting point for human skin, and OutOfTouch's Iray Hair Repair over from Rendo, though the Hair converters here in the DAZ store also have good results.
Another good option, if you want to learn from scratch, is to buy some Iray shaders, or hair/clothing, and see how they set up things.
If you are adventerous, you can read through everyone's accumulated learning curve here: https://www.daz3d.com/forums/discussion/56788/iray-start-here#latest
Yes, that's right, but note that all it does is convert the materials from 3Delight to Iray format, exactly the same as the auto-conversion at render time. What it does allow you to do is make consistent adjustments to the materials settings — if you leave a material as 3Delight and make adjustments to it, those adjustments don't really correspond all that well to the changes you'll see in a render. It's much easier to learn what those changes actually mean if you convert to Iray so you can see the actual Iray parameters.
Too much white light and it's too bright too. Introduce some haziness or fog too. Introduce different coloured lights from different angles.
Here is a link to 3 RTDNA products now sold at the DAZ Store. They still work in iRay too:
https://www.daz3d.com/catalogsearch/result/?q=Rtdna+Atmospherics
Uh, they are actually Freebies now so great for you!
Here is what the Rain Atmospherics & the Fog Atmospherics render like in iRay although I should have scaled the raindrops to be much, much smaller in hindsight.
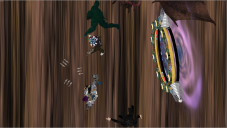
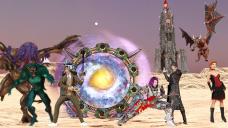
Okay, I have a question about the Emissive property of the textures on the wormhole gateway . . . what units should I set? Does "lm" stand for "Lumens?" And if so, should I use a high value like 190,000 if I want them to light the scene, or will that blow out the texxture I've applied to them and cause them to turn into "flash grenades?"
lms is lumens. I'd use the image on both, the emissise colour and the base colour slot. As for the strength, you'd have to experiment with that. I usually use the candles settings instead of the lumens, as I started out with that when Iray arrived; with lumens, I'm not sure.
Okay, I'll start with that and move up. Thanks for the tips so far! Keep 'em coming!
It looks like you are using distant lights instead of point or spotlights which is why everything is blowing out so bright. They are pretty much preventing any of the shadows showing at all. Instead, try starting with just the environment light and then adding point or spot lights as needed. You might want to consider maybe starting with a more simple scene with just one or two figures and then work your way up from there.
If you use lumens the average lumens of various lighting situations is quite easy to find with an internet search: lumens for various times of day at various times of year and maybe even some data according to weather conditions. Data is available for indoor lit enviroments too.
I replaced all my incandescent bulbs with LED bulbs and basically the packaging claimed that 60W Soft white = 800 lumens LED soft white or bright white bulb. 100W I think was 1000 lumens. All that is online.
Using Sun & Sky or an HRDI such as agentunaware suggests tends to render much faster & produce better distributed 'nice lighting'. You then can create local lighting for lamps, fires, cosmic rays, and what not with emissive surfaces.
SGZ, Have you tried turning off the camera headlamp? If anyone asks me "Why do my renders look bad/ugly/unrealistic/cartoony" it's almost always the headlamp that's the problem. It bathes everything in direct light and makes your scene look almost entirely unlit (like you've shown above). Go to the Render tab, General, Auto Headlamp and set it to NEVER. Once that is off, you can progress from there.
I turned off the headlamp and my renders have improved! Also, I tried spotlights, focused on the major characters only, but that didn't seem to improve the renders. That in fact made the characters look flat. So I went back to ambient light. I'm experimenting now with different angles, lumen values, and shadow settings, and different Environment settings. I also bought & downloaded a program that lets me create my own HDRIs, so I will be experimenting with that in days to come, as well. Tell me what you think or what else I should try!
Now that the headlamp is off, you should really start to think about how you actually want to approach scene lighting/comp. It's not the lights that make the scene, it's how you use them. Here, watch this video by blender Guru, he goes through scene lighting and composition, its well worth a watch. He has other video's on color theory and framing too, which are very useful.
Which one? I have a couple but I'm always curious what people are using.
Wow, that is much better. It's more interesting now.