Visual Style Shaders - Turning off Ambient Occlusion?
 chris the stranger
Posts: 132
chris the stranger
Posts: 132
I've been using Visual Style Shaders pretty successfully for awhile, but now I've encountered some rcent problems. I noticed that artifacts were appearing on surfaces while creating lighting profiles for a character, but couldn't figure out the cause until today.
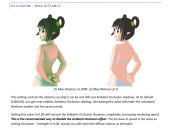
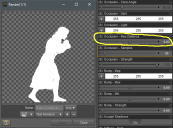
The product guide recommends setting Maximum Occlusion Distance to 0, to get rid of all ambient occlusion. When I do this, the image gets flooded with white (or what I assume whatever the set colors for Occlusion Light and Occlussion Dark currently are). I think I used to set Occlusion Strength to 0, as a sort of hackneyed way to deal with the problem. POSSIBLY because of the recent Daz update, doing that is no longer viable - setting Occlusion Strength to 0 does exactly what is advertised.
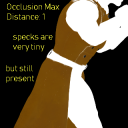
When I set Max Occlusion Distance to 1, most of the AO goes away, but there are little tiny white specks that still appear on the surface. I replaced the Visual Style Shader Base with a Default Daz Shader, just to verify it wasn't a problem inherent to the diffuse texture - it wasn't.
Now, I could get around this problem in flat-color renders simply by using one of the default shaders, the problem being this will also show up in my lighting profile renders. As of right now, the cel-shaded style I've been crafting over the past few months ABSOLUTELY DEPENDS on me being able to manipulate the Diffuse Light, Diffuse Dark, Outline Light and Outline Dark properties. Those specks appear in the lighting profile, which then get baked into the sprite normal maps I generate, which creates a lot of noise on what was otherwise a pretty good method I've been working on for making sprites out of 3D renders.
To the point: is there a way to turn off Ambient Occlusion in Visual Style Shaders, altogether? i.e. going into some complicated Shader Room and figuratively cutting some branches. I've tried playing with Cone Angle, Occlusion Samples, Occlusion Bias, and etc to try and find a workaround, but no luck.
Daz 3D is part of 
Connect
DAZ Productions, Inc.
224 S 200 W, Suite #250
Salt Lake City, UT 84101
Licensing Agreement | Terms of Service | Privacy Policy | EULA
© 2024 Daz Productions Inc. All Rights Reserved.
Comments
I don't have these shaders so may not be able to help. I guess you tried setting AO distance AND strength to 0? What does that look like? Still flooded?
The product description says it's a shader mixer network, so it should be possible to create a shader with AO disabled. You would need to open shadow mixer and import a surface, find the AO brick and disconnect it, then save as a new shader.
That was indeed a thing I tried. as Strength approaches 0, the surface gets brighter and brigher (I assume it's going toward Occlusion Light), until it hits solid white. That is, at least, consistent with the effect it said it would have in the guide. however, it possibly didn't act this way in the last version of DS.
While decreasing Occlusion Max Distance , the amount of AO gets less and less until you reach 0, then suddenly all white. Like a divide-by-zero error is happening.
I've never worked inside the shader mixer before, but after poking around in there a few minutes, I realized that I couldn't even load the thing. "File > Open Shader" wanted me to load a DAZ Brick Material, and I've found no such thing in my content library. Looking into the Shaders directory (Yes, not Shader Presets), all I have are the .dsb files. Don't know how to edit those.
Try creating a simple DS primitive and apply the Visual Style shader to it. Open Shader Mixer and in the top left corner click on file and select import from scene, choose material. You should now have the material/shader of the primitive in the shader mixer pane. Go searching for the AO brick:) Good Luck=)
Edit to add: If you find it and manage to disconnect it, you can either apply it on the primitive, or save it as a shader in the top left file menu.
If you know it worked in a previous DS version, try re-installing it. If it still doesn't work, maybe file a help request/bug report?
Did you (as a workaround) try to set max distance to something like 0.001?
Turning down Max Distance to 0.001 was another thing I tried, but still saw the white dots. I'll probably submit a ticket tonight.
Now, for the Shader Mixer stuff - I went in, deleted all blocks pertaining to Ambient Occlusion, and saved it as a new shader. I don't exactly know how to apply said shader to other surfaces. I saved it as a .dbm in one of my preset folders, which is not a thing I can just launch from the content viewer. Perhaps it already is applied to the surface after I tweak it. If that's the case, then surprisingly, deleting said branches did not get rid of the AO.
Ok!
To apply the shader after tweaking it, in the lower right corner of the shader mixer pane there is an apply button. In general, to apply a shader (that you have saved to your DAZ library/shaders) to a surface you need to have the object/figure selected AND the surface(s) you want to apply the shader to. So maybe you did the right thing but didn't apply the changes=)
I was thinking more in terms of, 'how do I turn this into a thing I can see in, and apply via the content library?' And just as I typed that, the thought crossed my mind, "Hey, it's probably one of those Save As options in the main workspace!' Checking....yep! The question is, do I go with Shading Preset, or Material Preset?
(But also, I didn't know how to apply the shader after tweaking it, so that was pretty helpful. There's a lot of UI stuff I tend to overlook because of an eyesight problem)
That would be shader preset;)
This started as an Edit, but it's long, and different enough in tone that I think it warrants its own post.
Disconnecting Ambient Occlusion leads to a material that appears properly in the viewport (light and dark diffuse show up), but then renders as solid black. I think I'll have to take a deeper dive into the shader to fix the issue. Specifically, I'll need to look at the blocks Ambient Occlusion, Light Occlusion, and Dark Occlusion fed into, and either bypass them with the other inputs, or change the operation. I don't think I'm allowed to post a screenshot of the whole thing, since technically, that'd pave the way for someone to recreate their own version of it - but I can probably describe a few aspects that pertain to the troubleshooting.
At the top-level (?) of the shader, there are Diffuse, Ambient Occlusion, and Edge Blend blocks. The inputs to these are what you would probably expect, if you're knowledgeable about Shader programming. I'm not, but I'm starting to figure it out...
Ignoring components regarding specularity and opacity, these are the Image ID blocks that specifically handle the shading, in order of theoretical brightest to darkest (for my use-scenario):
* This is separate from the [Diffuse] on the top-level. Inside the Shader Mixer, it's named just 'Diffuse', which could get confusing, especially since the other one is differentiated as Diffuse - Dark
There are two blocks one level down called Light Surface and Dark Surface. Both of these perform a Layer Mix operation. Inputs are as follows:
Now, here's where my head begins to hurt. Remember how Ambient Occlusion and Diffuse were on the top-level? Well, Ambient Occlusion goes to [Light Surface], [Dark Surface] (as mentioned above), as well as a block called [Light & Dark Total]. [Diffuse] goes to a separate block called [Shading].
The Multiply block [Light & Dark Total] is where I suspect the problem could be occurring. I don't know enough about the shader language to know exactly what's going on, but it could be that when performing a multiplication that becomes a Color, the 3Delight renderer says "Oh, hey, that's a 0! Solid white," versus "Oh, hey, first that's NaN! Solid black!" However, [Total Light & Dark] only has one output that goes into a block called [Outline Mix]. That's not to discredit the theory, but I imagine were this the problem, it would show up in the outline rather than covering the entire surface. So, going back a little...
There is a block that [Light Surface] and [Dark Surface] feed into called [Shading Mix]. It's another Layer Mix operation. Inputs are:
And just as a reminder, [Shading]'s output was a float (or at least, that was the specified TYPE - maybe that's not the actual output in this shader language). [Light/Dark Surface] are colors.
[Shader Mix] goes into [Base Mix] as Layer, [Outline Mix] goes in as Base, and Alpha is...[Outline] (Just the numerical value of Smooth Step operator on Edge Blend, I think)
At this point, there are a dozen things I need to experiment with - changing outline start/stop, shading start/stop, to see if these have an effect on a zero Occlusion Max Distance. But if you see anything described above that sets off a red flag, let me know. All I know with certainty is that it works fine when it DOES use Ambient Occlusion. The problem could very well be a result of introducing a zero into the Layer Mix's Alpha input. At the very least, I now know that there's a difference between 0 and No Input...is there such a thing as a conditional path modifier? "If Max Occlusion Distance == 0, go around all this stuff."
Wooah a lot of text there:D Not sure either if you are allowed to post a screnshot, but it sure would help. Maybe @RichardHaseltine could help us out?
First let me say I'm in no way a shader mixer expert, I know my way around the basic stuff when it comes to RSL bricks, but this is getting a bit complicated, especially since I don't own the product and can't mess around with it.
Maybe you should post in this thread where the hardcore 3DL guys hang out https://www.daz3d.com/forums/discussion/55128/3delight-laboratory-thread-tips-questions-experiments#latest. Mustakettu85 and wowie know shadermixer like their own back pockets, so maybe they would have some valuable tips.
Basically you want to make as little changes as possible, so be careful with deleting entire bricks, you should rather just disconnect certain paths by rightclicking on the arrows.
There is a brick in utility/control called" if else". Maybe you could use it for bypassing certain things under certain conditions. There is also a "dead end". Haven't tried it yet but sounds useful
Yes, I would be reluctant to sanction a screen shot of the whole network (quite aside from the size) as it could be a problem.
Call me a crazy person, but I couldn't reproduce the problem today (when testing on a torus primitive). That's not to say the problem doesn't exist, it's possible simple generated shapes are better at hiding the noise. I tried using blinding colors for the Ambient Light and Ambient Dark channels, and I couldn't see any trace of artifacts with Max Occlusion Distance set to 1. If I set it to 0, all lit areas become the Occlusion Light color, and all dark areas become Occlusion Dark. Side Note: When turning Occlusion Strength down, The diffusely lit areas come closer and closer to being the solid color of Occlusion Light and Dark. To me that sounds like the EXACT OPPOSITE of what Occlusion Strength should be!
For my flat-color renders, my best course of action would be to set the Occlusion Light/Dark Images to the same image I use for the diffuse channels, and that should prevent the artifacts from appearing over the surface. I still worry about the lighting profiles, though. If I set the Occlusion Light/Dark color to be the same as the corresponding Diffuse one, the AO 'goes away' in the sense that you aren't necessarily going to see it, but it'll still pop up in places where say, the geometry of the surface is oriented in such a way that a tiny part of it catches light. That does give me an idea, though...
So I can't test it right now (I'm currently in the midst of doing a bunch of dForce simulations with a woefully unqualified GPU) - but I suspect that some of my AO artifacts may result from using specularity and glossiness maps for the lighting profile renders. To some degree, it seemed justifiable; if I don't differentiate materials when using the visual style shaders, then when the final sprite is subject to dynamic light, it looks like it's made entirely out of rubber, clay or plastic. I think instead of assigning different specularities to different surfaces (to bake into the normal map detail), I should instead focus on the light/shadow blending. Have certain materials that 'spread light' more widely than others, creating brighter and softer gradients.
Now, that doesn't resolve the issue at hand, that Ambient Occlusion is *NOT* disabled when Max Occlusion Distance is set to zero, as advertised - but it might be the best workaround for the time being.