Anyone know what's the best way to model this knurled lid?
 homey_jay
Posts: 44
homey_jay
Posts: 44
The underlying shape is pretty easy but whats the best way to add the vertical grooves on the side face? I tried to map scan lines vertically on the side - it works but not very well!
Any help would result in a virtual high five..
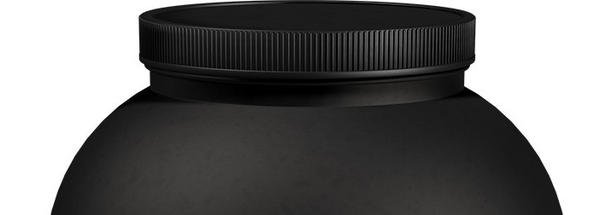
lid.jpg
702 x 252 - 27K
Daz 3D is part of 
Connect
DAZ Productions, Inc.
224 S 200 W, Suite #250
Salt Lake City, UT 84101
Licensing Agreement | Terms of Service | Privacy Policy | EULA
© 2024 Daz Productions Inc. All Rights Reserved.
Comments
If you have Pro, I have a suggestion for a relatively easy way, but probably not the best.
- insert an oval (z axis) in the vertex modeler and increase the vertex count (or insert a cylinder and increase sides and have 3 sections)
- add thickness to the oval. Extrude slightly from top then from bottom.
- select two of the vertical lines in the middle and choose ring. The middle section of lines should be selected.
- use "extract along" and drag the new lines to about the center of the polygons. The new lines will remain selected.
- Keeping all of the new lines selected, reduce the scale in both the x and y dimensions by the same amount.
I have attached a couple of screenshots. To make it easier to continue editing, you might want to use the name function in the selection menu. That way you can easily select the ridges if you want to filet to add smoothness, etc.
I'm sure others have an even easier way, but this will work.
In the vertex modeller you can use the replicate command. (Under meny Edit)
Create one part of the shape.
Chose replicate.
Set it to circle.
Set no. of replications.
Arch angle - 360 - full circle
Radius - this is the tricky part. I wasn't able to find any system in the value here, so it is trial and errors. You want the ends to touch each other. Start with the default. Then, if not right use - Edit - Undo and then decrease or increase the value.
When you got it right select all the replicated shapes and weld together. When welding you want to use - Use Custom Tolerances. And then adjust this value to it just welds the ends together.
I've got a solution close to Varsel one, but I use the replicator (not the surface replicator, the regular one) to save on polygons.
diomede64 is on the rite track. i dont have carrara installed at the moment thanx to my confusion with the dim app. but here is a screen shot from something i did a while ago
Thanks guys,
These have all been totally helpful and I've done it now, using these tips.
Consider yourselves be be high fived..! :)
It's a great little community with a lot of knowledgeable folks. Most (if not all) are willing to share their knowledge with anybody that asks. The great thing about Carrara is that there are usually many paths to get the results you need!
Please feel free to ask for any help, and also if you have an insight to share, please do so! There may be answers already, but another way can't hurt, and even us old salts can still learn a thing or two!