Creating faces from vertices?
 WsCG
Posts: 391
Hello,
Okay, so back to business lol.
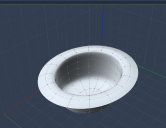
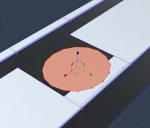
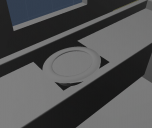
I'm installing a sink in the counter for my kitchen project. I have the sink, I have the spot I want it to go into. Thing is, because I love to make things more difficult than I need to (I could just make the sink a more square shape, for example) I've decided to make the sink round/oval. This leaves an open area around the spot it will be sitting on. My challenge is to create a solid area that encloses the sink, but leaves the counter area where the sink rests open.
That's really confusing to explain, so I took some screenshots, and a video.
Now, in Blender, it's a matter of selecting the vertices and pressing the F key to create a face. Pretty straight-forward. I can't seem to find a similar tool in Carrara, either in poking around in the program, or searching in the help or online. I'm sensing it's another case of Carrara having its own naming convention for such a tool/process, and so I'm just not looking for the right thing.
So, here's some screenshots of what I'm working with, and a video I recorded in Blender showing what I'm basically trying to do. The video should really help explain it better than I am lol. The circle/oval in Carrara is still solid since I figure I'll have to delete the face once the rest of it is connected. Trying to delete it now deletes the whole thing; I can't find an option to only delete the face, leaving the vertices/edges intact.
Here's the Blender vid demonstrating what I'm trying to do - or something to the same effect.
So here ya go. What process should I be using to get the same results as in the Blender vid?
Thanks!




Comments
It's really very similar in Carrara. hold shift to select all the lines around the oval edge of the sink (you can hit the 'loop' button so it gets them all quickly) and continue to hold shift for all the lines around the enclosure, then under the 'model' tap hit 'fill polygon' and it will fill the empty space (ctrl F does the same thing)
Edit: wait I think I'm wrong, I'm only doing this from memory, better if one of the other more expert modellers answers this, I'll whip out a practice scene to make sure I remember the method right.
Well I've managed to construct the edges connecting the corners of the counter to the vertices around the ring. I just can't create a face out of it, even using Ctrl-F.
So, the mystery remains!
Actually.. quick edit.. I added the edges, using the Polyline Tool, and it seemed to connect the points together just fine. I went out into the Assembly room, and then back into the modeling room for the counter, and those edges were gone... So... that's odd.
Creating faces from vertices, or edges, is a pretty common process in mesh modeling, so I'm sure there's *some* way to do it. I guess they just don't make it obvious in Carrara heh
Mitovo, I created a few pics to show how I would approach what you want for a hole. Not the only way I'm sure but it should get the job done. Please let me know if this works for you. If you think it's good enough I'll add it to my Modeling thread as one of my mini tutorials. If so would you mind me using you cool looking sink? I'll call it fitting round objects into square holes. :)
I can't remember, off hand, which it is... but one of my plugins has taken over Ctrl + F, so I always have to go Model > Fill Polygon, at least until I go in and get back that kb shortcut. I'll just make a new command for the plugin.
Anyways,
When I'm looking for some kind of a command that I can't remember... I usually first try the "Model" menu and browse the many options available in there. If I still don't find it, I come here! LOL
I've never fashioned myself as a pro modeler - or even a good one. I mostly just dabble with it. I was getting some great personal (yet informal) 3d modeling training before finding Carrara, and was getting pretty far along. My mentor seemed really pleased at how well I could model humans and organic things.
Animation is what drove me down this path. So he introduced me to Poser. I really liked Poser, but I've learned that - at least for me - an animator pretty much needs to have modeling tools to get things working according to vision. Oh shoot... I'm babbling again!
So anyways, I enjoy modeling in Carrara as much as I did in 3DS Max. Kind of a funny thing to say. When I was considering Carrara, talk around this (but an older version) forum was that Carrara was very much lacking in the vertex modeling department. I didn't care... I just needed the tools to be there to tweak with.
After actually starting to model in Carrara, I didn't see anything (Anything!) wrong with using the Carrara vertex modeler. I still feel that way. Anyways, I came in here and asked which modeler I should be using if Carrara's modeler is so insufficient. I got many responses from Silo to Modo and LW to Hexagon... I have Hexagon, but seem to enjoy Carrara a bit more, just because I'm more fluent with navigation and the tools.
So then 3DAGE came in and asked why I felt that Carrara's modeler was insufficient? I told him that I didn't... I was asking due to all of the negativity about it within the forums. We got onto quite a kick at that point, sharing our proof of how excellent a modeler Carrara's vertex modeler is. PhilW joined in (this was before I purchased his excellent "Advanced Carrara Techniques" video course) with some more positive reviews along with many other friends here. Of course evilproducer had to pipe in with his positive feedback towards the Spline modeler, which was used to make a bunch of the native content models that come with Carrara.
It was around then when I started using the vertex modeler (kind of like what you're doing) to do a lot more actual modeling instead of just tweaking content. UV Unwrapping is still not my best skill in the world - to be sure. So I started opting for other UV Mapping methods. I should actually just spend more time practicing unwrapping to get it down, but by coming up with a different method of mapping (creating multiple domains and using various projection methods to get a good mapping) actually made me a more conscious modeler - thinking about how I was going to make my models as I extruded them from an initial cube.
Oh my... I'm really babbling here! LOL
Point being... now that I've got good and used to modeling in Carrara, I feel really confident in it. I still use it more for teaking purchased content (making morphs, adjusting for custom shapes, etc.,) than I do for making my own content, but either way I really enjoy it!
I still get stuck - like everyone else (except 3DAGE! LOL) and come in here and ask for help. It's amazing how many ways I've discovered how to accomplish the same or similar result! It's so cool! One user will say: Do this. Another will chime in and say: Or you could do that. While yet another user comes in and says: Oh... but I prefer doing the other thing! In practice, I find yet another method that fits my workflow, now armed with all of those other methods in mind! LOL
Why am I saying all of this? I don't remember. I also don't 'type', so this took me a really long time to write - and can no longer remember if I had a point I wanted to make ;) So hopefully it's at least within the correct topic?
There is usually more than one way to accomplish the same thing in Carrara. I am going to show two different ways. I am not saying the following is the best. However, I would select the edges of the two areas that you want to join and then use from the vertex modeling room top menu, CONSTRUCT : LOFT. I will show a second way in the next post, however, I want to point out a few things about CONSTRUCT LOFT. I inserted a vertex model and constructed a simple cube and a simple cylinder. Note that the bottom of the cylinder has more points than the top of the cube.
As I did it, it was 12 points for the cylinder and 4 for the cube. When I did CONSTRUCT : LOFT, each of the corner points of the cube are connected to multple points of the cylinder. I think this is good, but it is not quads.
Another way to do it is to use the bridge tool. Select the top edges of the cube and the bottom of the cylinder and click the bridge tool. However, this will create extra points along the top of the cube, meaning that the corner points of the cube will connect to just one point on the bottom of the cylinder. So, as a resut, the connections of the new face are quads, but the side faces of the cube are now n-gons.
Just watched the video. Still same basic concept, but with slight tweak. Here I use polylines.
- in vertex modeler, I went to top camera.
- from polyline menu, choose rectangle. Clicked and dragged for a square shape (could use snap to grid if need exact square). Hit enter to accept size.
- from polyline menu, choose circle. Click and drag for a circle and hit enter to accept.
- returned to directors camera
- selected all (both rectangle and circle) and chose CONSTRUCT : LOFT from the menu.
- Carrara connected the vertexes of the rectangle to the circle.
NOTE: I have Carrara Pro. Not sure if these tools are available in the standard version.
diomede, Cool... I'd never used Construct/Loft before... kept getting requester which wouldn't let me do it... finally emptied the top polygon of the cube and both top and bottom polys of cylinder... then everything worked like a charm. :)
Worked great... I'm curious... couldn't the bottom corners be joined to the mid vertices?
HI Mitovo
After ther first connection,. i understood the issue,. and why you'd have problems doing that in Carrara
it seems that you've picked up some "not great" modeling ideas.
Squaring the circle,.. or circling the square.
If you select the edges of an empty polygon,. Then use dynamic extrusion to create another internal square poly,. (which will become the inner circle) select those inner edges and subdivide
this gives you eight vertices,. to form into a circle,. moving four of those vertices should give you the circle you need.
If you need accuracy,. you can create a poly line circle to use as a guide to place the vertices.
For me,.that's a much simpler, cleaner method of creating the shape you want, and should be faster than connecting each edge to vertices by hand, and less likely to cause issues.
if you want to maintain all quads,. then you can use the "Add vertices" tool, and the "Link" tool.
Hope it makes sense
update:
Attached image of "Smoothed" mesh,. the outer edges are "Creased" to hold the rectangular shape.
How do you mean 'not great' modeling ideas? Are you referring to what I did in Blender? That's a perfectly normal and acceptable process of creating something. Everything's broken down to triangles at render-time, anyway. Perhaps it's "not great" in Carrara, but it's perfectly acceptable in any other app I've ever used. NGons are perfectly fine to keep as-is, as well, as long as all vertices rest on the same plane.
I'll give that a try, along with the other suggestions I've seen in this thread.
Thanks all!
I meant making a mixture of Quads. tri's and ngons. mixed geometry. is never a good idea.
it makes it harder to create good consitent edge loops,. polygroups, shading domains,. UV's etc
Having clean geometry will make modeling easier,. and help when working with subdivision smoothing.
If it's for you own modeling fun ,. then,.. anything goes.
A good time saver is to use a tool like http://igl.ethz.ch/projects/instant-meshes/ to convert to clean geometry.
Thanks, 3DAGE and Philemo. Went to the instant meshes page but can't figure out how to get the actual executable program, just the research paper and the video..
At the bottom of the page, you have a link Code and binaries (on GitHub)
Clicking it brig you to a new page, if you scroll down, you'll find a chapter called Pre-compiled binaries
There you'll find the link to Windows or Mac OS executable.
Thank you again
I haven't tried it, but it's supposed to read point clouds. So, with that tool, you should be able to create faces from vertices (coming back to the thread title ).
).
I've been using Z-brush and 3D Coat which both have excellent retopology tools.
it's nice to see that instant meshes video,. looks interesting,. with live paint stroke auto-repo. a bit like the process with 3D coat
:)
Note to self - get 3DCoat
It's very cool,. but it's completely different as far as modeling is concerned. forget poly's and vertices,. and sculp with volumes, "Voxels",. those can be converted to surfaces,. which can be retoplogised down to get a lower level polygon mesh,. plus all the texture maps for normals and displacement to get the look of the high-res sculpt.
you can also just load in a model for painting and UV-ing
there's a bunch of great tutorial videos , and a 30 day demo version,
Z-brush has the advantage of being able to use the GOZ plugin to jump into zbrush from carrara's vertex modeller.
There's no 3D Coat Applink for Carrara yet,.. ..maybe one of the plugin developers will do that someday.
Andy, Thanks.. seems I discovered... A happy accident... I misread your instructions... not unusual for me. :) Below, what I did follows...
Inserted a grid with default settings, Except for U and V which are set at 2 for each and changed axis as Z, like the one in my mini tutorial. I used Model/Crease Edges after emptying the poly. Next with the poly selected I chose Dynamic Extrusion... after extruding to a smaller square in the middle I held down the Shift key to be sure it's lines were flat and matched the outer polys.
Here is where I strayed from your instructions...
I changed view to Top view and turned on wireframe mode in order to grab the inner four vertices easily... Next Uncreased the inner square and then used Model/Subdivide... Wallah--- Instant circle (the happy accident).
Remaining in Top view I then chose only the outer rectangle and used Subdivide... think I got that right since it created center vertices for each line. Then just selected only the 2 vertices 1 from center line and 1 from the subdivided inner rectangle that needed to be linked to and chose Model/Link to create the quads.
Pretty Cool Indeed! Guess I should go back and Crease the center now circular polylines.
Loft is still my preference. For a clean mesh, just make sure that the square and the circle have the same number of vertexes. What that number is to fit in with the rest of the model will vary by project. Here are examples for 16 and 8 vertexes. You can enter the number of vertexes for circle in the righthand properties pane, or use the + and -
Cool! I've never done this before. So, when you say "Polyline Menu", is that the right-side panel, or is it from the upper tools menu (like where Construct is)
Sorry... I don't have Carrara available to me right now :(
Dart,
Polyline Menu is the 2nd icon from left side of screen in the vertical toolbar of icons/tools. The default Polyline looks like a italised capitol N with points at each end and corner. You know what it is... you've used it to create paths/templates which you can use to Lathe/Bridge/etc. anything.
Diomede,
Loft is fine. I like more vertices pic. Lower number is ok if the outer lip of sink hides any holes.
Ahhh... silly me... I knew that!
In your comment to diomede... can't we hit the "+" key after creating a polyline to increase verts?
Yes, you can enter the number of vertexes for circle in the righthand properties pane, or use the + and - keys to increase or decrease from default.
Same goes for the outer square too, right?
The modeler has a lot of control over the number of vertexes of the square, but the rectangle polyline draws a 4-point quadrangle. You can take it to 8 by subdividing once, or to 16 by subdividing twice. Or, you can use the free-style polyline tool and 'snap to grid' to get a perfect square with as many points as you want. But, the OP's question doesn't really start with a polyline square. That is just a stand-in for the free edges of the existing partial model. The OP wants to connect these free edges to a circle. Purely personal preference, I would rather prep the existing model's free edge, and then loft to a quality circle than extrude and try to reshape or smooth to a circle. Smoothing would apply to the whole model, not just the circle addition. Or, the circle/square is done separately and then welded to the existing partial model. Just personal preference. There are always multiple ways to get similar results. Not saying loft is the best, just my personal preference in this particular situation.
Gotcha. yeah... I'm sorry... was just kinda thinking aloud. Looking at the OP situation, this looks like a good way to work.
I'll have to slip in when I can and nail down this flow... looks really useful for many of the things I do.
As always... Thanks diomede!!! (and all others, for that matter!!!)
Hello Mitovo, Carrara is a bit finicky, ??, perhaps. I have only used a few different 3D apps before... one used 3 sided polys only while the other used 5 sided polys only... Carrara handles 3 or 4 sided polys only and doesn't play well with n-gons. Before this year I'd never met an n-gon I didn't like. :) I found out the hard way what chaos n-gons can create in Carrara. I imagine that Blender is a superior program in that respect. That might explain why some Carrara users model in Blender as well as other programs.
Before I forget... Thanks for posting your questions. I've found them to be very helpful in my own thirst for knowledge about 3D modeling.
I'm looking forward to seeing your counter in a render in the future... complete with drawers and doors... bet you already have upper cabinets planned out.
Early this year I finally decided to started entering the Carrara Challenges to help me learn all the many features of Carrara. Current one is Carrara Challenge #28: “Marriage” WIP Thread. I enter these to help me be a better 3D modeler and always create a few objects for each Challenge. I don't expect I'll win a prize but at least now I have complete scenes rendered which give me hopes and a feeling of accomplishment... but then who knows... perhaps one day... .. .
Modeling in Carrara is funnnnn!
Hey there,
Yeah, I'm eager to see it come together as well. The scene is being roughly modeled after my kitchen here, so I all I have to do is turn my head and I'm looking straight at my reference. Completing the kitchen set up is only the first part of this. There's an entire little story I have in mind to create, and that kitchen scene is the setting. Should be a fun little story :p