Timeline misadventure
 starboard
Posts: 452
starboard
Posts: 452
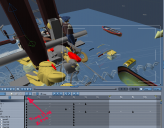
I was wondering if there is some magic that can establish a new zero time for keyframes on the timeline. I became so involved in modeling that I forgot to move the timeline cursor or timebar back to zero before I made changes. The result is that when I move the timebar back to zero time there is nothing but an array of objects that are at odd sizes and in odd places. Everything is correct at time 5 seconds. In short I would like to make 5 seconds my new zero time and if possible erase the earlier keyframes.
At present I am living with running my video from 5 seconds onwards and ignoring all earlier keyframes...But it would be easier when I archive the model that it is set to zero time.
Thanks Starboardtack/ msteaka /....
Daz 3D is part of 
Connect
DAZ Productions, Inc.
7533 S Center View Ct #4664
West Jordan, UT 84084
Licensing Agreement | Terms of Service | Privacy Policy | EULA
© 2025 Daz Productions Inc. All Rights Reserved.
Comments
I feel your pain about accidentally making major changes while inadvertently leaving the play head somewhere down the timeline...
If the 5 second mark is your new zero, can you just drag select and delete all the keyframes before the 5 second mark, including the keyframes at zero time, and then drag all keyframes at the 5 second mark to zero time?
That's what I do when I blow it, in fact it's a habitual bad habit...
If you look at the timeline,. each object has a couple of keyframes,. one at the start,. and one wherever you made a change,.
If you select the Keyframe at the begining of the timeline, and delete it,.. then you should only have the final changed object.
Select those keyframes and move them back to the begining of your timeline,.
there is a button, (animate) at the top left of the timeline,. switching that off,. nothing get's animated.
Hope it helps :)
Thanks guys for the help,
I have moved the keyframes to zero time for all objects Some show the object at zero time as they should be. Others just gives me a junkyard of objects. Very strange. These are the only keyframes... yet when I move the timebar to five seconds the model is as it should be...yet there are almost no keyframes anymore at that location. Will keep trying
Not sure what the animate button does.. Will look into it.
Thanks
Starboardtack
The animate button selects whether keyframes are automatically generated or not when you make changes. You could switch it off (particularly if not actually animating) but then you need to remember to set a keyframe manually, or your work could be lost.
we've all been there with inadvertently moving the timeline. Usually deleting and moving keys as 3dage has suggested works fine, but I have had occasions where the model itself disappears and you are left with an empty skeleton. You can of course move the start time range to wherever you like and that is sometimes the safer option, even though it is a little frustrating.
Phil,
Thanks for jumping in. Thats what I was doing...placing the range marker and rendering. It seems like there is no magic correction after all. Fortunately nothing is lost. Thanks for the explanation on the animate button...Something I should definitly stay away from.
Incidentally, I just came back from England a few days ago. Took my wife to London for a week ( she has never been to England) followed by three days in Newcastle where I have cousins. It has been a long time since I was in London. I was very impressed how clean the tube is and the streets in general, especially seeing how many people use them each day.
Starboardtack
I'm only a couple of hours away from Newcastle (rather further from London, although I used to live down there when I was younger).
Yes, it would be useful to have a function that resets the scene to start from a finishing position. That way you could have a new scene when doing animation that was continuous with a previous scene, but as far as I know, it isn't there.
This is a very timely thread - I just managed to accidentally create some keyframes while playing with particles last night and wondered why my room furnishings and key light where suddenly jumping around the room! Um - to be clear, I mean in Carrara, not IRL - it's almost Halloween after all! I come to the forums and help and BLAM! there it is already waiting for me. Problem solved.
Yeah... it's amazing how easy it can be to accidentally jump around in time.
One thing you could do is to create your own imaginary Zero reset by dragging the left-most yellow timestop forward to one second or so, then drag all of your keys to some place either before or directly on that point. That way you'll still keep all of the changes made after zero, and will never be able to rewind to zero via the rewind button.
I know it's a flimsy fix, but it does work.
Normally I just delete all of the keys I've made beyond zero if they were made accidentally - then start over.
But there were a few times when I've had days worth of work done before noticing the problem - so I did as I've described above, and just pretended that 1:00 was 0:00, and the yellow stopper kept me there.
Some things, like Groups, can have their zero key frame deleted without wrecking them. So I've started getting into the habit of creating a group around all of my things as soon as I'm done tweaking them into my Saved version.
So now, if I need to set something according to where something else is further down the timeline, I can do so using Groups!
Example:
Say I have a train coming down some tracks, just to make a point.
I load in a figure, but I need it to be standing over where the train comes to a stop, around 10 seconds into the scene!
Solution - I select my figure, put a group around him (Ctrl + G), move the time scrubber to when the train comes to a stop, select the group with my figure in it and move/rotate it into position. if I play back from zero, the figure moves across the floor. Being that it's in a group, I can simply delete the first keyframe of the group - and nothing odd happens, except that the figure is no longer sliding across the floor!
I use this technique a lot getting my animations set up how I need them to turn out.
So now, whenever I save figures to my Browser, they're always (and I mean ALWAYS) placed within a group - even if there's nothing else in that group.
Thanks all for the help.
Dart. I tried your grouping with a cube for the train and a sphere for the figure. The cube (train) moves 10 units in 10 seconds. The sphere moves at right angles from 0 units to 10 units to join the cube at 10 seconds. Your right, you can place this cube in a group and then remove the first keyframe of the group. Now you can move the group anywhere and the movement of the cube wil move the ten units...but not tied to grid geometry.
Not sure how to use this - I know it is significant ... but I am thinking. Up until know I have just been using grouping as a static folder. I think I understaand. lets say you have a M4 walking and you put him in a group...Now you can drop him in anywhere and he will walk say ten paces regardless of where you drop him on the ground. Neat.
I just realized the advantage of the animate button. It should be off when I am building the model... of course......Only when the model is finished and you want to animate, switch it on.... All the trouble I created was having it on while I was still building it and testing it... Thanks Phil....
Starboardtack
Well, the importance is that we can delete the first keyframe of a group without wrecking what's in it.
Say we add some keyframes to a rigged figure. Then delete the first keyframe (at zero), it will make the rigged figure unusable. Can't even render it.
So I used this to help prevent me from accidentally keyframing the wrong thing, since it is relatively easy to accidentally move the timeline scrubber, then move something without realizing that we're no longer on frame zero. If this was to happen to a group, we can easily delete any of the keyframes that result in something re don't want to keep - not so for the hip of a figure! ;)
It doesn't really help for things that have already had keyframes added accidentally, but using this procedure has helped to save me from that happening in the future - somewhat.
As a side note, grouping is also very handy for right-click selecting.
We can select anything within the first group layer, but not individual things from inside a second level group, unless we open that group, then right-click.
This is very handy for the same reasons - and more. For complex scenes, and I need to continually make specific selections via right-clicking in the scene, and the wrong things keep coming up in my right-click, I'll put thiose things into another group to hide them from the right-click selectability.
While this is getting off track from the timeline misadventure, it also helps to support how grouping can help to prevent unintended timeline mishaps - by making it harder to accidentally select something.
This is most beneficial to me for Figures, but I've also been using it on scenes and vehicles as well. For figures, I'll have a main group. Inside the main group I have the actual figure and another group for the clothing. That added clothing group makes it so that, with the main group closed, I cannot individually select the limbs of the clothing, while I can select the individual limbs of the character - which is HUGE for me. Same thing can apply to making it more difficult to select individual plants or trees, when all we want to be able to select are different masses which hold those plants and trees, birds, whatever.
It all helps to make it easier to NOT add accidental key frames where we don't want them! ;)
Turning off Animate for certain things will ensure that:
No keyframes are added along the timeline for that item, no matter what you do to it - all changes get applied at timeline = 00:00:00
Sorry for confusing the issue though! ;)
One thing that CAN be done, as I was mentioning in my first post:
Since you say that everything is fine at Timeframe = 5 seconds, you could:
Now set the left yellow timeline "In" marker to the end of those keyframes - effectively making that Timeframe = 0 for this scene. As long as you use the Rewind button instead of dragging the scrubber above the actual timeline.
If it's a single model, you might even be able to export it as an OBJ at that point in time and bring it back in fresh at Zero.
Dart,
Thanks for spending the time with me. I apoligize for not getting back to my posts right away, however it is due to a number of pressing factors from my outside life. Thanks for the explanation..I think, in my case, the problem is that the ship has already sailed (sorry about the pun) The key frame mess is already created. I spent about three hours moving them all yesterday to zero time..some of them took others did not.....I have decided to leave well enough alone and just animate what I have got from 4 seconds onward... Once through animating ..I will do as you suggest..export to OBJ. and keep that as my basic model.
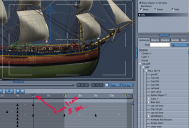
One of my problems is that when I use Carrara to actually do work..all the things I learned.. lets say from Phil's tutorials..slowly gets forgotten..... For example, the the button to animate the timeline. I know Phil covered that in the basic lessons, and I knew it at one time.... but not actively using it the information fades. However, the good news is that I am getting better and better in the modeling sector of Carrara and starting to turn out some product. At present I am working on animating the figures on the ship...I'l include a still from the video clip. Next will be getting the wake and spindrift right. last I have to revisit the figures in the foreground..for some reason even though I have a straight alpha channel checked it seems to be premuliplying so that there is a white outline on the figures. Finally..I have to have shirts on the figures that do not look like they are painted on. The figure on the far left has a more reasonable shirt for the period. Then there is the work in AE to tone back the color and Sat. There are some many facets to Carrara that needs to be mastered to turn out a sophisticated product... I get the feeling I am about three rungs up on a very tall ladder. It looks like it will take another couple of years, at least, until I am anywhere close to the understanding of the program that most of you on the site have..
Sorry to be rambling on...consider it therapy ....
Thanks again
yes I have grown to love iClone's remove all animation button for just this reason
Carrara is still an easier fix than DAZ studio which is a freaking nightmare if you add any animation to a figure you want to remove after, esp baked aniblocks.
msteaka - that's looking pretty impressive already and with your planned edits, I am sure that it will look awesome when completed! We all have parts of the program that get used more than others, and yes, some parts will need looking up when it comes to using them. Half the battle is knowing that there is a certain function there, even if you can't remember how to use it, because you can always look that up.
In After Effects, did you try right click selecting the problematic footage in the the Project tab/pane and go to Interpret Footage>Main and check to see if After Effects has selected the proper alpha, Straight - unmatted? There are other things that may have gone wrong with other solutions available, but I would start there.
This problem is often due to the ambient light (realistic sky, not rendered).
In AE, you use the effect “Mask/ Internal-External Mask” to clean the outlines.
Sorry if the name of the effect is not exactly like that, but I have a French version…
it's important to note that deleting the first keyframe,. (on figures) is a really bad idea,. but for objects in general,.. it'll work fine,. so things like models you've made in carrara,. which aren't rigged,. camera's, lights etc, and shaders,. everything and anything that can be keyframed.
It's also important to point out that in the timeline,. what you see isn't always what you've got,. there can be sub parameters to a group which don't show up until you expand out that branch of the timeline.
that may be the cause of the issues you're seeing at the start,.
If you expand any group or figure until you can see all the elements and then adjust any keyframes back to zero time.
When you're working with figure's,. It's often easier to work on the animation with the bare figure in an empty scene,. save your animation as an NLA clip to your clips browser,,. and then simply apply that NLA clip to the figure dressed in your scene.
The same principle also applies to modeling objects, .. it's really easy to create a new empty scene,. model something,. then copy/paste that model from one scene to the other,. or save and load from the browser.
For the Alpha issue you've got,. check what your antialias setting is,. make it 0.5,. also switch on premultiplied. that should clear the white edge,. AE should also be able to clear that issue.
hope it helps
DUDU, thanks for pointing that out. I just tried my test with an object against a Realistic Sky rendered with an Alpha Channel and I get the white fringe outline. I used a Simple Choker effect in AE set to 1 pixel to get rid of it. That's annoying.
3DAGE, I just tried the same test setting antialias to Best and both Object Accuracy and Shadow Accuracy to .05, and tried two renders, one straight alpha and one premultiplied and both still rendered with white fringe against a realitisc sky.
Thanks all for the input.
DesertDude nailed it. It was the Interpret Footage panal in AE.... It was set to premultiplied...once corrected the white fringe was gone. I would have thought that AE would have detected and corrected the alpha setting automatically.....
3Dage...I opened up every folder and subfolder indicator I could find and moved the keyframes to zero..It seems like there are hundreds of them - it took hours of eyestrain. It corrected about 90% of them but some still remained... deranged.. If you click on that object in the scene window then go to the object in the sequencer list..it shows one keyframe at zero (if you open it upto its properties- motion method, visable, etc. they are stillk at zero. If you now go to 4 seconds the object is correct as it should be ..yet there are no keyframes involved. I think the best solution in the future is what Phil suggests and switch off the animate button until you need it. I like the idea of creating and modeling an object in an empty scene..I have done that with a figure walking on a plane walkway. It works really well. I have to try it with other items thanks for the heads-up. A lot of these techniques require the mental nimbleness to see how they can be used in other ways.
Thanks all for chipping in.
msteaka
Yeah... here here!
I feel as if i have Gobs of Carrara experience - and I do in some parts. But the large majority of the software is still doesn't get visited much, if at all. Such a small slice of carrara can do So Much!!!
Yeah... what you (Starboard Track) ended up doing is actually what I tried to most strongly suggest: Just flick the timeline stopper (Little yellow triangle along the top of the timeline) to be 'after' the last edit - so we can start rendering the animation afterwards. Works great and there are fewer hedaches.
Most of my other banter was just how I started to try and avoid these situations as I moved forward - but nothing can truly stop it from happening, because we have to open up those groups to do the edits. Inside a group or not... editing after the timeline scrubber has changed... well... you know what happens! LOL
Great work! Love the image!