Material preset did not apply texture appropriately -- now what?
 ModernWizard
Posts: 850
ModernWizard
Posts: 850
Here's one of those situations that Unified Brain has been mentioning in which we Daz users, who are new to Carrara, come across something that has us going, "HUH?" because it's recognizable, but also different enough to appear baffling. My overarching question is about the texture room, as well as shaders and textures in general.
In my slow progress toward actually doing something in Carrara, I have saved a G2F base as a native car file and ported my character morphs down. Fired up Carrara, loaded car native G2F, applied character morph and pose, then applied material preset. As expected, it did not apply correctly. My question is -- how do I fix that? I have been looking at Diomede's basic scene setup tutorial, but that does not really help me. My character's materials are not standard out-of-the-box ones from any Daz character base, and he certainly didn't come with any Carrara shaders, which was very inconsiderate of him.
I know what shading domains are [=materials], but how do global shaders and top shaders play into this? Furthermore, I can see that some materials have correctly been identified as "AoA Subsurface." How does that affect global shaders and top shaders? How do I make sure that the right maps are in the right place? Can I save the materials as a preset? If so, how?
In more general questions, is it possible to dock tabs in other places besides their defaults? I'm used to a three column layout with content [=browser] on the left, scene in the middle, and parameters over to the right. Thus I would love to dock the browser/sequencer where all the little arrows are and move the little arrows either up to the horizontal menu bar at the top or over to the right. Is that possible?
Also I would like to make subfolders under My Objects, but I can't figure out where My Objects lives on my hard drive. It's not on the C drive where I installed the base program. It's not on the D drive where I have my content runtimes. Maybe I'm missing something?
--MW
Daz 3D is part of 
Connect
DAZ Productions, Inc.
7533 S Center View Ct #4664
West Jordan, UT 84084
Licensing Agreement | Terms of Service | Privacy Policy | EULA
© 2024 Daz Productions Inc. All Rights Reserved.
Comments
Which figure? Which character preset? Which UVMaps if more than one apply to that figure? Which channels do you think failed to load correctly?
For example, Figure = Genesis 1. Character = Freak 5 for Genesis. UVs = genesis base. Material preset was David 5 for Genesis. Bump and Highlight channels did not load the maps.
In honor of the baseball game tonight, here is the David 5 material preset load to Freak 5 that I describe above that lacks the map for the bump channel and the highlight channel.
Carrara has a color channel. Most Studio material presets come with a hi res skin colored texture map. Load that map in the color channel.
Carrara has a highlight channel. Most Studio material presets come with a map with sss in the title. Usually, these go in the highlight channel, but they are too intense. Best to use a multiplier and use a fraction to lessen the effect of the highlight map.
Carrara has a bump channel. Most material presets come with either a bump map or a normal map or both. Usually, these go in the bump channl, but again the strength is often too strong. Lower the bump intensity in the top shader level.
Carrara also has settings for reflection, refraction, subsurface scattering, etc. See other posts on skin shaders for discussion of those.
Repeat for all shader domains, although you can copy and paste when multiple shader domains use the same maps - like forearm, shin, and hands may all use the "limbs" maps.
Once you have a shader you like, drag the global shader from the multicolored sphere in the upper right to the browser tray under the shader tab.
Okay, I'll get busy soon and do a nice write-up on how to fully tweak Genesis (1 & 2) shaders properly.
Now, As far as Carrara 'properly' noting the shaders as AoA_xxx, no. It's just a name and Age of Armour's cool shader works are made for Daz Studio, not applicable to Carrara.
So how do we get our 'non-standard' textures working as Carrara shaders? It's actually very simple, yet can be as complex as we want as well. Simple-but-good shaders are easy to assemble in the Texture Room, so I'll give you some quick tips on that, but to get deeper, I'll actually prepare a full article with illustrations and such - but that might take a few days.
Now, When it comes to your Custom Characters that you've made in Daz Studio, I suggest that you save them to the Library system within Daz Studio. Then come into Carrara and load in That character from the Library instead of building it from Pose files and the like.
For example, with your custom character loaded into DS, save it as a Scene, but with nothing in it but your character, hair and clothes.
When I do this, I save it back into the regular Library structure. Like My Daz 3d Library > People > Genesis 2 Female > Characters > and here I create a new folder and name it Dartanbeck, and then save the character in that folder. That makes it available in my Content folder in Carrara - and doing it that way, Carrara actually does a decent job of bringing in the materials.
When I say that Carrara does a decent job with the materials, that's been my experience with default shaders for Genesis 1 & 2 by Daz3d. Some other material settings might now translate the same. But we all need to understand the Texture Room anyways. That, my friend, is the Magic between Carrara and its render engine!
===================================================
First things first: when we have our figure in the scene, and the texture we want are already applied to it, we need to consolidate the like shaders together to save us from having to repeat our work repeatedly - unneccesarily. To do this, we go Edit > Remove Unused Masters > Consolidate Duplicate Shaders.
Edit > Remove Unused Masters > Consolidate Duplicate Shaders - We MUST do this before we start changing any of the shaders - so that the changes we make on one material zone get changed for everything using that same shader!
SKIN Shaders
We should end up with three main skin shaders, and perhaps an extra supplemental shader with some differences, like lips, the back of the head, etc.,
These main three are Torso, Face, and Limbs. After the initial consolidation, these names will not be "Torso", "Face", "Limbs", so we might need to see them in the Matrial list to know which is which. So to do that, we need to Select "Actor" and enter the Texture Room. This will load the entire shader set for the figure into the Texture room, selectable from the materials list on the right window.
Double-click a shader from the right list to open the shader. Double click the shader window to go between window mode and full screen mode.
For simple skin shaders, we only want to worry about four of the channels in the shaders:
Color - This should be a Texture Map - the color map for the figure
Highlight - This will either be a Texture Map - the Spec Map for the figure, or to make things simple, set in to Color = Black or Value = 0 (Value = 1 - 100)
Shininess - make this between 0 - 5 (Value = 1 - 100)
Bump - This will be Texture Map - the bump map for the figure - or - Normal Map - the Nomal Map for the figure
Now we click on the Top Channel of the shader, so that we can see the whole list of shader channels in the window.
Make sure the Bump channel is not too high. 3 to 20 should be fine depending upon the bump being used and the result wanted - there are always excepetions. If using a Normal map, you might get better results with values closer to 100. Again, it all depends on what we're using and want result we want.
If the skin looks too wet or glossy, lower the value in the Highlight channel. So if we're using a Texture map (Specular Map) in the highlight channel, and we want to turn down the highlights, we slide to Brightness slider under the map to the left.
If the highlight looks to much like plastic, lower the shininess value. 0 (zero) is the least glossy, though a high bump might still make a shininess of zero look wet. If that's the case go back up to Highlight and lower that even more. For this reason, it's often the easiest to simply use a value of 0 (zero) in the Highlight channel.
Eyes
For the various eye parts, use the above advice for Iris, Pupil, Sclera (Eye Whites), Lacriminal. Do not make these parts glossy or shiny. We'll do that in the Cornea and the Reflective layers. A great way to 'see' a wonderful way to set up a good glossy-yet-invisible material for those, go to the Shaders tab, select Glass and use the Clear glass shader in the Cornea and Reflective layer. If you need more or less gloss or reflection, just tweak those channels (Highlight, Shininess, Reflection)
Note that this shader is not as simple as what we've just been making. This one uses Transparency, Reflection and Refraction and some pretty cool procedural options.
Fingernails and Toenails
These use the same maps as the Limbs, so all we have to do is to use a copy of that shader and make it a little glossy, perhaps a bit of a tint added to the color.
Ooops. Diomede posted while I was busy typing! LOL
Hi diomede!!!
Hi Dart. Waves back.
Hi MW. I obviously don't have the experience here to help. But I'm trying to follow along, and wonder if you can help me. Can you give the details of exactly what you did again? For example, I don't know what you mean by "ported my character morphs down," or if you are talking about losing material presets on clothing, skin, or both.
You've just asked one of my questions as well. I've seem discussion of using multiple monitors in Carrara, but nothing about undocking and relocating panes. Hope someone addresses this.
Sorry guys. As far as I know, only the little tool bars on the left are un-dockable. Each little section of tool groups can be pulled away from the left dock area and floated anywhere you want. Not sure if they can be dragged to another monitor though.I'm still solo, myself.
Please, after perusing my primary instructions above regarding Shaders, go ahead and ask anything about that stuff.
I remember first starting out and, although I was very happily learning my way into Carrara, I now realize that it did take a while to get shaders working right. It's easy, but it takes getting used to.
I say "It's Easy" because it is - to get great looking renders. However, that Texture Room holds a LOT of tools to do some really amazing things - and we can push realism to some levels that go vastly beyond my brief instructions above.
In the Post your Renders threads, we can post anything we want, which is really cool. Beginners can post their first attempts and see magaremoto pushing the limits of realism all on the same page! It's fun!
As you get more and more used to this forum, you'll find out how incredibly good some of our members are at rendering. Vastly beyond anything I could tackle. I am a speed renderer - working on making CG movies. I began with a dual-core laptop and taught myself how to set up shaders and render settings to help get some good animations done within my lifespan LOL.
I've shown this link more times than I can count - but it makes a great example, because all of these clips were rendered using those low settings on that little Core2Duo laptop. It was also stitched together using nothing but test-render clips destined to be deleted. I was glad that I still had them when I got my 30 day trial of Sony Vegas Movie HD, and this video was the result of my testing out that software, which I bought shortly after.
Nowadays my shaders have improved and I've built a Carrara machine to render with (and am saving up for a new workstation) so my end result should look much better than that... but I still like the look of that crazy little test film!
Anyways, point being...
I'm happy to help if you have any questions - I've had many when I first got Carrara, and I wasn't much of a communicator on the internet. This was the first forum I've ever actually been part of - and have been to very few others since. Once I bit the bullet and stated asking questions, my techniques have bloomed SO much faster! I've asked some really basic questions! LOL
I can answer the last question about the My Objects folder. It's in:
Documents (on Mac, or My Documents on Windows) /Daz3D/Carrara 8.5/My Presets/My Objects/
You'll need to create new subfolders in Finder/Explorer and then refresh the browser in Carrara. I don't think the browser window is undockable (I'd also prefer it down the heft-hand side if it was!). I made a shortcut to the top My Presets folder and put it on my desktop - makes it a lot easier to find!
Hi all! Thanks for pitching in with responses. A few points of clarification, in chronological order:
Diomede, my base is G2F with V5 UVs. Material preset was a custom skin I made with Zev0 and DraagonStorm's Skin Builder Basic. Given that he's all flat black, I'd say all the diffuses failed to load at the very least.
Thanks for your details about applying textures. This gives me a little more to go on.
Dartanbeck, can you give me some details on your custom character import stuff?
It sounds like you're saying the following:
1. Set up custom character in Daz Studio with morphs, textures, clothes, and hair.
2. Save character in your Daz Library.
3. Now that Carrara sees the character in My Content, you can open the duf in Carrara and stand a better chance of getting the materials imported correctly.
Is that correct? If so, in step 2, should the character be saved as a scene, scene subset, or character preset?
UnifiedBrain, here's some more detail about what I was doing.
The first step, actually, was to port my character morphs down from their current G3F bases. That means I used GenX2 or whatever it's called these days to transfer the character morphs from G3F to G2F with the standard process: Morph Loader Pro, rigging adjustment, ERC freeze, saving, etc.
Then I saved a G2F base as a native car file, closed scene, then created a new one and loaded native car G2F. I dialed up one of my character's morphs and posed him.
Then I tried to put textures on him by using a material preset duf that I had made [in Daz Studio, obviously] of all his surfaces. The material preset seems to have brought some of the necessary files in, but not all. I am now trying to figure out the best way to put his textures on correctly.
Tango Alpha, thanks for the info on where My Objects is hiding. Now I can create an organized runtime with subfolders in My Objects.
Re docking panes in other places, I just reread the whole chapter in the C7 manual on Setting Up Carrara. I didn't see anything about customizing the screen layout. :(
Yay, more homework after I leave work!!
--MW
Modern Wizard, there is more than one way to do similar functions, so use the way that is best for you. Dart and many others recommend setting up characters in Daz Studio first and then exporting. I prefer to load and set up in Carrara as much as possible.
RE: the black outcome when initially applying a material preset - it does not necessarily mean that the skin map did not load in the color channel. It could easily be that something is going on in a reflection channel or a SSS channel that is appearing black in an empty Carrara scene.
This is how I set up a character for G2F. It is not the best way, just my way. Some of the issues that I try to address are
1st - top priority - numero uno *** Do I want a Poser CR2 version of this G2F available for the Poser cloth room? (because I have V-that which will not be named -plugin, the answer to ths is usually "no" now). Given that I don't care bout a Poser CR2, my preference is for setting up and saving as much as possibe in Carrara for direct future use.
OK, whatever the answer to the Poser CR2 issue, have to address the following.
- Which maps does the character come with? Where are they located? Which shading domains in Carrara can make bes use of them? Which shading domains share the same maps?
- Do I have the correct UVs available for the G2F in my scene?
- Am I doing a dial morph?
- How do I want to save?
OK, I acquired a new G2F character set in a recent sale, so I will do a walk-through of setting up the material presets for my future use in Carrara. However, I will put the walk-through in the "First steps thread" because I want to keep cluttering that. Again, this will be just my method, not the best method.
Hmm... I don't remember... it's been so long since I've done that. I was hoping that DS users would know better what to do for that.
Like diomede, I usually live in Carrara - and just build my figures up from there. Back when I was planning to switch to Genesis 2 figures, I started making my characters in DS, then I think I actually just saved as a character preset, but I know I also did another method which kept the clothes and hair too.
Okay... thre material files turning your character black. This is common when using DS material presets. Let's go back to my initial Shader instructions above and have a look at your character, shall we?
1- Okay, so first things first. Apply your material preset you've made in Daz Studio, then immediately go Edit > Remove Unused Masters > Consolidate Duplicate Shaders (done in the Assemble Room) Do that first - always.
Perhaps not. It might have loaded with a multiplier - the multiplier being Black. This can happen if certain channels in DS or Poser materials are set to - or left at Black - which actually apply to something else entirely in those programs. So look at your shaders' Color channel.
Color Channel - we just want a Texture Map in there. If it's a Multiplier, click and drag the Texture map and drop it onto the Color Channel, to get rid of the multiplier.
If you watch (or read) my Shader tutorials on V4, you'll see me do this with her - she was multiplied by blue, making her look sickly.
Okay - you're using custom UVs - so you MUST use that specific Character Preset for those UVs to match up properly in Carrara. We cannot change the UVs automatically in Carrara as we can in DS. So you'd have to have a copy of the G2F with those UVs saved as a Character Preset. But Carrara won't care either way, they just might not end up seemlessly. We can alter UVs in Carrara, but we'd have to do it the old fashioned way - by hand!
Alright. Did you look at the Shaders? Was there a multiplier in the color channel, or was it just a Texture Map?
In testing just now, I've noticed that applying Aiko 6 Material Preset to Genesis 2 Female made her turn flat black.
So I consolidated Duplicate Shaders, now I'll have a look at what's going on.
Hmmm... I see a Shader called "Ear", which is a Torso-related material zone. But it is set up to give a good, flat texture of just color, nothing else, which would be a great start in Carrara.
However, "Ear" isn't assigned to Torso - AoA Subsurface is! I open AoA Subsurface, and it's a blank shader - everything set to None!
So, Select "Actor" and enter the Texture Room.
In the list on the right, use the little blue button furthest on the right of each listing to change the shaders as follows:
Legs zone > "Feet" shader
leave the Eye Reflection zone as is for now
Nostrils > "Face"
Lacrimals > "Irises"
Pupils > "Irises"
Lips > "Face" (unless you have a "Lips" shader)
Leave Tear zone for now
Gums > "Gums"
You'll see how after Consolidating Shaders, you'll only have a few shaders. Three are major skin areas, the rest are eye parts.
The names of the shaders may be different from those I've listed above, and I didn't carry on through the whole figure.
Note that "Head" zone does not use the "Face" Shader, but the Torso (in my case "Ear") shader, as it's referrring to the back of the head. In some tetxure packs that include hair on the head, this Head zone might get its own sepearate shader.
Do get to know where your texture maps are located - where they Install to.
Inside those folders is the key to tweaking out these shaders to make them stand up to Iray and other renderers.
Inside the folder for your texture set, you'll find maps for Color, Spec, and Bump, as well as Trans.
Individual artists will have their own naming conventions. Sometimes Color is called _Tx or Diffuse. Bump might be _B and Specular might be _S, etc.,
Again, Tweak your skin shaders to:
Color = Diffuse Maps
Highlight = Specular Maps
Bump = Bump or Normal Maps (If using Normal Maps, set the channel to Normal Map)
Use Shininess to control the effect of the Specular or Highlight channel. 0 = Soft and Dry, 100 = so tight of a highlight angle we likely won't see it, 30 = really wet-looking.
Where I asked you to leave the Eye Reflection and Tear shaders earlier... try dragging the Glass > Clear shader into those zones from the Carrara Shader Tab browser.
After seeing it in a render, take a close look at the shader itself - see what's going on. You'll likely want to change it some... but I think you'll agree that it's a lot better than what was there ;)
For some more fun with Shaders on Characters, try this:
V4 Skin Shader Kit and Lights (ShareCG, requires Free login)
It says it's for V4, but there aren't really any maps - so they work on literally any figure. They're all procedural shaders which also use SSS (Subsurface Scattering), which can slow down your render process some, but it's good to know that we can use it.
The information that comes with the kit can also teach us a lot about setting up shaders in Carrara. She gives advice on using these shaders along with your own texture maps (like what you're doing) to get some incredible results.
She also has this:
Endless Eye Kit for V4
HI MW :)
The GLOBAL shader,. is a "container" for a set of individual shaders,.
The global shader can be dragged 'n Dropped into your browser,. or dragged from the browser, to the shader slot for a figure, or object.
If you're using custom texture maps (which you've made) for your figure,. then those should be in a folder somewhere,. you'll need to load those manually, if Carrara hasn't
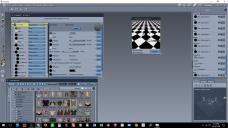
In your Pic,. what we're looking at is the "Default 1" shader,.. which is the "container", for the individual shaders.
The other ones,. with AOA subsurface,. could help diagnose the problem
MW quote:
this could also indicate the root issue,. UV's.
does the G2 base have the same UV's as your custom figure,. ?
Carrara doesn't allow you to change the UV's for a figure in the scene. .. the uv's depends on the figure you loaded.
In the shader room,. if you open one of the main shaders on your figure,. you'll be able to see which Maps are loaded and which ones are missing from each shader.
See pic of G2 "Gia" shaders list,. and Legs shader,. note that only the Diffuse texture map has been loaded automagically, from the Duf shader. the Highlight shininess Bump etc,. are missing. those need to be loaded manually,. adjusted to suit,. then , when you're happy,. you'd drag the complete global shader to your browser to save it.
In the shader room,. If you hold your mouse over the texture maps "name" in the shader window,. it'll pop up a wee yellow note, which shows you the location of the file,. can be handy when loading other texture files.
See pic
On docking UI panels.
You can click and drag in the outer edge of a panel to undock and drag it to another location,.
you can open and close panels,. that's probably the easiest way to free up space on screen
personally I don't see much advantage in moving stuff around, and changing colour schemes, but that's probably just me,. each to their own. :)
The walk through for the initial adjustment of a store bought material preset designed for Studio is complete in my 'First Steps' thread. I want to make a couple of comments here, because there are just one or two slightly different issues when someone sets up a character in Studio, saves as DUF, then loads in Carrara. Ultimately, the endgame is the same in the sense that you want the right color/specular/bump/normal maps to be in the right place, and you want to take advantage of Carrara's subsurface scattering channel (or not) and you want your other settings optimized for Carrara. But one thing to keep an eye on is whether the Daz figure has distinct uvmapping sets for different characters. For example, the G2Fs uvmaps for The Girl 6 may be completely different from the G2Fs uvmaps for Victoria 6. So, a color map for The Girl 6 might map incorrectly if the figure has been set up to use Victoria 6s uvs. You can mix and match the maps as long as they reference the same uvs. If I buy a character pack for G2F, I always check to see if the seller has listed the uvs that are matched in the product description before I buy.
Being aware of how to load and customize maps can open opportunities for other Daz PA products. For example, I acquired Forbidden Whispers G2F merchant resource skin shader pack.
I've just finished a video tutorial (whew!!!) on Genesis and Genesis 2 shaders - just a basic understanding and quick start type of thing - which should help to square all of this stuff away.
Just waiting for Vegas to finish rendering it, then I'll upload it to YouTube... I'll be back with the link ;)
Thank you. That will be a great help.
Right here (be kind?) ;)
Kidding... be critical on me... thaat's how we learn!