Glowing Head Problem, with subsurface scattering (interjection) addon, DS and Genesis Figure
 lostlegends
Posts: 2
lostlegends
Posts: 2
Hey Guys,
i'm fairly new to DS and try to move over from poser. I successfully converted my V4 character to a Genesis Figure and
now i'm trying to go for the waxy looking realistic skin i was used to from posers latest firefly renderer....
i got this product to get a more realistic look using subsurface scattering in Daz Studio 4.5
http://www.daz3d.com/shop/interjection-surface-injections-for-daz-studio/
the scene is setup with uberenvironment2 at 50% intensity and a 50% spotlight aswell as a directional light behind the model
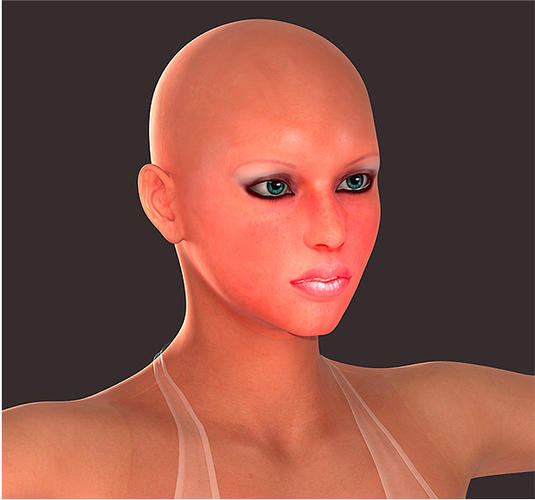
but all i could come up with is the attached picture, which gives me a massively glowing head.
any help what i'm doing wrong would be greatly appreciated.
Daz 3D is part of 
Connect
DAZ Productions, Inc.
7533 S Center View Ct #4664
West Jordan, UT 84084
Licensing Agreement | Terms of Service | Privacy Policy | EULA
© 2025 Daz Productions Inc. All Rights Reserved.
Comments
Wow...I knew those nuclear powered tanning beds were a bad idea, but no, does anyone listen?
First check the Ambient setting, under Surfaces...it's probably all the way at 100%.
Next, adjust Glossiness and Specular.
Then work on things like SubSurface scaling.
Depending on the original skin texture, the Interjection settings could be 'too much'...
(I will make no comment on the 'look' from most Poser renders....)
thanks for ur reply!
checked ambient, its only 7%,
but subsurface scale seems to have some effect, though i lose sss on the ears when i up the value
but better than a glowing mouth ;-)
i guess the poser results cause quite a controversy. imho the "wax" look of the skin isn't real aswell, but it looks much more
sophisticated than the solid-plastic-output most other solutions produce for years. still up to this day most human renderings look
just like mannequins... why is it really so hard to get a decent skin shading....
I can think of about 7.5 billion reasons...
More seriously, though, it's one of the most complex surfaces we regularly have to deal with in 3d/cg...at least visible ones.
Now, don't for get you can tweak each surface independently, so you should be able to bring the 'mouth/lips down even more and still preserve the ears. SSS scale does have some impact. but be careful with it.
Translucency and velvet (I think interjection uses both of those, as they are HSS and/or UberSurface variables) are two more 'play' with items...
Also, do a little testing with each light by itself (just turn one of them off)...if the effect is mostly due to specularity problems, the it shouldn't be so evident with just the UberEnvironment light.
Also using one of the UE presets that actually uses an image tends to get a better light response, as without an image, it's just a large, white, sphere of diffuse light.
thanks! following your advice, here's what i came up with so far...
i'm still not utterly pleased but it looks far better than before
i'll probably still spend a few hours tweaking the textures and lighting befor i get anywhere...
:-)
Turn off SSS completely as you don't need it with humans as we're not translucent all the way through, the only SSS you need for 99.999% of your renders is already burned into every realistic texture out there.
Skin is a VERY translucent surface, and no texture regardless of how well made can emulate SSS alone, which is why we have surface shaders. Hold your hand to a bright lamp and you'll see the redness as the light shines through it. Turning off SSS might be suitable for some renders, but for those doing portraits it can add an incredible amount of realism The difference is very noticeable when placed side by side with non SSS surfaces.
Here's a quick comparison. It's Poser, but you can get similar effects in Daz (and better if you use Reality).
that looks outstandingly smooth. i will have to look into reality.
:shut:
No offence to BB, but the one on the left looks more like how my skin looks in the mirror, the one on the right looks out of focus and badly or heavily airbrushed.
If you're doing realistic renders it can have a huge impact on the overall quality, which is why things like UberSurface2 use SSS on the skin shader presets.
The key is subtlety...and most renders with SSS seem to have it applied about as subtle as wearing a fur coat at a PETA convention...
Lighting plays a key role in it. 'Sunlit' scenes probably could stand a little more than interior ones, unless they are 'studio' shots (bright/dim, clear/overcast, day/night and so on all need to be taken into consideration). And bump/displacement are very important, as are 'age' of the character....very young and elderly being two examples of needing more.
And as was mentioned, the 'baked' things on many skin texture sets means that even less is required.
Best thing to do...get away from the computer, go to a mall, a park or somewhere with people and observe...pay attention to how their skin reacts under various lights.
so with reality and luxrender i can't come up with anything at all, sorry
Try these:
http://www.ShareCG.com/v/66181/view/21/DAZ-Studio/WC-SSS-Materials-for-Genesis-D|S4.5
Here are the interjections applied to the same figure with the same lights.
this lightset: http://www.sharecg.com/v/65921/gallery/21/DAZ-Studio/fast-render-light-set-with-UE2-and-Light-Target
Top is Strong
Middle is Mid
Bottom is Light
The problem you're having has a very simple sollution; lower your shadow bias (on all yor lights) to around 0.2 and the effect you're seing goes away.
Machieltje, shadow bias affects SSS? I didn't know that, why didn't anyone put that in the documentation???? sheesh...
It's the flashlight nose/mouth thingy put into overdrive by the subsurface scattering. I had the same problem when I started messing with it and came up with pretty much the same sollutions as are mentioned here none of them really worked but shadow bias did...
I'm doing the test renders now: will post my results. Thanks for the tip.
You're right humans aren't translucent all the way through that's why its a SubSurface scatterer as part of the light is reflected but the skins subsurface. If you want proof that this is a real effect; take a powerfull flashlight, wrap your hand around it and see what happens (it helps if there isn't a lot of other light so doing in the dark might be a good idea :P) Once you've seen the difference you won't want to render human skin without SSS it's way more realistic.
No problem, it took me ages to figure this one out thought I'd save people some time :D
btw the effect does not always occur but sometimes the light hits the subsurface in such a way that nose and mouth light up adding an additional light can sometimes make it go away but if you don't want to do that the only way to get rid of it is by adjusting the shadow bias.
Okay, starting with my own materials, I have made these tests.
My default shadow bias on my lights is 0.1 So I tried my materials at that, and then at a shadow bias of 1.0
bottom is at 0.1, top at 1.0
Now here are the Interjection Light mats
Top is at 1.0, bottom at 0.1
OH: these are Shadow Mapped... it just occurred to me that Raytraced might be different!
wancow try raising your Subsurface scale to help get rid of the lines you seem to be getting on the skin.
Alot of things effect SSS, there doesnt really seem to a one size fits all answer.
Raytraced lights are alot better, DT recommends using them when using Injection
Ok so if that is right I've identfied a problem I've been having with the nasty striping when using SSS :P also your lighting setup seems to prevent to glowy nose something I've also seen in one of my portret setups.
Yah, I'm learning that! :)
Subsurface scale... is that in the render settings?
My settings (I found it in the Materials) are currently at 4. How far up should I go?
Well, he's proven one thing; shadow bias does affect SSS :D
Oh and raising the scale as in bigger numbers yes? (been toying with that as well but couldn't seem to get it right...)
My settings (I found it in the Materials) are currently at 4. How far up should I go?
I have the scale set at 1.7 (the interjection default) and I don't get the lines except on a char's thighs....
I've never had to go above 4.
Your lights seem very bright to me and raising the bias seems to have helped but it might cause problems elsewhere with shadows.
I often find it is a act of balancing several things.
It's raytracing that gets rid of the lines. It seems those lines come from Shadow Mapping.
Here it is, Shadow Bias 0.1 with ray traced shadows, my materials.
HOWEVER: it looks a lot like the Raytraced Shadows set at 1.0, but without those lines... interesting... I'll play with the scale and see what happens.