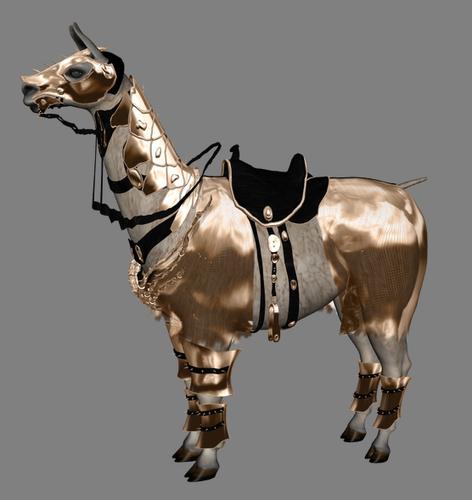
How to clone a horse
 zigraphix
Posts: 2,787
Another kind soul has already made a "clone" shape for the Horse 2 that allows us to refit saddles and such intended for that horse model onto Horse 2, using the Autofit feature (this is the same feature that allows V4 clothing to fit Genesis, etc.) So I thought I'd do a clone for the Charger. Then I was asked to explain how to make a clone... so this is that thread. :)
Be warned-- process pictures tend to be ugly. There will be very few cute horsie pictures, at least in the early parts of the thread.
But first... why would one want to do this? Well, thanks to the aforementioned Millennium Horse clone shape for Horse 2, I was able to refit Spinebender Armor to the Llama! (Ok, I acknowledge it's a bit lumpy in places, but it does work!) But... what about the Astral Armor??? That was designed for the Charger, not the MilHorse!
If this image doesn't turn you off completely, read on. ;)


Comments
*grabs note pad and stylus and waits for information to flow*
Ok. Where I start with clones is to load both figures into the scene, set them to two contrasting colors, and make each only 50% opaque. This helps me to see how different they are.
So here's the Charger (in fuschia) and the Horse 2 (in blue). Note that Horse 2 is longer than the Charger, and the base pose is also different. So the first thing I'll be doing is adjusting the overall length of the Horse 2, and arranging the pelvis of H2 to match the same area on the Charger.
Sometimes when I'm working to line things up, I like to use different views. Here, I've made a first pass at lining up the legs, though the head is still sticking out.
Now I'm starting to get closer. I found the fetlocks of the Charger were making it hard to see how well the feet lined up, so I made them even more transparent. I could have hidden them altogether, but then there would be a gap in the Charger's legs, and I thought that would be more jarring to work with.
Also note that I set the Charger (and its tack, not shown here) to be non-selectable in the scene, so I wouldn't click it by accident.
So really I just keep fiddling with scale and rotation parameters per joint, working outward from the pelvis area. That point needs to stay fixed, so it's easiest to adjust the parts of the horse closest to the pelvis first. A couple of times I had to go back and fiddle with the pelvis position and redo work in other places. :(
Also remember to keep checking from different angles.
Occasionally I like to turn off the target model (Charger, in this case) and see what the "morph" is looking like. It will probably always be ugly-- we're never going to use this shape in a render. This is just being made to tell Horse 2 how to stretch and smush gear for the Charger to make it fit.
(Also, remember Horse 2 is semi-transparent here-- the gullet isn't really protruding out of the head.)
Although I usually start with orthogonal views (Left, Top, Front, etc.), eventually I start rotating the Perspective camera around to see how things are lining up. One important point-- as much as possible, try to do right and left matching joints at the same time, and while you'll probably eyeball the first one, make sure to copy the numbers to the mirror joint exactly. Here I have the left front hoof not matching the right because I forgot to change the y scale of one of the joints.
You're never going to get a 100% fit just by scaling and rotating joints. But I got pretty close! Here's the original Charger with tack, and a semi-transparent and opaque version of the Horse 2 as I have it now, with the same tack (actually still being worn by the Charger, but the Charger is hidden).
By looking at the Horse 2 with the Charger tack closely, we can see where the points are that will need to be fixed. (When I'm doing this with human figures, I often use a bodysuit at this point.)
Unfortunately, I don't have time tonight to show the next step, which is using D-Formers to push and pull the mesh to fit. Or you can use a modeling program-- I use Blacksmith3D.
In any case, what we're going to do after that is export the obj of this horse, then re-import it as a morph, and I'll walk everyone through those steps as well... but it will need to be later this weekend. :)
Great information. I'll be watching for more when you can post. Thanks so much! :-)
Great, thank you. Waiting for more info.:-)
Thank you for doing this!
Wow...I was stumbling around on my own and came up with much the same...but was missing 'something', in my attempts. The setting of the meshes to 50% opaque is what I was missing. I was really messing things up just trying to eyeball them.
For the final 'tweaking', though I've tried using Blender's shrinkwrap with varying results. It's never going to be 100 match, especially around the ears...but I did successfully make a Maddie clone that works (unfortunately I had a power outage and the final version didn't get saved...yeah, I get brief 10 sec to a couple minute 'flickers' several times a week since Sandy...which is 'normal' for around here...about 10 yrs ago).
Thanks Z, for the tips on getting even better...eagerly awaiting your next instalment.
I'd love to see how to do this. Feel free to post in this thread! :D
Fun with D-Formers coming up!
Remember to save your work regularly. If you try something you're not sure about, save as a new file name, so you can get back to whatever you had before. (mjc1016, sounds like you need a UPS now....)
Everything we've done up to this point has essentially been a "pose" for Horse 2, so you can save out your current work by selecting Horse 2 and saving the pose.
To use DFormers with Tri-Ax figures like Genesis or Horse 2, you must select the main node of the figure when creating the D-Former.
I recommend hiding the Charger at this point, but don't delete it from the scene, as you'll want to make it visible every now and then to check your progress.
For some reason, the D-Former field is always created as this huge thing. Crank the size of the field down to 3000 or so. You'll find that the system will probably respond very slowly until this step is completed.
Then, maneuver the field into the position you need. We're going to work on the chest first. After I've resized the field, I usually parent the D-Former base and control to the field until I'm done moving it and angling it the way I want. Then I parent it back to the main node of the figure.
After a lot of fiddling and trial-and-error, I ended up angling the D-Former a bit, and narrowing the width (x axis) to pull in the sides a bit.
Also, although I had previously used the scale controls to increase the Y axis on the abdomen, I ended up setting that back to 100% because it interfered with the D-Former, and I liked how the D-Former looked better.
Next I worked on the belly/groin area. This also took some tweaking, and I ended up reducing the x-axis of the field quite a bit to avoid distorting the legs.
Even though D-Formers are attached to the root node and can cross body part boundaries, you'll often find them easier to control if you don't try to do too much with a single D-Former. I found that I really needed separate ones for the chest and belly.
The last thing I did today was make the rump bigger, overall, but then nudge in the "hips" a bit.
Then I had to duplicate the work on the other side of the body. I used "copy selected items" and "paste to selected items" to get the parts of the D-Former into the same position as the one on the right, then reversed the x-trans and z-rotation to move them to the left side.
More later -- I need to go make supper! :)
Ok. I exported the altered beastie as an obj, brought it back in as a morph, did the Freeze ERC thing with the appropriate pose, but I'm having some scaling and translation problems with the final result.
Here's the result now.... with just a bit of cheating. Namely, I loaded the saddle and bridle, fit them to Horse 2, chose the clone Charger, let the refit happen... and then unfit the saddle and bridle and translated and scaled the horsie to get them back on to the horse. The saddle fit is much better than just repositioning the saddle: the green version is the refit saddle, the pink is the original. The bridle, not so much.
So I'm not going to be posting the process until I manage to figure out what I'm doing wrong here. A couple of things have changed in DS 4.5 about how clones are handled, and I didn't have translation concerns with my previous clone attempts. But I'll get it figured out... eventually. ;)
Will these techniques work for human shapes to Genesis, too? (I'm thinking Sixus1's Behemoth, HER, and Scrum, just to start with...)
Why did you do an ERC freeze? A clone shape shouldn't adjust the rigging, as far as I know, but should simply reshape the mesh. If you did adjust the rigging to the new shape that may in part account for your problems with the converted items.
Yes. You want the same number of arms and legs, and remember that a clone shape and AutoFit will convert the confirming item to use the Genesis rigging, so if there were extra bones in the other figure, you're not going to still have them when the conformer converts to Genesis.
Also, if you're thinking of making an actual shape to replicate a non-Genesis figure to use in a render, unless you are the creator, you won't be able to distribute it. The likeness of an original character belongs to the creator.
...fascinating. Considering doing the same with the original Mavka so I can use the older figure's clothing & props with the Genesis version as I have a fairly decent investment in the original character.
There should be a link for this in Nuts-N-Bolts forum!
so is the obj you save and imported as a morph the clone?
can that be used in the auto fit?
im looking to make a clone for autofit .
Yes, import as a morph and set it's type to Modifier/Clone
thanks
ss
I don't know how I missed this post before. I should get back to this project now that I'm done teaching my double section of stats....
I came to this thread to learn how to make a clone and instead I am being told how to make a copy. I know how to make a copy.
Assuming I have the perfect copy, so I can make a morph. How do I proceed so I can pick this alternative from the autofit popping up list?
And above all how do I delete it from the autofit list if I may want that.
?
See above - you do this on import or by clicking the gear on the parameter's slider to get to the settings dialogue.