Help building a shader
 david_macrae
Posts: 109
david_macrae
Posts: 109
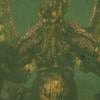
So I have been messing around with Carrara recently just to try to learn more about it. and am trying to build a shader in poser. In the pictures below you can see that they are very similar. (the left 2 are poser and the right 2 are carrara).
They are procedural skin textures with the base skin color and an overlay that creates the shaow layer. Here is the problem. In poser by adjusting the x, y and z in the n node I can change the angle and amount of coverage on the shadow layer. In carrara I used Custom Terrain Distribution. I set the noise at 0 and coverage at 60% then bump all 0, altitude all 0 and slope all 0. On orientation I set influence at 80. I thought by adjusting direction and pitch I might be able to do something simmilar as I did in poser. however it always renders the same as you see in the image.
I was wondering if Anyone would like to try to create this shader better or help me to know how to do it?
p.s. with this I have almost been able to exactly duplicate all my poser animation in Carrara. In poser I delete all lights and and one diffuse ibl set to between 50-100% and in Carrara I delete all lights and set the scene effects ambient basic the same 50-100%. And I get a great cell shaded flat look on all my scenes even with texture maps. The only thing I have to do now is learn the shaders and also add outlines which Carrara does not do natively. I will eventually get toon Pro to try it. (I cannot use ya toon as I am on a mac).
Thanks for all the help.

Daz 3D is part of 
Connect
DAZ Productions, Inc.
7533 S Center View Ct #4664
West Jordan, UT 84084
Licensing Agreement | Terms of Service | Privacy Policy | EULA
© 2024 Daz Productions Inc. All Rights Reserved.
Comments
You're right... I really like the cel look you're getting.
I'm afraid I can't be of much (if any) help... I don't really do this. But have you tried the line creation from the Non-Photoreal renderer and/or the Toon! stuff in Carrara?
I don't know if it provides lines, but I think I remember something like that with YAToon (Yet Another Toon shader) which 2.0 claims to have Improved Line Drawing? Maybe?
I know... I don't like using the NPR renderer since it doesn't use multi-core processing. I was wanting to get into a sort of painted look, not quite as solid as cel shading, but decided to try doing that in Post.
NASSOS has a special means of rendering and then runs the frames through a Photoshop action he's developed himself, which we can see the result of here which he made for his many-award-winning "Dinner for Few" short film. He might even have sme good notes about it in the thread for that film here
Ahh yes. It appears he's using the UVs to create line textures and Toon Pro... ingenius!
Using that in combination with your rendering technique should work really nicely!
This interested me so I had a little play. I'm not sure why you are using the subtract but I don't think you need it - put the Custom function directly in the Blender channel. You can now use direction between 0 amd 360 degrees to rotate around the Z-axis and Pitch to move it from 0 degrees which is horizontal to 90 degrees which is vertical. Assuming that you want to have the light coming from above the hoizon, you will need the shadow colour in Source 1 and the "lit" colour in Source 2.
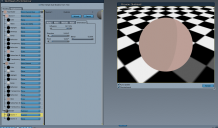
This works as far as the shader is concerned, but I am getting another issue when rendering. Although I have no lights in the scene, just ambient set to 100%, which should produce a flat unshaded look, I am still getting some shading on the figure, which ends up having a metallic sheen (see image) rather than being totally matte, and I can't work out why!
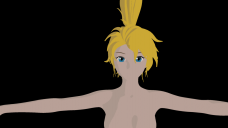
I just noticed that you have used the glow channel rather than the diffuse/colour channel, that works to give a completely flat appearance, still with the directional control that you were after.
@PhilW I got it I did invert the color and shadow and now have better control. Depending on which way as you said I want light I cand adjust and flip colors as needed. I do not know how I figured out that the glow has no sheen. Just messing around. Also your right I just put the custom directly in the blender. This is a learning exercize for me as I am new to carrara. In the past I only used the modelling room to create a simple morph. Next I need to tackle Carrara animation but I am a little worried that I cannot undock and use a seperate screen for the graph palette (at least I have not been able to) and I did find a tutorial on it but it did not seem to work for me. I wonder if it is because I am on a mac.
@Dartanbeck Thanks for putting up that image from NASSOS. I recently rented Dinner for Few on Amazon Prime. It was a great short. I do use hand drawn UV textures fir line work for things like age lines and I just did it with lines uner the eyes along with animation the face skin color from flesh to red to simulate embarassment like in anime. I learned about Hand trawn texture lines from a Brian Haberlin tutorial on the Smith Micro you tube channel. I am going to buy toon pro! soon. YA Toon does not work on a mac.
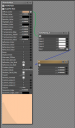
Here is thenext shader I am trying to build. I think it will require another blender channel (maybe that is why I had the extra channel. So I can combine a png texture just black lines with an alpha channel to the above shader here are a couple photos from by poser setup.
In essence I just added a blender node to the above shader to plug in a texture map which was just the lines under the eyes the rest is alpha. I did have to fiddle with the color in various channels to balance it right.
p.s. I used open gl render in this one rather than ff render as it shows the edge lines as well.
I did just realize that the was NASSOS is simmilar to what I was doing when I started with poser 10. Before they added the geometric edgr line and cartoon modes. I would render seperately a 2 tone cartoon and a line drawing and combine it with a texture shaded but I sort of abandoned that aproach when 11 came out because it has the built in geometric edge line render. Also this shader seems to negate the need for the 2 tone extra render. except that aproace might work combined as well for say nighttime or darker scenes. And I will be combining these techniques into my repetoire.
Here is a sampling of some hand-painted textures I was working on for a "Painted" look. While the total grayscale maps were made for Bump, I also used them as the driver (shader node) of Color Gradients as well, and the really dark color map in the lower left was originally intended for the highlight channel. I didn't like this particular set of maps, but I loved the experiment and will always be continuing to work with such ideas.
I painted these directly in Howler, which I love for the incredible paint feel I get, but I think my next attempt will begin in Carrara's 3D Paint, then bring those results into Howler for more fun ;)
If you just want lines under the eyes, you don't need a whole new shader for that - just use Multiply in your glow channel to multiply together the map with lines with your base colour (assuming that the lines are black and the rest is white).