Tried Out Fog - Now It's Slightly More Clear
 Hermit Crab
Posts: 841
Hermit Crab
Posts: 841
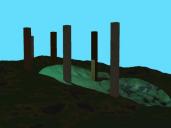
I decided to try to get the kind of effect that I saw recently in a fan-made Tomb Raider game where buildings and cliffs loomed up out of the mist as the character ran through the scenery.
Not knowing there was a fog tool in Carrara, I tried volumetric clouds. First I chose the Old Volumetric Cloud and used the cube shape. My scene consisted of a terrain with some columns of various preset wood shaders. I put in a spotlight and coloured the background a light blue.
Here is the scene:
Daz 3D is part of 
Connect
DAZ Productions, Inc.
7533 S Center View Ct #4664
West Jordan, UT 84084
Licensing Agreement | Terms of Service | Privacy Policy | EULA
© 2024 Daz Productions Inc. All Rights Reserved.
Comments
So I added an Old Volumetric Cloud and coloured it reddish:
(I hope it's OK to present this in steps - there aren't too many and my images might be confusing)
Then I tried the New Volumetric Cloud. I'm not sure whether I had my scene immersed in it or not but I got (surprise) a cloudy sky:
Then I discovered the Fog tool.
I added a figure (which is floating above the terrain) and got results closer to what I wanted.
Mods, this is the last post!
I tried removing the spotlight (no lights). I tried with the bulb and spotlight. Other shots were with the bulb only at different brightnesses.
I haven't really any questions but I thought these experiments present a 'look' that might appeal to someone out there.
I suppose the conclusion is that the Fog Tool does what it says on the tin!
I suppose also that I lied about the previous being the last post.
Awesome. I still use the fog tool as well. It's fun and it has a lot of options. When animated it has a sort of 2d look to it, which can be cool.
Volumetric clouds tip:
For immersing a scene or confined area in a fog, I recommend the following as a starting point:
With the Volumetric Cloud Selected:
Edit > Center Hotpoint, Edit Send to Origin
In the Director's Camera and With the Volumetric Cloud Selected:
Type 0 (zero) to zoom to the full cloud in view
Hold Shift and scale it down to about twice the size of the area of effect
Now, we need to know that, like real clouds and fog, this volumetric primitive gets less and less opaque the closer it gets to our eyes (the render camera). So to thicken this, we need to increase the opacity in the Volumetric Cloud controls.
Also, unlike the Fog tool, lights affect Volumetric Clouds. In the v-vcloud settings, choose Sunlight Only if using a Sun Light in the scene and only want the sun to control the lighting of the cloud. Note that the shadow controls help to determine how much sunlight may pass through the cloud to the rest of the scene. Use All Lights to further tweak the ilumination and appearance of the cloud in many ways, using lights. Then adjust Silver Lining to control the effect of lights coming in from behind the cloud, color and brightness to control the actual cloud.
Use the controls on the lights themselves to have them either affect or not affect the cloud by using "All Objects Except" and choose the clouds or choose "Only" and select the clouds.
Using lights in this way, we can create many different effects with the clouds as mist, smoke, atmospheric thickening of air, etc.,
Then go in and tweak the cloud's density and other shaping and texture controls.
If we want less definition in the appearance of the cloud, Adjusting the cloud scale (bottom left) higher and the Sharpness lower will create a more even effect, where doing the opposite with bring out the finer details.
We should also be aware that we can actually use these Volumetric Clouds as a light source, like magaremoto does. I'm not entirely sure of his exact design, but using the shapes setting and smoothing out the density can immerse the scene in volumetric light which can create its own indirect lighting properties. Then use the opacity to control the actual density of the look, and a combination of opacity and brightness to control how much light it emits into the scene. Likewise we can bring the color closer to black (or other dark hue) and reduce brightness to help make an otherwise too bright scene more spooky, dark, and with a sort of darkening depth of field.
well, it can do many other things other than being a sort of participating medium, it can slightly affect the depth of field in a subtle and realistic way, just like a classic fog but tweakable to get haze or light gray water vapor, it can even "absorb" light rays coming out from the camera so as to lower the general light intensity and take control over the white albedo; it also contributes to have a more gray look of the rendered objects, sort of mix between gamma correction and contrast adjustment
What an amazing amount of information in your replies!
I realized that I had actually used fog once before for an underwater scene a couple of years ago but had forgotten all about it and that led me to try clouds yesterday.
Thanks for all the info. In your last sentence, Dartanbeck, I started to imagine night-time fog, perhaps in an ivy-covered area of ruined cloisters. I have a statue of a hooded, monk-like character holding a lantern http://www.daz3d.com/old-man-with-lantern-statue by FirstBastion which might be good to use in that setting.
If I can get a chance I'll experiment some more.
Two things I noticed in passing yesterday:
1 when I tried to insert the moonlight light I had a message that it only worked with realistic skies. Are realistic skies brought in from somewhere - the browser or scene wizard?
2 when I turned off all lights (in my case a bulb and spotlight) the scene didn't become dark completely. I hear mention of ambient light - where does that exist?
maybe this paper can be of any interest to better understand how light may be affected by a participating medium
https://www.cs.dartmouth.edu/~wjarosz/publications/dissertation/chapter4.pdf
1 - Click on the Scene in Instances, select Atmospheres and Realistic Skies are one of the options. Click on Edit and you have a wealth of options to play with - skies, clouds, fog, distance haze...
One of the other Atmospheres option is Distance Fog which you should also have a play with.
2 - Ambient Light is just above the Atmosphere options (again within Scene). It simply applies light to all surfaces equally and as such can be very unrealsitic, unless combined with Ambient Occlusion in the Render options. It is really a throwback to when computers were a lot less powerful than now, and it was used in place of proper Indirect Light. I usually turn it off completely, but if you must use it, keep it low or it will wash out the contract in your renders (unless combined with Ambient Occlusion, which while not as realistic as Full Indirect Lighting is a lot faster and can look very good - particularly useful for animation when frame rendering speeds are most important).
Yup. And in the Misc tab of the browser there are some sample Realistic Skies that can be dragged directly onto the Atmosphere tab - Other purchased skies apply the same way. Like those from PhilW, Ringo and Tim Payne ;)
I was doing a bunch of stuff with the Fog tool during a period when many people were telling me not to! LOL I love ignoring stuff like that, If I have it available, and I want to try working with it... I'm going to try working with it!
Another great fog effect that I love to use is the one in the Realistic Skies.
On the left side of the Realistic Sky Editor window are circular buttons to enter certain settings. the bottom four are clouds options. The one directly above them is Sun Beams and Fog.
I like that fog for adding a natural distance fall-off atmospheric effect to my scenes - and I've recently discovered that it can even be used on interior scenes! Fathom that!
Just under the little render window of the Realistic Sky Editor is an area where we can set X mile in the scene = Y miles, etc., Setting that second range to higher number in miles will thicken the atmosphere, bringing the effect closer to the camera. So we can use that for smaller scaled scene, like interior dungrons and such. While Volumetric Clouds might seem simpler to set up, the RS fog renders incredibly fast.
Anyways... yeah... this stuff can be a real blast to experiment with!
This fog is a cloud-like gel in a spot light, used in the Fog setting in the Light Cone effect settings! ;)
The foggy appearance in my EnvironKits is a combination of the RSE fog and the very top of a fairly large volumetric cloud which mostly resides under the terrain - just the to sliver poking over the ground and into the scene. I also keep the fog in the RSE (Realistic Sky Editor) to a fairly low altitude, like 12%ish
Yikes, magaremoto... this is some deep shhhh... awesome stuff! You are really into the science of how everything works, aren't you? I love that! I spend years playing with this and that and making decisions based on personal results from experimental adventures. I love how you truly understand all of this stuff.
@ Magaremoto: Looking through the paper you linked to at least explained the term 'albedo' you used in your previous reply. It also gives a layman, such as I am, an insight into the complexities of creating a viable way to render images that will not take forever to compute.
It's interesting, if I understood correctly, that the formulae can be used to understand light behaviour in situations as diverse as light striking intergalactic dust particles and light being scattered in fog.
The term BRDF lost me - maybe it was introduced in an earlier chapter. But, in truth, I didn't pursue Mathematics after school and there isn't much I can bring to Carrara's fog tool from such an advanced study.
Mind you, another thing I noticed was mention of Beer's Law ...
@ PhilW: Thank you for answering my questions! I need to go and take a look at all this (as well as recheck your video courses)!
@ Dartanbeck: Thanks again for giving so much additional information and examples. I have noticed you putting mist/fog into your renders - it is nice that there is a way to have it indoors. Good for dungeons, sewers and so on. I need to try these out soon.
@ Magaremoto: I forgot to say how impressive it is that you can understand that dissertation you linked to. Dartanbeck mentioned you using volumetric clouds as a light source. Something more to pursue.
I do like that last render, Dartanbeck. Thanks for explaining what was done to get the effect.
well, I've been attached some shots ot 5thElement's scene showing the photon map rendered to better understand how volumetric clouds can work in carrara; I guess the key is the irradiance map and light caching that must compute the presence of a quasi homogeneous medium (depending on the settings) enlightened and irradiating (only with GI switched on): 2 different sun intensity ( 200 and 400) with or without volumetric dome/haze; you can see how the presence of the cloud increases the diffuse lighting (participating to GI) and may take control over the albedo (ceiling and floor). In outdoor scenes you can tune up the density to have a more effective DOF effect too (and, depending on its position, changes the hue of the sky in a realistic way: more dense at the azimuth, less at the zenith)
as for the BRDF: https://en.wikipedia.org/wiki/Bidirectional_reflectance_distribution_function ; it's a model to compute reflections and refractions on materials
as for the Beer's law I dunno anything unless it's talking about drinking
DB I like very much the light cone effect in the starship, I would have preferred red reflections on the metallic walls and less dark shadows but the image is intriguing indeed
Hi Magaremoto,
Thanks for the BRDF link - beyond the initial explanation that also makes me feel like Penny in the 'Big Bang Theory' comedy.
I regret that much of your post above finds me well out of my depth. I experimented a little with rendering a simple scene and briefly tried using the various sliders and settings in the Global Illumination section (which I don't normally venture into). I wanted to see the settings available for producing renders such as the examples above. I got some interesting results but none gave me the sort of smudged, almost non-photorealistic textures of your images. But I think I see the point of your examples. As long as sunlight isn't too strong, then haze can give an overall brightness to a scene with diffused light softening the shadows. Just as in nature.
It may never be that I'll have these features at my fingertips but it is amazing how much is possible in Carrara. Thanks for helping.
I also took time to follow Phil's and Dartanbeck's guidance to using the distant fog, realistic skies and so on.
What surprises me a little is how fog effects in Carrara can be found in different areas of the program.
On the top row of icons there are Volumetric Clouds (not strictly fog, I know). There are two choices of these, each with different settings to play with.
Then there is what I was calling the Fog Tool. This is a pull-down icon under the Fire icon. It has a range of settings.
Thirdly there are the fog settings in the Atmosphere section of the Scene settings - Distant Fog, Cloudy Fog.
This is a bit similar to the way Physics settings are scattered around various areas of Carrara. I'm sure there is a purely logical reason for it but it is a little confusing for my tired and wasted brain.
The image below shows pretty much the effect I started out trying to achieve. It's only a very simple distant fog with ambient light. But a couple of days ago I knew next to nothing about these and now have a lot of interesting permutations of light, etc. to experiment with. Thanks to those who helped.
Very nice fog effect you have there.. very nice!
...including the Atmosphere section's Realistic Sky option has a built-in fog settings which can be turned on in addition to it's distant horizon haze.
Fourthly, there's the fog in the Light Cone effect of a spot light
Yes, and the various fogs are all different in many ways - each being well-suited in their own way.
The Fog tool (Fog Primitive) can look really awesome and has a lot of options to make it look very different. It has a built-in animation feature much like how we animate the Fire primitive. It can take some practice to get desired animated affects. Sometimes it's even easier to simply switch to one of the other fogs for a more subtle fog effect in animations. But I do really enjoy how we can use this primitive's animation settings to create effects very much like a lava lamp or something like that. I have many uses for this wonderful tool. For all of them!
Thanks for completing the list, Dartanbeck!
Now I could amend my own title for the thread: now it's much more clear!
Often, when people talk of Carrara being outdated or dead and so on, I feel a bit despondent. It's like being the one at work who keeps the legacy systems going while others get new marketable skills.
But every time I get up-close, such as in this study, I can't believe how much has been crammed into this software. Nothing in this thread moves on to discussing other render engines either.
If anyone looks upon Carrara as they would an attic to be cleared out one day, they should really take a close look at what's in there. 'Hey, this is far too good to throw away!'.
I'm glad you like the example picture above. It isn't meant to be a rendered work, just a quick look at the effect. The colour isn't realistic but is exactly as used in the game I wanted to copy. Nevertheless, I sometimes see such blues and blue-greens in out-of focus, backgrounds of woodlands in some of the PA's renders.
the "show photon map" function can be very useful to be quickly aware of the surfaces affected by lighting in the scene, I've been using very often before rendering
if you take a close look at the examples with sun intensity at 400, you'll easily realize how the volumetric cloud lowers the white albedo and reduces slightly the contrast
As I've got to rush out in a moment, I'll show some efforts with distant fog that I've just made.
I'm using Stonemason's Village Courtyard.
The last two images are twice the size of the others, if anyone wants to take a closer look.
I'm a fan of the not-real! ;)
Awesome! Tell her to check those red bricks on the ground for traps! Or to just avoid them altogether! LOL
Very cool! ;)
Nice progress and effects!
Just to confuse you even further and provide yet another area to explore, you can render a depth map in the Multi-Pass render options, and use that in post work to add a fog effect like that. The advantage is that you can fine tune the effect interactively and have just the depth and colour of fog that you want.
I've seen that the volumetric fog in Fusion may be controlled (like moving around buildings and such over a 2D image) with the use of a UV Coordinates output, which we can include in multipass renders as well. I've done some UV Coodinates multipass, but haven't tried them in Fusion yet. Looks interesting though.
This is killer stuff and works for much more than just fog! Fusion's Volume Mask tool
Sorry for the late reply and thanks for the comments and additional tips.
I do see the differences you refer to Magaremoto, thanks for the pointers.
And now I see other possibilities with the mention of additional passes.
Since I don't generally aim for ultra realism (even if I knew how), I experimented briefly with running the last picture through some of the filters in the free FotoSketcher program. If nothing else, these I think have an effect of unifying the different areas of the picture in the way that most works in traditional painting have a certain overall unity derived from the artist's individual touch.
I just show these in case they may be of interest. The last picture shows one of the textures in FotoSketcher which I simply had a look at. The other nine textures are more useable - canvas, leather, etc. and these can be lightly or heavily applied.