Problems with the replicator...
 DUDU
Posts: 1,945
DUDU
Posts: 1,945
Hello with all!
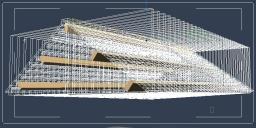
I would like to create a realistic roof with the minimum of objects in my scene, but there are two problems:
1- Carrara crashe after each render (hardware issue?).
2- The tiles leave a spacing between them.
I use the simple replicator with auto-grid.
For the tiles on the top wich connect the right side with the left side, no problem, they are likewise…
It is possible to solve this problem with the parameters in the replicator, or is there a solution other than to create true instances?
Thanks in advance!


Daz 3D is part of 
Connect
DAZ Productions, Inc.
7533 S Center View Ct #4664
West Jordan, UT 84084
Licensing Agreement | Terms of Service | Privacy Policy | EULA
© 2024 Daz Productions Inc. All Rights Reserved.
Comments
2 - you should be able to manipulate the distance between replicated pieces using the Gris Size controls. If the size used creates spaces, try making a smaller number in the proper axis.
BTW... Cool project! I love it!
wow, I have done surface replicated thatched roofs but never thought of that.
The Autogrid I have used for street blocks but it does have a few issues with tweaking positions as it goes strictly by the bounding areas of the items and possibly the hotpoint, I prefer just the grid for that reason.
I can see some parameters, but I don't know how they work, nothing change in the grid...
I dont think you can
as I said it strictly follows the objects bounding boxes.
thats why I use just grid with the exact sizes of the objects as recorded in motion of X and Y in the spacing for a start then tweak that.
Thanks Wendy, I 'll try that tomorrow.
May be also try a surface replicator on an invisible plane...
Hi,
When it comes to space between each tile, if there is no solution, you could create one replicator with the space in between of one tile; then, duplicate the replicator and place it on top of the other replicator with an offset of the tile. I hope, you understand what I mean :)
Best wishes,
Thomas
It's much easier than that. Like I said in my first post. Here are some screen shots to help.
Edit: Note that the camera view doesn't change in the three screen shots to demonstrate the size of the replicated structure
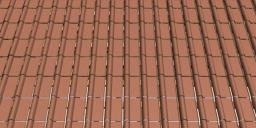
First of all, select the item to be replicated and switch to the motion tab to get the exact dimensions. We use that to fill out the Grid Sizes in the Replicator.
Here I have a cube 1' x 1' in x and z, I don't care about y because I want that to be exactly the same. In my new replicator, I set my x grid to 1.05', y to 0.0' and z to 1.05' and I'll have a gap between each piece. I am replicating 10 along x and 10 along z I have a small screen capture of the Grid settings from the replicator over the sequencer
Here is what happens when I change x and z to 0.5' : The pieces are overlapping each other 0.5'
and here is x and z set to 0.2', and also highlights the dimensions in the Motion Tab
The grid size lets us overlap or replicated item or put gaps in them and we can even set up random differences for a human feel to the construction.
We can actually have all of our replicated objects move from directly on top of one another to being miles away from each other, simply by using the grid size settings
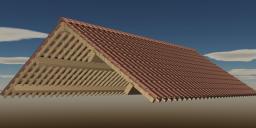
Hello!
Here the almost finished roof…
Wendy was right, autogrid is not the solution in this case and Carrara don't crashe anymore after a render!
Thank you Dart for your example, it was very useful to me.
I thought that the file would be lighter with the use of réplicators, here 21,4Mo all the same!
Here the file if it can be useful to you: http://mhdproductions.be/Carrarators/Roof.zip
Thank you all!
Nice work - I downloaded your file and it is larger than expected for 2 reasons - it is not compressed, and you have included the textures internally to the scene. Some people have had issues with compressed scenes not reloading, so I can understand that. Including textures internally can be good for distributing the scene, but is generally not a good idea as it will add the size of the texture files to the overall scene size. Just saving this scene as compressed made it less than 10Mb.
Thank you Phil, I use to do that for two reasons:
-The safety to reload as you said, and the safety if my "HDD Studios" die.
The price for a 2To is less than 50 Euros but I know that it's longer to load a big scene.
Q: If I convert a replicated object in real instances, are they separates objects or is it like a duplicated object?
I have to say that I thought that the answer to that was that it created separate objects - but I was wrong. I just did a test with simple spheres and after real instances were created, there was still only one master sphere in the scene.
So I tried it with Victoria 4 - and again it worked to produce a number of copies, but still with one master object. This is significant because normally you can't copy or duplicate figures, so this provides a way to do it. Each figure will still be a slave to the original - you can't for example pose the figures differently (oddly, you can move the skeletons, but the figures don't follow). But you can move, rotate and scale the figures individually, while still having just the one master.