Glass and Water
 whispers65
Posts: 952
whispers65
Posts: 952
Ok I'm home sick today and kind of bored but not so much I want to move around much. So I'm going to try and be somewhat productive before the day slips on by...productive 3d-wise anyway. :)
So I was thinking. I did a render the other day and there was a water cooler which didn't really render well at all. It was a pathetic attempt on my part.
So I think today I will work on:
Water Cooler - Surely I can get it to look better than what it is now. (ImageA)
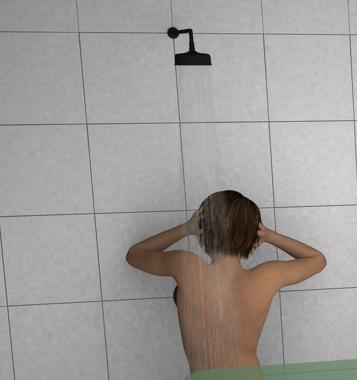
Shower Water - so far it just looks like hmmm hard to describe. (ImageB)
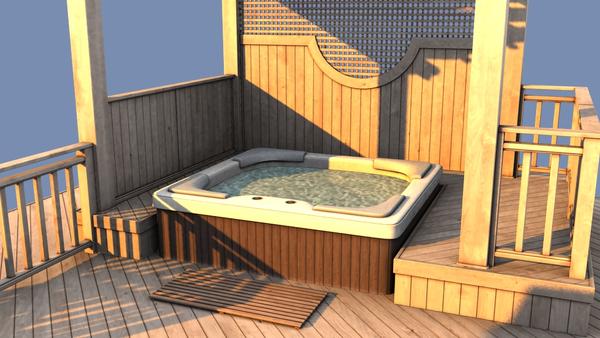
Water - There's a hot tub (ImageC)
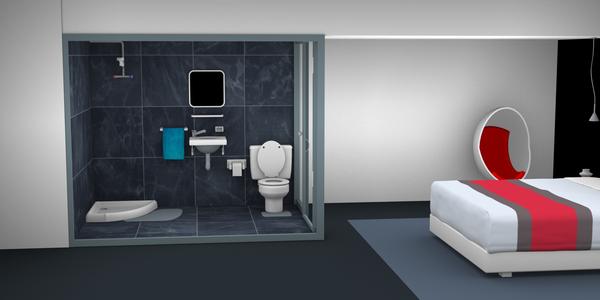
Glass and Mirror - I have a hotel room scene - most interesting room to me because I can try and make the tile slick looking (for lack of a better term), work on shower water (I don't think it comes with any), and work on the glass enclosure. So lots of things to try here. And oh yeah there's a mirror which in this image is black. I don't think they usually come that way in real life. :)

Daz 3D is part of 
Connect
DAZ Productions, Inc.
7533 S Center View Ct #4664
West Jordan, UT 84084
Licensing Agreement | Terms of Service | Privacy Policy | EULA
© 2025 Daz Productions Inc. All Rights Reserved.
Comments
Water and glass can be two of the most challenging things to work with.
With Mirrors, don't forget that they need something to actually reflect in the mirro to show that they are reflective, and don't forget to make them reflective in the mat settings.
In this image I got a good reflection going on in the mirror, but failed dismally with the bottle and glass, and the liquid inside both.
What program are you rendering in?
Some of the basics are the same across all programs/renderers, but there are specific procedures for each.
Pretty much just sticking to DS 4.5 for now. I have Poser but don't feel comfortable getting around in the program yet.
Thanks Chohole. I'll have to remember about having something to reflect. In the room scene, it is taken straight on with the back wall out so I was wondering what would it reflect anyway, at least at that angle.
It would reflect the back wall. Twist your camera angle a little and you not only get a more interesting image, but potentially get a more interesting reflection.
Here's a great Water for DAZ Studio tutorial: http://afina79.deviantart.com/art/Creating-Water-In-Daz-Studio-159064896
And some free glass shaders presets: http://morganrlewis.deviantart.com/art/Glass-Shader-Presets-for-DS-86711865
For DS one of the biggest things needed to get glass and water to look right...ray trace depth of at least 2, with 4 being 'preferred'. And depending on how many bounces you need going up to 6 or more may be needed. Of course doing so will dramatically increase render time.
I agree with the last two post 100%. The Tut and Shaders rock and the Render Settings are very important.
ok I did the water tutorial...took a while with the all of the stuff I try lol.
The first pic is just the scene loaded with UberEnvironment2 and that's it. Just as is.
The second pic is with some shaders added and the water tutorial as is.
The Shaders killed the Maps, you need the maps especially the Bump and Dis maps. I think that is even covered in the tut.
Although with that particular setup...I'd create my own displacement map in GIMP...some water brushes and end up with a customized wave pattern, instead of just plugging the default map back in.
Yup it is covered in the tutorial and I used one. This time though, I saw the name of the map he is using is "LS_mvmewater.jpg". I googled it and it comes from the "Painted Valley" product and I bought if off Daz.
So trying it with that. I don't know enough about bump maps to know the difference at this point. So at least with the same image I should get the same results. All I know is over all it looks the same but with no ripples or water movement which I didn't like. I just didn't know why because as far as I was concerned I did everything by the book except for the image. At least this way I can eliminate that problem.
There was mentioned at the bottom of the tutorial that someone said all they got was a mirror pane and then said something about the problem was tiling. I did see two tiling options and bumped those down to 0...they didn't show up as options on the tutorial.
Trying again.