Ask for help
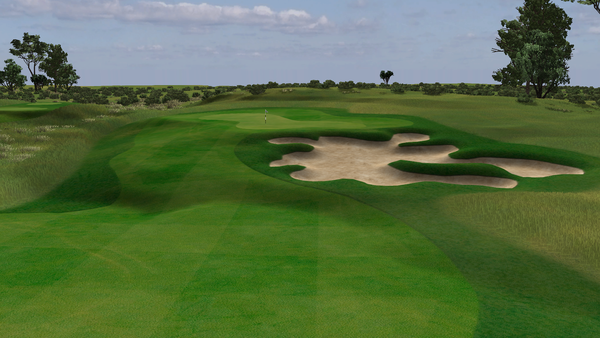
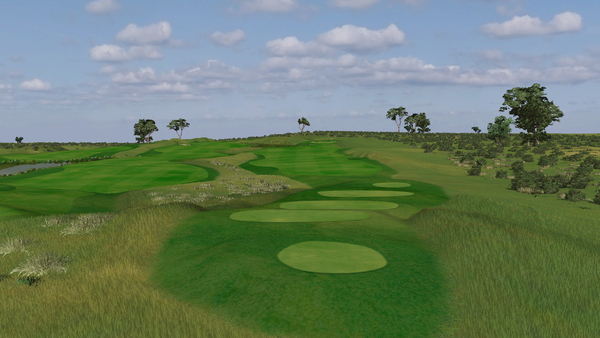
Hello everyone and sorry for my English. From a long time I read the forum and i am very appreciate. I have some questions. I made a surface with contour elevations in Civil 3D and i trying to make it look realistic ( like attached pictures) in Bryce7. Can you please check attached files and tell me if is that possible to do it in Bryce7 and give me some hints how to do it in easier way please. Just to know - I have already contour lines in Civil3D (DWG). Thanks!!!


hole17_green.png
1920 x 1080 - 3M


Hole17.png
1920 x 1080 - 2M


Hole_16_tee.png
1920 x 1080 - 2M


Comments
Shouldn't be difficult to do. One of possible ways (the way I'd approach this problem):
0. assuming 0.png are your lines viewed from top
1. render them as solid areas of grey according to height levels (map should be square of size 2^n, n=8..12) - result: 1.png
2. using Wilbur ( http://www.ridgenet.net/~jslayton/wilbur.html ) open 1.png and use Filter->Fill->Deterrace - result: 2.png
3. Filter->Blur->Gaussian Blur - result: 3.png (save as 16bit png)
4. open Bryce, add new terrain, open terrain editor and import 3.png
5. after terrain scaling, texturing, camera positioning, adding some sky, vegetation, buildings etc. (refer to generic Bryce tutorials and/or our forum) - resulting rendering 4.png
Thanks for the answer. I understand your point, but can you please explaine me item 1. I can render the surface, when I choose different then 2D wireframe in Visual Style (Realistic for example). How to render the surface as solid areas of grey according to height levels? And this is Autocad Civil 3D right? Thank you for helping me one more time!
Generally, draw the spaces between the isohypses (the lines that surround the same height of the terrain) with a shade of grey, the higher the brighter up to white, the lower the darker down to black. Finally change the colour of the isohypses so they are invisible. This can be done in a graphics application. Use some Gaussian filter, otherwise you get steps. If possible, save as 16-bit greyscale (not colour) and import it into the terrain editor.
I have some explantations on my website (see sig). Go to Raytracing > Tools > Iso2Grey and get the documentation. The program itself is very limited (only 256 x 256 pixels and only 8 bit greyscale), I wrote it long ago. But the doc explains the principle how to draw a height map that can be used in Bryce.
You could have imported your *.dwg lines to some vector drawing application to create filled areas, but I dug into Civil docs and there seems to be even better way. If you have your surface built from these isolines then according to documentation you can export your surface as *.dem http://docs.autodesk.com/CIV3D/2013/ENU/index.html?url=filesCUG/GUID-A3B01D44-7AA7-458D-84FE-F338962EB75A.htm,topicNumber=CUGd30e24427 I don't know Civil to be sure how it's going to work and which settings you'd have to choose.
There's a possibility that the resulting file will open directly in Bryce via File->Import Object. If not then I'd suggest opening *.dem in Wilbur and exporting file from there.
Bryce can import digital elevation maps (dem) directly. You do it from the Terrain Editor (TE). Also PGMs (portable grayscale map) can be imported into the TE.
Ok, I have done the steps that you told me and I attach the result like pictures. The contour lines from wich the 3D realistic pictures were made, are in pic 1. I made the surface from this elevations and rendering the surface - pic 2. Then i opened Bruce 7, I go on Create-Terraince, and I picked some of the install terrain. Then i go on Edit terrain/object-Elevation-New-Picture-and import the picture that I render in Civil 3d (pic 2). And the result is picture 3. This is not the result which i want, probably i have to scale the terrain on right way, but I dont know what numbers to put in Object Attributes. On pic 1 you can see the borders on Fairway, Greens and Tees, how to put different material (grass) in the different areas in the Terrain/Surface (like pic 4). I know probably my question are stupid for you guys, but still I am very apreciate for your answers. Thanks
I can not.....When I go on Import object and choose the DEM file, some error came up.
Scale the Terrain on the Y attribute you need to reduce the number.
That's not good news. It's been a long time since I last used this feature. If I remember correctly, the USGS DEMs need to be ASCII.
What do you think about my steps in my previous post? Am I wrong somewhere? And how to put diff materials in different areas when i generate the surface into Bryce (like pic 4). Thanks
Can you share the *.dem file on the forum? We could investigate if there would be any way to open it directly.
Anyway - your current heightmap looks pretty decent. If you normalize it so that the lowest level on your map equals ground level (black) before importing to Bryce you won't get that ugly edge and calculating height will be easier. Bryce uses non-real world units so any scale for your model will be appropriate. For example if your terrain map size is 500m x 500m and maximum height difference is 20m then in your terrain attributes you put size x:500, y:20, z:500 or x:250, y:10, z:250 (heightmap have to be normalized).
For material I've created the map of the different kinds of grasses with transparency mask for them. Masks have to be perfectly aligned with your heightmap (rendered form the same view) to avoid further aligning by hand. The separate masks for each kind of grass can be either assembled and including textures painted in raster editor, or it can be done in Bryce if you don't have such editor or you prefer to use all procedural textures (there was a tutorial about stacking transparency masked terrains - but I can't find link to it at the moment).
[edit]
Here it is: http://docs.daz3d.com/doku.php/artzone/pub/tutorials/bryce/bryce-terrain02
and this one as well: http://web.archive.org/web/20060212190851/http://pinhead.robbes.com/tutorial/Mario/mg_CTATerrains.htm - too bad that with missing images
Can you pls give me some email to send you a DEM file.
I am sending you some pic of my work, and still i can not put different material for different areas in the surface in Bryce :( I can but in C3D, and when i render...happen nothing with the masks. BTW where I can see my exactly terrain map size. Thanks.
Well, I don't know the software but please refer to your manual. Maybe changing masks order or giving them special material will fix it?
http://docs.autodesk.com/CIV3D/2013/ENU/index.html?url=filesCUG/GUID-A5541C60-D444-4352-B972-0E6D43A2C0B3.htm,topicNumber=CUGd30e132680
I found, some times simply increasing the resolution helps a lot to making something look better.
if you have photoshop or something similar. then you re-size your image down after the render. but the added pixels in the original render gives it much more detail in regards to textures and lighting.