Compositing shader? How to render object to alpha?
 recharred
Posts: 16
recharred
Posts: 16
I'm really excited about the new hair plugins (LAMH and Garibaldi Express), but I mostly use Reality and these plugins take advantage of tricks unique to 3delight and its cousins. The .obj export functions work, but they are a bit cumbersome (huge file sizes) and they don't look as good as the 3delight renders--I think a better solution would be to render the hair in 3delight and composite that onto my Lux rendered figures. I'm looking for the best way to do that.
It seems that there should be a way (I'm guessing a shader?) to set up my scene and render everything except the hair to transparent--that is, use the figure geometry to mask the parts of the hair that are behind the face, etc. Anyone know of such a thing? (Note, rendering the hair without using the figure as a mask would be an unworkable pain, since I'd have to mask it by hand in Photoshop.)
I have pwCatch, but it either doesn't work right or doesn't really do what I want. If I set it to use the background, I get a flat black figure where I want pure transparency. Of course, I can use the pwCatch render in photoshop and select by color to delete the figure shape, leaving me with something like the masked hair I want, but that is an imperfect and futzy solution. It's not going to be a clean composite without a lot of manual tweaking and fooling around. Surely it must be possible to send 3delight the message that the parts of the hair obscured by the figure should be rendered as transparent (alpha like the background), masking to transparent whatever is behind the figure?
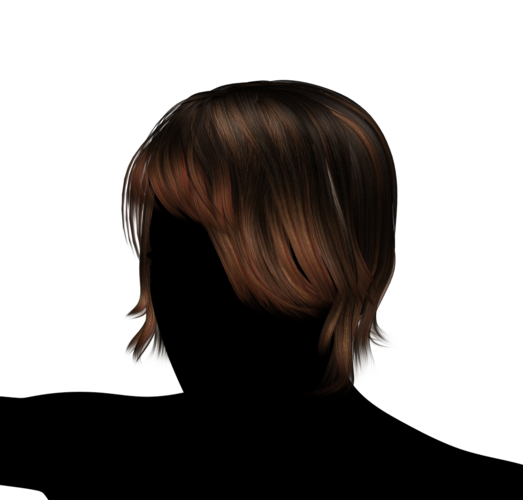
In case this isn't clear, I've attached images of what I'm talking about. One is the hair rendered from pwCatch, the other is a quick select-and-delete of the black mask (you can see why that's an imperfect solution--notice the aliased edges and outliine left behind. if there's a better way to do this on the Photoshop side, I'd love to hear it--fooling with refine edge is a pain, and generates only moderately better results so far). The last is a composite with the hair applied to a bald figure, which is the ultimate output of this exercise. Hope this makes it clear what I'm trying to do.
Any thoughts? This would be such a useful tool, and it seems like it should be possible. I've searched around and haven't found anything, so maybe it's not as easy or useful as I thought. Any suggestions are greatly appreciated.


Daz 3D is part of 
Connect
DAZ Productions, Inc.
7533 S Center View Ct #4664
West Jordan, UT 84084
Licensing Agreement | Terms of Service | Privacy Policy | EULA
© 2025 Daz Productions Inc. All Rights Reserved.
Comments
pwCatch would hav been my suggestion, though if you save as a non-alpha channelled format you shouldn't get the rim. It won't, however, help with and problems with the selection running into the hair.
Here is what i would do:
1. make the main figure and the background black and render the hair twice: once with usual colors (Render 3 in the illustration) and once with a pure white color (i.e. disable diffuse and specular, set ambient color to white and ambient strength to 100%). Leave the opacity as is (Render 1)..
2. invert the hair mask, so you get a black hair on a white background
3. render the figure (in lux or so, Render 2). Multiply the inverted hair with this render. This makes the image black where the hair will be.
4. simply add the hair to this last image.
Note:
This does not make use of any alpha channel, so if you save your images as e.g. png make sure you remove the alpha channel somehow, or you will end up with a doubly applied alpha. Or you could use a big black background plane, so there effectively will be no background.
The background color for the hair renders should be black, otherwise you will get a colored rim around the hair. Not a big problem, but it would require additional steps to remove it.
Thanks so much for the suggestions! Just using a black background and saved as jpg not only takes care of the outline I was getting before, but it also makes it much easier to smooth out the selection using the refine edge tool in Photoshop (which is not as mechanical as I was hoping, but it can be very effective and doesn't have to take too long).
On the other hand, I'm really intrigued by the suggestion to render a mask using ambient. That strategy never even occurred to me, but I think it's clearly the sort of thing I was looking for. This is the kind of mechanical, non-futzy solution I want--otherwise I'll spend forever trying to get my selection just right with the refine edges tool, always wondering if it would have looked better if I'd spent more time on it, long past diminishing returns.
I guess I was so focused on what seemed like it should work (a shader that wrote to the alpha) that I didn't think hard enough on other strategies to get there. I will try it out tomorrow and report back.
Thanks again for the tips!
So I've had a chance to work out how to render the hair with just ambient at pure white to get a mask, and it works great to create exactly the mask I needed. I did things a little different from the suggestion above, since it seemed easy to do it this way once millighost pointed out I could get the mask from an ambient render of the hair.
Here's the steps in CS 5.1 (but a similar procedure should work in any image editor that supports layer masks):
1. Render scene in Lux without hair (Base Render)
2. Render hair with black background, everything except the hair and figure invisible, and pwCatch using background to black out figure (Hair Render); take care to set up lights in Daz that are roughly similar to what you used in Reality/Lux in terms of orientation and such. Save this as jpg.
3. Change hair shader to something that allows turning off diffuse and specular (I didn't see how to do this with the hair shader that comes with Garibaldi, so I used UberSurface); turn up ambient to 100% with a pure white color; render this (Trans Render) Save this as jpg.
4. Open Base Render in Photoshop
5. Place Hair Render into the document
6. Place Trans Render into the document
7. Create a layer mask on the Hair Render layer
8. Copy the Trans Layer and make this layer invisible
9. Option-click on the layer mask so it will receive a paste command (the document will turn all white)
10. Paste the Trans Layer into the layer mask (command-shift-v)
11. Option-click on the layer mask to make it a regular mask again
Voila! Thanks for the tips; now I can use what, for me, are exactly the right tools for the job--3delight for hair and Lux for the rest.
Glad you have a workflow that gives you what you need.
You need to be careful at step 10 (where you set the layer mask to the hair-mask). In your case it mostly works, because you have a dark hair and a dark background. When using a light hair with a bright background (like eg blonde hair and white background) you will get a dark rim on your hair. This happens whenever you use a mask and color channel that have the same outline (it is called premultiplied alpha btw). In that case, you could divide the color layer by the mask layer before applying the mask to it. Photoshop has a function for this, i think, called "remove white matte" or so, But the division can have its own problems when working in 8-bit color, so i generally prefer the Add over the Normal blending mode. Like i said, not important in your image, but i thought you should know :-)
That is good to know. I've run into this before, and I just knew to reach for the "remove matte" feature (which usually does the trick) whenever I saw it, but I didn't know the underlying mechanism. I think I'll try to make it happen to see how common an issue it is likely to be for this application--I'll try a blonde character on a light background and see what sorts of combination make the problem apparent and whether "remove matte" gives a decent result. I'll report back what I find.
Hey, I'm five years from the future and there is now a solution :)
https://www.daz3d.com/forums/discussion/233066/creating-a-wig-asset-transparent-head