Need feed back on this UV Mapper program.
 RAMWolff
Posts: 10,249
First off. I don't use Blender. ZBrush I use for morphing and eventually textures, Hexagon crashes every other moment on my good system (buggy as hell?) and don't like Roadkill plus is crashed on me even more than Hex. Silo is a no go since most development on it is done and it's just not mature enough for me to understand it from a newbie's standpoint. What allot of these programs do is under sub menus with barely any documentation! I think we all know how frustrating it is when there is little to no documentation! :P
So, after all the help from SickleYield today in getting other parts of modeling figured out (thanks so much SY!). Got the boots and glove basics done (using JoeQuicks freebie bodysuit he released into the wild for Genesis a week or so ago now). Got part of it done in Hex and then finished it in Silo 2 and now needing better UV Mapper than UV Mapper Pro. It's just getting a bit antiquated for me. SO.... I found this one:
Ultimate Unwrap 3D: http://www.unwrap3d.com/u3d/index.aspx
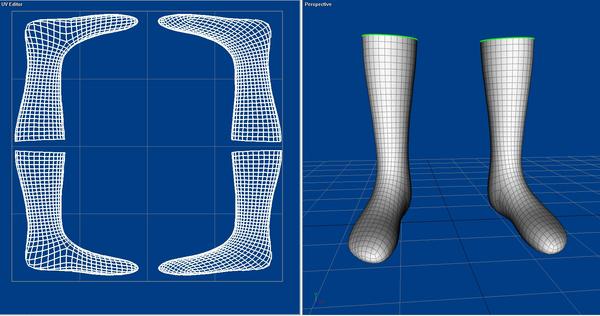
Screen grab below shows what I was able to do in about 1/2 hour. Well laid out and not overly pricey like headus UVLayout which had me feeling like I was back in Windows 95 for some reason. Sorry I like slick easy layouts that are more intuitive than a million and one menus and buttons with hidden menus.
Let me know if you have any other suggestions . Remember... it's gotta be intuitive and well laid out.
Thanks!


Comments
I hate to point this out but that UV map is not good at all. The Boots are still cylinder wrapped. Making a texture that followed the LINES to get a none distorted image on them would be next to impossible. They need to be Flat mapped for easy texturing.
EDIT: Try to add and emblem to the front of them. You'll soon see what I mean.
Hmm. You have ZBrush that has one of the better uv tools and still want to buy UU3d?
Actually they look like a planar map - the soles are just a line across the bottom of the map, so anything will be smeared out there with no way to rescue it. You need to be able to split the mesh down and cylinder unwrap, or you need some kind of pelt mapping. ZBrush will probably do the job, and there should be plenty of tutorials on using it.
Zbrush will unwrap those for you in 2 seconds - under z plugins, open UV Master. Tell it "unwrap" and then when it's done click "flatten" to see how it looks. "Unflatten" to go back to the normal view of the model. Under "texture" tell it "new texture from UV" to see the results and also apply a color map to the object.
To change how it unwraps, in uv master activate painting mode (I forget exactly what it's called sorry). First choose "attract" and paint a wide blue line down the center back of the boot, including the heel underneath. Then choose "protect" and paint a red line down the front of the boot down to the toe (it will make the red and blue for you; you just have to choose attract/protect). Unwrap again and look at the results. Neato, huh? Export your ztool obj and it will have the new uv's.
If this is a best map that this program can do for this item it isn't very good. You'd have a very visible seam in front, which I would avoid, just as I would UV map the sole of the sock differently. And it will be a pain to texture seamlessly, unless you use 3D paint sort of application.
ZBrush UV mapping is very good right now. If you already have ZBrush, I won't recommend to buy this other program.
http://www.pixologic.com/zclassroom/homeroom/lesson/uv-master/
P.S. I usually avoid programs that have "Ultimate" in the name. As my experience shows, they are usually everything but.
WOW.. thanks for the replies. Thanks for the little tutorial Canary! That's really helpful and for the link Kattey!
I keep forgetting about UV Master. :red:
Hmm... very easy and not bad at all. I actually don't have regrets buying the other program. Sometimes you just need a quick and dirty solution and I used UV Mapper for that but this is like UV Mapper on steroids. I think there is a way to pelt map in there too, just need to read the PDF. Could have sworn that was mentioned.
Anyway, thanks again for the help. Now I just need to figure out how to make a sole and heel for the bottom of the bootie. I'm horrible at making inorganic stuff. LOL
.pdf ? as a link or was it available after purchase?
I took a look at the demo and hay! Didn't crash once. :-)
Don't have ZBrush myself and so far Ultimate Unwrap 3D looks to be quite the utility. Come payday, in the cart it goes! :-)
It does flatten maps. Few tutorials are listed here.
http://www.unwrap3d.com/u3d/tutorials.aspx
Ah, good to know Patience! :-)
Did some more digging, this may be a little old but the interface looks to be close. Apparently this program has been around for awhile, previously under another name.
unwrap head
mapping a sailing ship
unwrap eye
edit; found the links: place to start:
http://www.carls-corner.net/pages/tutorials.htm
http://www.carls-corner.net/tutorials/UnWrap3D_WalkThrough/UnWrap3D_pg1.htm
Thanks so much. I did learn how to unwrap in ZBrush so I'm good but hopefully these links will be of use to other folks! :-)
I hope so. Weren't all what I needed to know though and am seriously rethinking the concept of buying this. I contacted the company and for what I'm wanting to do, the suggestion was to mark seams and use the LSCM unwrapping. Well ... sure hope I wasn't doing that right 'cause what a mess! So did the trial and error thing, figured locking some things is good. And while now and then I manage to hit a good combo of keys to get something looking better; not consistently and I simply don't have time to spend another year to figure out the mysterious key combinations. But it doesn't crash!
However between Hexagon and Black's program, I don't need another program to make a mess of the uv. [can just picture a certain texturer's face if I presented her with a template of little square faces all by themselves, all over the board. nope.]
Did discover window "hot keys": p l r f b u => perspective, left, right, front, back and uvmap
Seems that for complex items, it does better with one breaking up one's work into many smaller pieces, done separately.
I can't see this being time effective for clothing items. If it is and somebody would be so kind as to tell me how, I'll reconsider.
And ... there is no export of any form of model?! Just the uvmap? I checked the folders, the .obj plugin is there. And some others. And none show in the program for exporting the work. The uvmap without the .obj is pretty useless.
The "save as" function ... well one cannot tell what those options are without buying the program.
Oh, are you referring to the Unwrap3D program I bought recently that I mentioned towards the top of this thread? Yea, there are more options when you purchase but after I was schooled on how to flat map in ZBrush I've not opened it up since. Out of habit I still open up stuff for quick views of UV maps in UV Mapper Pro. I really need to switch my quick views over to the new program so I can get more used to it and can answer questions about it.
Oh that's okay but thank you. I sent a letter to the company casually mentioning that IF there is a way to do this, exactly how ... and that I have popular thread going etc ... so if there is a way, I expect their support team can shoot me some pictures.
Have you had a look at UV Layout?.
I love it. Does exactly what I want.
I get along quite well with UVmapper Pro, actually, but I probably don't use it the way it was designed to be used... I just learned a bunch of tricks while trying to remap Queen of Ages to take MFD textures that have served me well enough since.
Well. One came with a magazine which was a little misleading. Turned out to be a time limited offer the key for which would be expiring about now. Somehow I don't feel like dropping $300 for just a uvmapper.
Just an update. Heard back from the company and no, this product won't work for the clothing items and that. And for anybody interested, all that talk on the website about answering questions, well, no they don't. They refer back to those few beginner tutorials which don't cover all the buttons! Okay ... however the free demo that doesn't save, I did discover can show the 'connecting sides' if one is interested. For items already uvmapped properly in a program such as Hexagon ;-) .... one can load the .obj into it and select the faces along one of the edges. The corresponding edges that it would connect to will also be highlighted. So it might be helpful for finding/matching seams. And that part is free :-)
Shift/click => add
Crtl/click => subtract
2D/3D toggle button up top is also rather important as various actions only work with one or the other option.
So, back to Hexagon ... and I did it.
Got a nice uvmap on a cloak. :-)
[don't mind the arm, image is part of another project]