Hexagon to Daz-Now I get it (pt3)
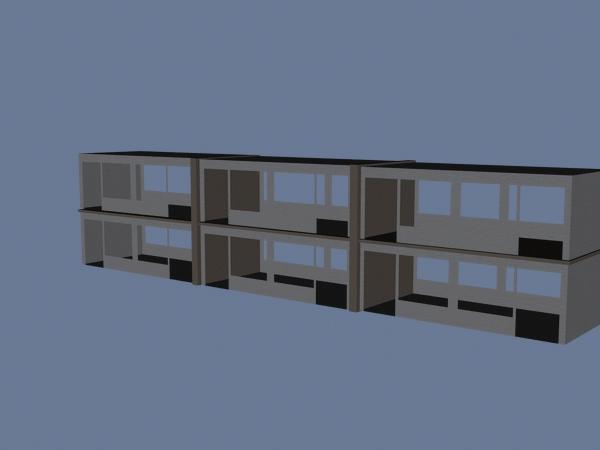
OK, I understand it now, If this helps someone else. Here in the render, this is a basic setup frame for a hotel I am creating to go into the scene. The one thing I have learned, (actually there's two), when in Hexagon, this is one room copied five times, the room divider copied once and the floor divider is just lengthened enough to cover the area, in Hexagon DO NOT make them into a group. I saved it as it is, seperate parts so each has its own characteristic then exported it as an object in Hexagon. Re-opened the object in Hexagon, as an object all the parts become one, still with their own characteristics, then sent that to Daz. and everything stayed exactly.
The second thing I've come to understand, in Hexagon, the loops I made to cut out for the windows and door frames, the mistake I was making before was cleaning up those loop lines. DO NOT clean them up, leave them. When you unfold the object for the UV, you can select each part face to adjust the checker to make sure they all fit the same. BEfore now, I was taking out those loop lines and when I sent it to Daz, Daz responded by trying to close the lines (those diagonals I kept getting). IN this, if I had gone ahead and cleaned up those lines there would diagonals all over the place. And If I had grouped everything they would all have one texture.
So now, I start making the door and windows, and again for each part DO NOT group, leave them seperate they will become one as an object sent to Daz.


Comments
Went back and re-worked it, using Room Creator door and window as a model for size and to cut out the frames for each. Then created my own doors and windows and roof (the roof texture I found on the net, same as the door wooden textures). The curtains is where I learned to keep cutting the rectangle and "squeeze" every other loop to get the effect, Daz adds the smoother.
Again, NOTHING was grouped in Hexagon, and did not clean up any loop lines, but re-applied the texture in the UV properties each time I made the loop cut. Saved all of it as a single object in Hexagon, then re-opened in Hex and sent the object to Daz. Then in Daz take the smoother off the doors and give them the skin lighting model. Then the final step before saving this as a prop in Daz, I bring in M4 to check for size, if clears the door, etc. And since learning how to set the XYZ values in Daz, it really helps in Hexagon.
So I got it now, I understand Hexagon to Daz. Now to complete the layout I add the stairs and balconies from MacLean.
...and finally completed. Changed the textures on the stairs to match the doors, and changed the street lamps to a nicer metal texture I found, which worked out accidently in how arranged itself on the lamp. Then added the tree from Urban sprawl (hopefully the rez is low enough to not give me trouble), and created the plant box.
The more I work in Daz and Hexagon and understanding those little things the easier it's getting. One of the big rules I've learned is when you do transfer the object from Hexagon into Daz and save it, DO NOT change anything about it from what you did in Hexagon, even and especially the textures. That's where I was having the problem. Also if creating a simple primitive and setting the textures after you've saved it, again DO NOT change the texture. I can change the textures in the things I've bought but not in the things I've created.
And setting up the cameras as I create each subscene set makes it easier to make those little adjustments in the placement in the scene, and they help to see at another view without having to turn the central pivot grid.
Now I've so many cameras in the village to help get to certain points of view.
It's pretty much gotten to where when I do run into a problem, I stop and think "okay, what have I learned so far?"
nice work, Tex! I'm impressed.
Your tips are valued!
...and so with everything I have come to learn about Daz and Hexagon and the years and years of studying and practising animation this is "Muscle Shores" so far...
http://www.youtube.com/watch?v=TezNskvDKmk
Your Kidding me. Is that the Muscle Shores I think it is?
If you're thinking the "Muscle Shores" I've been working on for the past few months yes it is. Originally I was going by Tex Jones (I came up with name back in the mid-90's before I ever got on the internet), when I found there at least 14 others around the US, so I had to make a name change to Tex Selander.
And so this is an overview of the layout so far....As I have really learned more about Daz and Hexagon, and how to control the cameras.
http://www.youtube.com/watch?v=ikZt26XwxBk
And as I have come to understand the programs a bit more the easier it's getting to create the layout. And create things like the billboards, a newspaper box to go with MacLean's Diner. I had put the two boxes from Urban Sprawl in front and realized a newspaper box should in front also, after all it IS a diner. So I created one in Hexagon and it's then I came to understand about the loop lines and cuts.
Nice!! I'm watching.
The billboard came really easy as I come to understand better about setting the UV's
And finally the completed hotel, you don't get to see it enough in the video so here is the final layout. The buildings ALL done in Hexagon, as well as the sign, parking lots and the highway. The fence is from Urban Sprawl, and the hanging traffic light is MacLean, of course. I made it in to a 3 way light.
...and so THIS is Center Stage of Muscle Shores. THANK YOU DAZ and Hexagon for coming along. I've waited YEARS for something like this to make the animations I've had in my head for almost 30 years come to life....