Using the Bump parameter in Surfaces
 jvdesuit1_582de7c548
Posts: 182
jvdesuit1_582de7c548
Posts: 182
Hi,
Here I am again with my scene and its components. I have now my stone figure practically ready. I used Michael4 and made invisible some of its features to give it the actual rendering of worn casting of one of the victims of Pompeii's eruption. I changed the whole skin texture for one of Nobiax ones which looked more or less like the kind of cement used by the italian archaeologist who had the idea of doing those casts at the end of XIXth century.
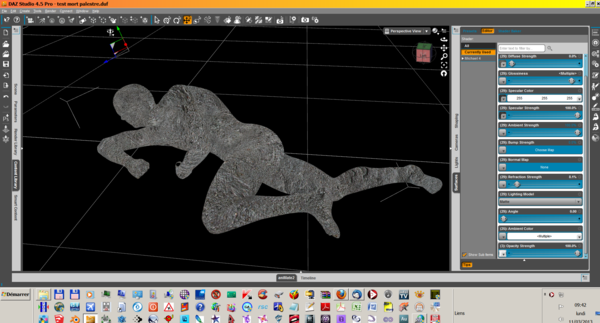
Now i'd like to give this texture something grainy and I suppose I should use the Bump parameter. For this purpose I created a bump file with the help of a tutorial I found on the web and with Photoshop elements 11.
My problem is to set the different parameters in DAZ Studio Pro 4.5.
I'm not sure to understand well there significance.
So my question is what each of them does,
What should be the better settings to render what I'm looking for.
I checked on the forum but did not find any explanation that I really understood.
Here is my figure at its present stage with the parameters I applied up to now for the remaining properties.
Thanks in advance
Daz 3D is part of 
Connect
DAZ Productions, Inc.
7533 S Center View Ct #4664
West Jordan, UT 84084
Licensing Agreement | Terms of Service | Privacy Policy | EULA
© 2025 Daz Productions Inc. All Rights Reserved.
Comments
Click the little square to the left of the Bum Strength slider and from the menu pick Browse, then select your bump map. Set the strength to 100%. That will make the bump equal to the Min value, in cm, where the map is black and equal to the Max value, in cm, where the map is white - adjust Min and Max as needed to get a plausible look.
I would suggest adjusting the tiling values for your materials, to make it finer grained, and setting the values on the head zones to a lower value than those on the body areas so that there isn't such an obvious mis-match in scale.
Should I change the 4 parameters of the tiling property?
Should I change the 4 parameters of the tiling property?
The min/max values are how far to move the apparent surface, in centimeters, from the original surface...with a bump map the move is 'apparent'. Shadows cast by bump mapped items are those of the original surface, not the bump mapping.
For the tiling, just the horizontal and vertical tiles, don't worry about the offsets. And do it by surface group at least...if you noticed, for Genesis the surfaces are broken down in to 7 'groups'...SkinFace, Lip, Nostrils are all group `1; Head, Torso, etc are 2 and so on...tile each group separately...
AH, this becomes clearer to me....A last question; I have added to the body the roman tunic for M4 .When I
did that in the guy's subset, the tunic took the right color of the texture of the skin I chose and that I applied to the tunic as well to his body.
Exactly what I wished as it supposed to be some kind of plaster used to take the imprint of the body under the lava.
Now when I merged this subset into the scene for no reason (so it seems to me) the tunic appears with a darker appearance and shades of green it? I have set the guy on the pool side and there is around the pool the green lawn. Could that be the reason?
Can you post a screen shot of that section?
How does it look rendered?
Can you post a screen shot of that section?
How does it look rendered?
Here are two renders one without the tunic after having adjusted the tiling
the second with the tunic. Originally it was yellow and I changed the texture to that of the corpse.
Can't understand this ugly greenish/bluish color....
EDIT: I've just found the reason, the glossiness parameter of the tunic had to be set at 0%. STill adjustements to be made to the tiling of the body, I wonder If I should match it with the tunic's. What do you think?
Yeah, but it probably isn't going to be the same number of tiles...you'll have to eyeball it.
And, yes, specular/glossiness/lighting model will need to be manually adjusted. I'd probably choose Matte for the lighting model for the tunic and the body...then drop the glossiness to not quite zero with a very low (no more than 5%) specular strength. I'd also change the specular color to a medium to light grey...making sure it's the same for the body and the tunic.
Thanks for your advices; anyway for the moment as far as lighting is concerned nothing has been done; I want first to completely finish the set and position the corpse ; I have yet decided if I'll leave it by the pool or move it inside one of the galleries of the palestra. I want also to review the backdrop cyclorama which is not completely homogeneous...So a lot to do to pass to the next major step.
Thanks for your advices; anyway for the moment as far as lighting is concerned nothing has been done; I want first to completely finish the set and position the corpse ; I have yet decided if I'll leave it by the pool or move it inside one of the galleries of the palestra. I want also to review the backdrop cyclorama which is not completely homogeneous...So a lot to do to pass to the next major step.
The Lighting Model is a Surface property...it sets the basic specularity model used for the surface/material.
The Lighting Model is a Surface property...it sets the basic specularity model used for the surface/material.
Oh yes I know I think I already changed it from "plastic". What I was speaking of is the general lighting of the whole scene.
I can't wait until you've got some renders of all of this...it's been a long process, but it's starting to look like it's coming together. You're starting to get all the little details now.
I do appreciate your interest, it's very kind of you...
I do appreciate your interest, it's very kind of you...
How can I not be interested...you got me hooked with the first questions about the model from SketchUp...I may not be answering all that much, but I am watching...and waiting.:-)
How can I not be interested...you got me hooked with the first questions about the model from SketchUp...I may not be answering all that much, but I am watching...and waiting.:-)
Actually speaking of Sketchup, I sent a email to the guy who did the models to tell him I was using them for a private project and what I intended to do and at the same time I asked him if had the possibility to send 2 models he is supposed to improve since a year ago. They are interesting because they are the 2 districts of houses surrounding the Palestra and the Amphitheater; up to now I had no answer and I think I wont have any!!!!! Pity and frustrating. The 2 suburbs are shown on the site but you cant download them.
Something I could have used is the DS3_AnimatedTextures_1.0.1.235_Win64 usable with DAZ 4.5; I thought it was and bought and found it was not! I was furious and told what I thought to the customer's service and since then it looks as if they check up and put the precise version of DAZ which an addon is compatible with and not just DAZ Studio which does not mean anything. Animated textures would have enabled me to have the Vesuvius eruption in the set! Instead I'll have to do it using mattes and all the annoying part of it...
Something I've been meaning to drop in one of these threads, for a while now, but always forget...
http://www.sharecg.com/pf/full_uploads.php?pf_user_name=Gerwynt
Yes I saw them and downloaded them just in case I needed them. A guy having the catalogue of the Naples Museum could make fantastic objects if he is gifted. Look at this movie; it is amazing what the woman shows, especially the jewels. I've seen some of them when I was there in September 2009. Look at this objects they could be ideas for you.
The collection of 5 objects together are from a dentist's study!!!!! Want to try them with yours?????:-)
The last one, the little Vase is a proof of the cult of Isis in the town where was also found a temple dedicated to this goddess.
Not mine...
I haven't done any historical stuff, for distribution, yet...I did start on a couple of things, but haven't gotten them finished. There's a bunch of other stuff higher up the list.
Well that'll be to add behind it as a note! I'm transforming the Amphitheater precise map I've just found to have the terrace on the 1st floor
in one single map and not be obliged as I did to have multilple primitives to follow all the curves! But what a work to do , to erase all that is not to be visible!I have to erase all the black and grey ones...Grrrrr
How can I not be interested...you got me hooked with the first questions about the model from SketchUp...I may not be answering all that much, but I am watching...and waiting.:-)
Here are some rendering of camera views of the scene. The lighting is the default Multiplane one. I've found at last the suitable ground for the hills and terrace but had to abandon my idea of have only a single plane for it. The map scale and data are not the same as the model's; obviously the guy did not check a real and accurate map of the amphitheater just as he has made 2 major mistakes in the walls of the Palestra which unfortunately I can't although I tried. I can't un-group the two sides of the palestra concerned and change their situation.....