New-User Tips
 Inkubo
Posts: 745
Inkubo
Posts: 745
I'm just starting to learn Carrara, and as I figure things out, I'll share to help other newbies.
TIP:
Don't Let the Viewport Fool You
In the upper left corner of the viewport, you can select which camera to use to view the scene. If you choose a rendering camera, like the default Camera 1, then as you manipulate the viewport and move around in the scene, you are positioning the camera for the final render.
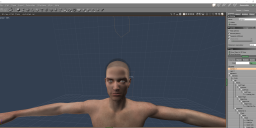
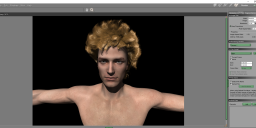
But beware that even if you're looking through Camera 1, the viewport can fool you. I have attached one image showing what I saw through my viewport, which was the perspective I expected to render--and another showing what actually appeared when I rendered. Note how in the viewport there is a lot of empty space above the character's head. The guy's eyebrows are more than halfway down the screen. But in the render performed using that camera without moving it, there is almost no space above the character's head!
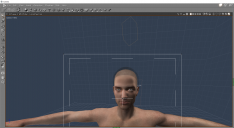
The key is to alway show the Production Frame. Use View > Show Production Frame menu item to reveal it.
When I turn on the Production Frame in this scene, you can see that its box does indeed correspond to what the camera will render.
WARNING: In this case, the Production Frame is not centered in my viewport because I've used the 2D drag tool to move my view around. I was unaware until now that the 2D tool does not pan the camera.
Daz 3D is part of 
Connect
DAZ Productions, Inc.
7533 S Center View Ct #4664
West Jordan, UT 84084
Licensing Agreement | Terms of Service | Privacy Policy | EULA
© 2025 Daz Productions Inc. All Rights Reserved.
Comments
Welcome, Inkubo. Great idea to start this thread. Can be a great resource for newbies - and I look forward to following along.
Speaking of Carrara resources, you will find a very helpful thread entitled "Carrara Information Manual" stickied at the top of this forum. It was compiled and edited by Dartanbeck, who also has a number of threads on specific topics (such as the terrain editor). You will find tutorials, links, and other help in the information manual thread.
There is also a thread that has a first page devoted to helping someone start a new Carrara scene, load a Daz figure, assemble a terrain, plant, realistic sky, etc., and render. It is meant merely to help someone find where some basics are when they first see the user interface. See here
https://www.daz3d.com/forums/discussion/119181/no-one-asked-me-diomede-posts-screenshots-on-whatever/p1
you might find some of these handy https://direct.daz3d.com/forums/discussion/28022/hints-for-new-users
batting cage grid can be customized. for small scene with scenery, something like 10ft z, 500 x, 500 y looks less cluttered
LOL! I'm surprised you didn't recognize ol' Phillip! Those screenshots are from me following your tutorial :-) Thanks for creating it.
And thank you for your hints as well, head wax and Mistara!
TIP:
Better Zoom Control
While you can zoom your view in and out with the mouse wheel, the changes are very coarse. The tiniest movement of the mouse wheel can take you from "it's too small to see" to "dang! I overshot it!"
For more precise control over zooming, (a) use the Track XZ widget on the Camera Tools toolbar, or (b) hold down the E key on your keyboard, then hold down the left mouse button and slowly move your mouse back and forth. In this mode, moving the mouse from side to side pans left and right.
here's one from the manual I always forget
TIP
Nudging with the Keyboard
You can use the keyboard to nudge objects or groups in small steps.
To use the keyboard to nudge an object:
• Press and hold the Command/Ctrl key, and then press the arrow keys to move the object in the
active plane.
• Press the Command/Ctrl and Option/Alt keys at the same time to move the object perpendicular
to the active plane.
• Press the Command/Ctrl and Shift keys at the same time to move in smaller steps.
TIP:
Bring Back Missing Translate Arrowheads
Often when positioning something, you will need to move your view around to get where you're going with it. Frustratingly, Carrara will hide the Translate arrowheads while you move the viewport, but then not bring them back when you are ready to move the object again!
To get the arrowheads back, while the object you want to move is still selected, briefly hold down the R key on the keyboard. The manipulator will change to Rotate mode, and the rotation discs will appear; then when you let go of R the manipulator should go back to Translate mode and the arrowheads reappear.
.
I agree about the wheel. I never use it in Carrara.
But I use another method than the one you suggest. I hold down the 'ALT' key and the middle mouse button. And then the movements of the mouse have the same effect as in your method.
But there's more: 'ALT' and left mouse button to dolly, 'ALT' and right mouse button to pan.
What's interesting with this method is that just by holding ALT key down and using the different mouse buttons you can almost instantly switch from zoom to dolly to pan, which allows to navigate very easily, quickly and precisely in 3D view. I use almost exclusively this method.
A little downside is that on most mouses the middle button is the wheel and you have to be careful not to turn it while pressing it ... It can be a problem if the wheel is very sensitive. I recently purchased the 3Dconnexion CadMouse. It has a real middle button. It's rather expensive but really worth it.
There's a tip in Carrara about 'my' method. See attached file.
I don't know if there's a setting that changes this behaviour but if I hold down the R key then it switches (and stays) to Rotate mode. It does no go back to Translate mode no matter how briefly I press the key. If I want just temporarily to go in Rotate mode I have to hold down the shift key while pressing R. But this doesn't bring back the arrows.
What I do when I have this problem is press R key as you do (which switches to rotate mode), and then press the T key to switch back to translate mode.
Other tips about the cameras:
For setting the scene (placing objects, posing characters ...), I think it's better to use the 'Director's camera'. It's because it's not affected by the undo command. If you use another camera, and want to undo the last change in the pose or the place of something, but have in the meantime changed the position of the camera to get a better view, then it will undo first the camera position change, and only then the pose or place change. That doesn't happen with the Director's camera.
Press the '0' key to aim and zoom the camera directly on the selected object. You often have to zoom out, though.