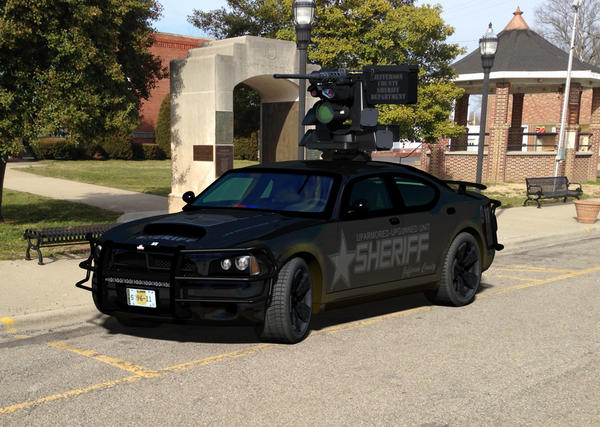
Reflections and stuff
 richard.chaos_91798ec102
Posts: 0
Heres is where I am here! BUT! I think that the ROADWAY/ASPHALT would be reflecting on/in the car body???
The background is in the backdrop with an shadow catcher. I am wondering if I could make an object maybe one large vertex with texture map OF the road way that would reflect up on the car body BUUUUT is invisible in the final render?


Doc15.jpg
1200 x 853 - 859K


Comments
The shadow catcher will act as a mask, so the best way to try it would be to make your plane, apply the shader to it and in the render room under Multi-Pass, select Relfection and render. Then render your scene as you have it now and composite the reflection pass with it.
Forgot to add that your picture's looking pretty sweet so far.
Well I took the time to actually make real geometry for the tire tread and stuff BUT if you look close the CONCRETE arch and the ret of the background DOES NOT come through the ARMORED GLASS of the car as well
What one can do is put the actual scene texture map in Highlight and in the Reflection render nodes.
In the graphic showing the shader tree, I used in the highlight shader - a mixer, a texture map, a gradient (black to blue), a color (darker blue), blender value = 80% and in the shininess shader a value of (0.50).
(used the blue in the gradient and secondary color to simulate the diverted rays of natural light that would give the appearance that one is actually looking at car paint and not a mirror.)
note: to get the reflection in the side panels of the actual scene, just render out the scene with the car invisible so you can use the map in the highlight and reflection channel. (the car is obviously in the reflection on the cube I used.)
In the reflection shader, I put in a texture map of the scene where the value or color usually goes, added blurriness (check the box) at about 90%.
Just used a couple of spots at 55 % intensity for this purpose of illuminating the cube, the backdrop of the texture map so you can see where the car is in relation to the scene and an infinite map with shadow catcher. There is one distant light.
Holy Cow, Professor. I really like this car. Those tires really help sell everything - their color and texture against the hard, glossy rims... Jeeez. And the residue kicked up from them on the car...
The only way I can think of, off hand, to help with your problem would be to use a Spherical Background instead of the Backdrop channel. What you'd need to do to get the position of the road just right, would be to use the motion tab on the camera you're using now, and using the same, exact distance in the Z axis on the spherical camera. It might even work to go into the spherical camera, looking through it, and select 'Set Position To" > select the camera you're filming with now.
You have a hefty system - you'll still have to wait a bit for that spherical image, 'cause they recommend 8000 x 4000, but I think that might be too pixelated for what you want. You need to have 2 x 1 aspect for it. Maybe 10,000 x 5,000?
Anyways, that would be an easy sort of solution as your current lighting would stay the same - unless you're using the Background channel for illumination or something. You'd just switch from backdrop to background... done. The exact distance on the Z axis of both cameras will land the road directly under the car - even though they're shot in different scenes. Then the shadow catcher would be casting shadows on the road, and the road will reflect onto the underside of the car - and likely correct the concrete arc thing too... but I'm not quite sure, why it's doing that now???
Hope you get this... Love that frickin ride! Glass... perfect. Everything about that darn car is just right! I bet she's a fun drive too... fast!
Refraction doesn't work right on a single sided mesh. took me a while to figure this one out. Many times I have had to deal with what looked like the interior of the car mashed against the windshield. So basically you wont see what is on the other side of the glass right. Adding any amount of thickness; so it isn't a single sided mesh, will fix the refraction issue. Or you could just set refraction to none.
Also for tire tread I would have went with a displacement map. ;)
That's because you used transparency and not alpha. You can use both, especially if you wish to retain any refraction in the glass, but you may have to adjust them in relation to each other until you get the effect you want.
I so want to post that on Facebook and watch people flip out ;p
Nice job :)
Thanks for all your help on this thread specially Acrobat! I am going to get ingot that shader night tonight.
I have another issue!
AS you can see I dirtied the car up just a tad. After paying close attention to cars in traffic specially black cars, unless they have come right off the factory floor or just washed and wax, they quickly get a film of dust then a little heavier DUST MUD around the wheel well.
What I have noticed is almost a gradient from the lower part of the body then lighten up higher on the car with DUST. This dust reduces the SHINE and reflection the lower one gets on the body!
I have included my Texture map for color and a greyscale for hopefully one for the HIGHLIGHT reflection channel but its not giving me the results I want
THANKS man i will work on this BUT just thinking ahead this solution would be problematic for a moving animation..
I would think ONE could use an object with a map on it for the reflection BUT the object itself would be invisible! Invisible to the views but not to the reflection/highlight channel
THANKS man i will work on this BUT just thinking ahead this solution would be problematic for a moving animation..
I would think ONE could use an object with a map on it for the reflection BUT the object itself would be invisible! Invisible to the views but not to the reflection/highlight channel
That's true, this technique is not meant for animation, but for a static one view "beauty render".
You could try putting a reverse image on a plane or if it works better a curved vertex object like a cyclorama, and place it behind or out of view of the camera. Put the image in the glow channel and make sure the object casts no shadow. Might work better for animations.
Seriously. Probably one of the coolest images i've seen on here. I didn't even realize it was a render: thought it was an actual photo. Fantastic work!