Sunbeams in Carrara
 Dartanbeck
Posts: 21,543
Dartanbeck
Posts: 21,543
Sunbeams have been introduced into Carrara 8, and are a very cool effect. But they have proven to be quite elusive. There is a tutorial at Daz3d's YouTube channel, "Carrara 8 God Rays" that really doesn't go into very great detail on what you need to do. Yet it is eerily truthful in what truly must take place!
We had a quite extensive thread regarding Carrara skies in the old Carrara thread, and many people, including myself, found the entire discussion to be most useful as we shared our trials at various settings within the sky editor, render settings, cameras used... And it gave us all a good excuse to render cool skies, share them with others, and talk about what we did wrong, what we did right... but overall just have fun learning and teaching. So why don't we start off with a free tutorial by one of our resident Masters of the Carrara Skies, Tim Payne.
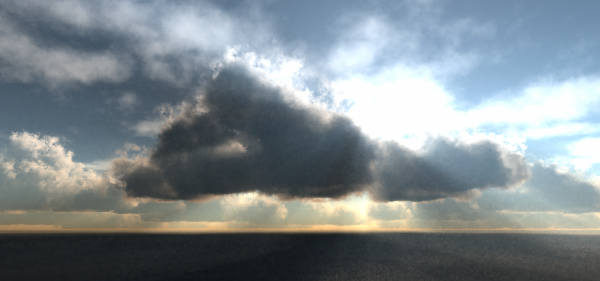
Sunbeams Example Scene - By Tim Payne
If you have an account set up at Carrara Cafe, you have the ability to download a beautiful Sunbeams Example Scene - By Tim Payne, which includes a perfect place to start, if God Rays are what you want to make. He is most generous to provide a good outline of thoughts in the included text file. This gives you a great understanding of what he did to make the scene, and why - but, more importantly, it tells you what to look out for before you render. Especially before you change his preset render settings! As an example in that, the below image is the default scene at the default render settings through the default camera - just open and render. I took Nine minutes, sixteen seconds on an eight core workstation with16 GB RAM at the default 600 x 281.25 PNG resolution. This is a long time compared to most sky renders for me. But most of my renders are not going for Sunbeam illustrative results. This shows them quite well. More importantly, he explains how to reproduce the effect in your own scenes.

Daz 3D is part of 
Connect
DAZ Productions, Inc.
7533 S Center View Ct #4664
West Jordan, UT 84084
Licensing Agreement | Terms of Service | Privacy Policy | EULA
© 2024 Daz Productions Inc. All Rights Reserved.
Comments
The issue with getting sunbeams in carrara; which still eludes me. is the settings are so outrageous that they will be the only thing in the scene.
As in, say I want to do a scene of a tomb/crypt with sunbeams coming from the clouds lighting it up. Can't do it. The only way it will ever work is for carrara to get volumetric lighting.
One of the early apps I worked with; and loved, was Terragen. Even the ten+ year old TG.9 could give you sunbeams with out trying. In fact it was hard for me to have a scene with clouds and not have sunbeams. The old TG.9 is my bar for realistic atmospherics, And carrara doesn't even come close.
Not saying light/sunbeams aren't possible, just takes a lot of set up and very precis settings.
Here is one I worked on for quite a while, I gave up because I couldn't get the colors from the window to be in the beams, but I have learned a few tricks since I worked on it last ;-P
{this started as a visual of a Joker/Jack Nicholson line from the first batman movie.}
In the image you posted, wouldn't a light cone work better? You could use light through transparency and enable shadows and the cone would take on the colors of the window. The other option would be to use a gel.
I tried 8.0 while it was in beta and tried the sunbeams as well and could not get them to work. That was before Tim's tutorials. I've faked them a couple times in images I've done using C7.2 Pro and a strategically place spotlight with a gel.
It couldn't possibly work better, that is what I did :coolsmile:
I tried a gel also, but looked bad because I couldn't get the gel to match the window.
I just got done running the window texture through Genetica and really amped up the color. But it didn't help.
Here is the actual scene, I want the colors from the window to be seen in the beams and on the floor, blew the sene for me because I couldn't ever get it to look the way I wanted.
Give me a few and I'll put a render up of the scene I was really wanting sunbeams for.
crepuscular rays ;-p
I was under the impression that the sunbeams and light cones 'are' volumetric effects.
Anyways, have you tried ramping up the atmosphere as Tim suggests? It might work that way... not sure. For small scales like that. I would simply use a separate spot for each beem needed. Each been (light cone effect) can be set to the desired color. I do this fairly often as it's faster than forcing a shadow from some object. Set the angle to less than 9... 9 being a super wide ray or beem. You can set the cone color within the cone effect, I guess... but I've always left that white (default) and let the light color set the color of the cone. Like for woods scenes, I's set the color to yellow-green with around 45-60% saturation, depending... leave distance all the way at 400 and get the spot high enough, yet low enough for easy control, set the angle to 4 and angle falloff to 30 and play with the cone settings. I think I left the intensity at default and just used falloff in the cone effect to dim it down to where I need it. Once I think it looks close, I 'Ctrl D' (duplicate) and translate it to create a supportive cone to the original. Repeat this a few times and go in and change the angles slightly, and the falloff and brightness in order to get a really sweet effect.
I'm not sure the cone is a true volumetric effect. It could be close when you enable the light through transparency and shadows options, though the shadows use a buffer, so I'm not sure if the effect is more akin to a shadow buffer?
The sun beams I think are closer to a volumetric effect. The light cone won't respect a volumetric cloud, but the sun beams do. Probably why it takes so long to render. All supposition on my part, so take it for what it's worth.
mmm Sunbeams in Carrara? %-P
I had a mixmaster but the motor burn out
most my appliances are Breville or Kambrook
but maybe I could model an electric kettle?
oh, not that sort of sunbeam!
:facepalm:
I know it is evening for you Wendy; but it is too early in the morning here for that sort of pun... %-P
No the light cone is not volumetric lighting. It may render in scene now but it is an AE like aura.
I finally managed to get the color to come through using a gel, but had to amp the the light up to 500%. In the scene I am working on there is no building, yes it is an interior scene, but if it were in a room the cone light would light up the distant walls behind it. This is why it is an effect and not volumetric lighting. If it was it wouldn't light things up that aren't in the spot light. This is a bug with the AE light cone. Items on the opposite side of the cone from the camera light up, even though they are not in the light cone.
When I set the light to affect "Only" and then select nothing, then nothing lights up from the light, but I still get the cone.
ManStan is referring to any objects behind the cone being brightened as if they're under the cone. I'll have to see if I can find an example where I had that issue...
Hmmmm.... Can't find an example that I did. I learned early on to ratchet the whole effect down. If I want a light streaming through a window with a sun beam or cone effect, I usually use a volumetric cloud as (surprisingly) faster to calculate than a light cone with shadows and light through transparency enabled.
Here's a couple examples of getting light cone like effects using tight spots and volumetric clouds.
ManStan is referring to any objects behind the cone being brightened as if they're under the cone. I'll have to see if I can find an example where I had that issue...Oh... I know what you mean... perfectly. I've usually found that a small price for the effect though. Try making the effect much more minimal. (Did I just say more minimal instead of just saying... "Less"... OMG, what's happening to me?!)
Great images EP!
On another note, I was amazed when I was shooting promo images for Starry Sky for Carrara - when I just tried sun rays for a quick experiment. They came into the low, sun scene without a fuss, and looked great! There are times when one doesn't need to jump through too many hoops... but in order to find those sweet spots, I think we need to start with settings like what Tim Payne describes, and work backwards.
Actually that is just what blows the effect for me. If you drop your ambient light to 0 it usually fixes the issue; but you may not want your ambient light set to 0 for the scene. I will have to admit it isn't near as bad as it used to be.
Here's my take on God Rays. Light Sphere, Light Cone, and a noisy gel.
And remember, God is Cow spelled sideways.
Actually that is just what blows the effect for me. If you drop your ambient light to 0 it usually fixes the issue; but you may not want your ambient light set to 0 for the scene. I will have to admit it isn't near as bad as it used to be. Yeah, what I was doing in an enchanted woods scene and what you were doing here have entirely different needs... I agree... sometimes they can give you just that needed effect - sometimes no. I really think that the God Rays function was designed to be used with the atmospheric affects of the realistic sky, and I think it was even meant to be using the sun light as it's source. That's just me wild-guessing though. Tim Payne's findings of scaled up atmosphere with more density in the air makes sense though. Did you try that stuff in your example? In the image in my first post, he has the atmospheric scale at 1 mile = 4 miles. Then I believe he cranked up the haze altitude to really bring them out.
One thing I've always noticed in God Rays I've produced on my own, and again with this example from Tim, is that it's a very grainy effect. Probably more so than what would work the wonders you're looking for.
From a different perspective:
I have always preferred doing FX and such straight within Carrara. But with Dogwaffle's ability to stabilize motion, and FX, make changes, etc., and then put the motion back in is really making me rethink my animation strategies. Rotoscoping in it is super simple (and actually very fun!) and gives you an unlimited variety of options on what you can do with your scenes.
Again... nothing to do with the fact that some of Carrara really should get a bit of help... but I still think it's an awesome Softy!
But I'm really convinced, now, that Dogwaffle is Carrara's missing element that makes it complete.
It will now get me to watch through the special features discs of the extended version of the Lord of the Rings - and watch how excited those guys were when they discovered digital grading. Many of the things I just learned in Howler reminded me of the exact techniques they were using. The code master/developer of Dogwaffle, Dan Ritchie, is a special effects guy, himself. No wonder we have such awesome tools through his hand.
The new Howler uses the latest Microsoft GPU assist code and was developed using Windows 8 - to be sure of compatibility. Where computers simply can't use the enhancement, either because of a motherboard-integrated graphics solution - age of computer, etc., (Win XP and 7 should work perfectly if they don't have some bizarre grafix card) it will simply function as it always has before the enhancements were made. They include filters, rendering options and plenty of FX, not to mention a bazillion other features that can truly post the heck out of your stills and animations alike, and is incredibly quick at it - even in rendering across animated frames.
It can open avi and sequenced image files, and save as either, no matter what the original was. You can resample to a new size, change the frame rate... yeah... it's Bomb!
God rays? You can apply them directly (with controllable values, of course) from the brightest values within the image. Switch it around and you can cast from the dark instead! That's simple in Howler! You can just keep editing to your heart's content!
Poop. I'm going on again...
"Have you ever....."
Well I like the way this one turned out. The top one uses the actual Sun Beams. Not enough haze, I guess, to get them to go downward. But they shoot through the clouds nicely, I think. (edit: Shows up a lot clearer when clicked for full size)
The bottom one uses light cones like I described earlier.