I am totally confused on how to do an internal render in this specific scene! :(
 launok
Posts: 793
launok
Posts: 793
It's some time that I have last done a render in Bryce and have literally zero knowledge with internal room renders.
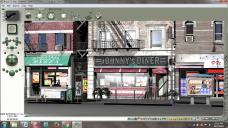
I want to do an internal render of the 'Johnny's Diner' with an outside view through the front of shop, i.e. people sitting close to window peeping through shop window and have a glimpse of street, etc. Even to do an internal scene with pizza shop, or whatever other internals of buildings with views to outside through doors, windows, etc.
But this is here where I am totally lost! I assume it's to do with the camera setting ... or am I wrong? By moving the rotate doesn't seem to work as it just moves the building in another direction. I really have to top up my skills as surely there must be a solution but I have no idea on how to do this, leaving me feeling quite embarrassed. 
Daz 3D is part of 
Connect
DAZ Productions, Inc.
7533 S Center View Ct #4664
West Jordan, UT 84084
Licensing Agreement | Terms of Service | Privacy Policy | EULA
© 2025 Daz Productions Inc. All Rights Reserved.
Comments
Launok, I'm probably getting your intentions incorrect, but if you want to move the camera (in your Top view), then you simply click on the camera itself (it turns red), and drag it over the proposed inside building position of your choice. Still highlighted, you can then rotate it to look outwards of the buildings (through switching to the EDIT mode), or, adjust its position in many other ways through the View Options arrow (the small, second-most down arrow on the left panel) - using, say, the Right, Front...etc., view options. Note, once the camera, or, indeed, any object, that is highlighted (clicked-upon), you can use these view options together with the rotating options for best results/positionings.
PS. Try changing the camera viewing options also from, say, 60 to 80 - much better (how? click on camera, click on A, change FOV from 60 to 80, click ok - arrow on bottom right). Note, you can also use this FOV setting for further viewing effects - experiment/change...etc.,, why not :)
Jay
@Jamahoney - thanks for the hint.
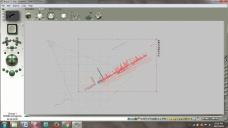
But since this is the 1st time I am trying something like this, I am still clueless. I have moved the camera in top view on top of the area of the particular 'diner' but cam is way big. I thought one can resize it to fit only into a certain area but it seems not. Can it be resized to fit only insize the particular area? It's more or less on top of the diner. See attached image showing how big the camera is. It's a row of shops of which diner is only a part more in less in middle of row.
Are you certain that you're not suffering from the Director Camera vs Camera issue? Remember that the Diretor's Camera will always trangulate the center point of the geometry within the scene to determine its orbital center. Objects placed far away from center can cause the orbit of the directors cam3era to become very odd indeed. The Camera by contrast remains localized and doesnt rotate around any imaginary center points. For the type of work you are doing its probabloy best to use the Camera.
@Rashad Carter - I don't know why I keep forgetting that there are some videos to have a look at 1st before trying to do some advanced work. And as I remember you also have a thread on here regards lighting, etc. As I am actually more of a beginner, best to do is get past the learning part 1st! The camera I have used is the default camera in the scene.
I also ran across a thread about Bryce Cameras and will have a look at that too.
Just another question, when I am in top view I can get some scenes close-up only to a certain point, i.e. as shown in the image. It don't want to bring the model closer and also I can't move the close-up around to get another view (top view mode). For instance, I want to move the model as in this close-up to get to another part (still in top view) - all the "move" handles to left of Bryce scene is then locked. Is there a reason for this?
I'm sure Rashad won't mind if I step in to answer: the movement arrows only work when in Camera or Director Camera mode. Yes, there is a limit as to the zooming process (annoyingly, I know).
As to moving around during a Top View (or any view, in fact), press and hold down your spacebar (the cursor arrow changes to a fist), and then simply move (holding your right mouse button down) the entire view to the area of your choice.
Note, about the Camera: if you zoom out, you'll see two grey lines resembling a V that like the red camera itself point in the same direction. This vertex point, where these two lines meet, is the exact point of the camera (e.g. the lens-point of, say, a normal camera), so positioning that vertex point over the area you want to be at is where the view will be from.
Two hints: (1) Setting up the camera, positioning it etc., is really a trial and error task, so you may have to be changing back and forth between view options, zoom options etc. (2) If you look at the top left-hand corner of Bryce, you'll see a small series of green bars, which, when singularly-pressed will 'capture' the image-view that you are currently looking at.
So, if you like a particular view, click the first bar (it will record that current view). Say, you play around with the view, and you like the changes, click the second bar (it will record the new changes). But, say, you don't like the changes afterwards, you can always go back to the first view by simply clicking on the first bar (note, there are several bars for recording several views).
You will see how handy these bars are, only when you experiment about with them. And that's what it's all about in Bryce - firstly, save your work, secondly, experiment - it costs nothing.
Jay
When in any iso view (top, left, right, etc), hitting the + and - keys zooms respective unzooms the view. This is not helpful if you have a big grouped object selected. Hold down the ctrl key and click on the group and a list of nearby single objects in the group appear. Select the one you want. With + and - the zoomed view centers on that object.
After you zoom in using the +zoom tool, hold the Ctrl and Spacebar keys then click drag a marquee in the area you want to zoom closer. If you want to zoom even closer hit the render button, stop the render then without holding any keys click drag a plop render area, hit the drop down arrow next to the plop render marquee and select zoom into area. This is a close as Bryce will zoom in any ISO view. Then use the display mode tool ( the box above the zoom tools ) to go back to wireframe view.
I do a lot of camera placement by using a tracking object. Create a sphere then on it's attributes menu make it hidden. Then select the camera and on it's linking menu ( tab ) select it to track the sphere. Now where ever the camera or sphere is moved the camera will track the sphere. Put the sphere on the outside ( in the road ) in front of the window you want to see through. Then bring the camera to the inside of the room. This should get you close to the position you want the camera. To really fine tune the camera's position go back to the Linking tab and select the camera to track none. Which will give total position control over the camera.
Many thanks to all who have give me help in this regard. I appreciate everyone's input and advice.