InaneGlory's Photo Studio Lux and the Photo Studio Bundle - Now Available [Commercial]
 InaneGlory
Posts: 294
A couple of years ago while crossing a lake in a kayak, a few different thoughts and ideas I’d been having on lighting coalesced into one cohesive vision. That vision became the basis behind what became the original Photo Studio. And while Photo Studio 2 and 3 both expanded and filled out the core concepts behind that idea, there was one aspect of my vision that never really came to light until now.
Part of the idea was always to create a set of lights that would work across boundaries. One set of lights that would create the same light in different software platforms. That was the dream and until recently it has remained just that, a dream. At first I tried The Photo Studio lights in Poser. P8/PP2010 was still all bright and shiny new at the time and Area/Mesh Lights where a brand new feature in Poser but there was no joy down that road. The differences between how the Area Lights worked in the 3Delight and Firefly render engines where just too great to bridge. What worked wonderfully in one platform wasn’t so great in the other. Dejected, I put that aspect of the vision away and I worked to make the original Photo Studio lights all they could be in just one platform (DS). Then Reality came out and I dreamed the dream again but it wasn’t to be. While the lights would work, most of what made them special got left behind in DS, and you had to set everything up by hand in LuxRender, every time you wanted to use them. Workable, but not the quick easy, reliable results solution I was looking for either.
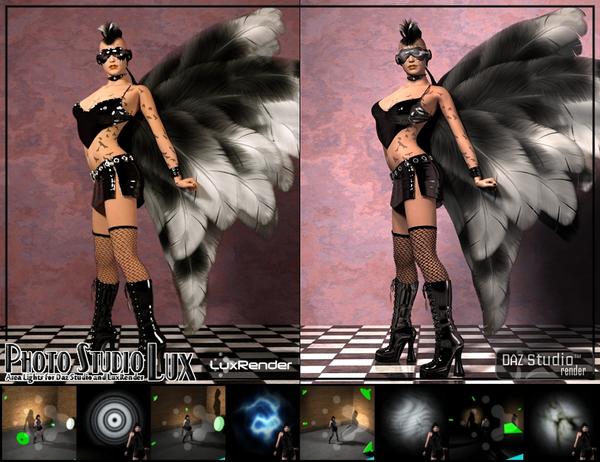
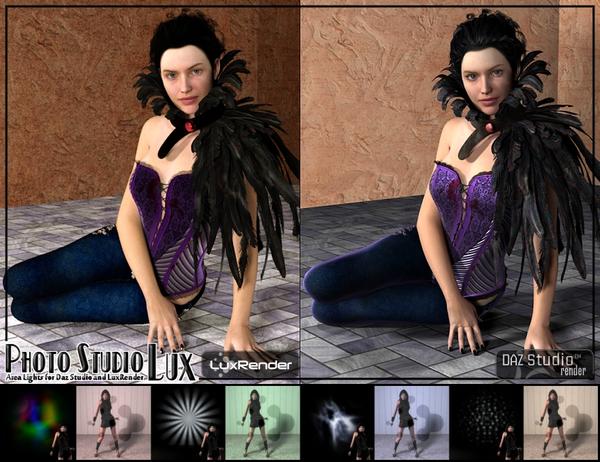
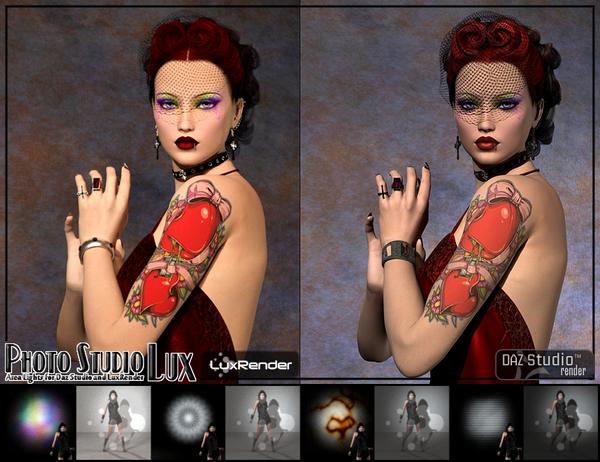
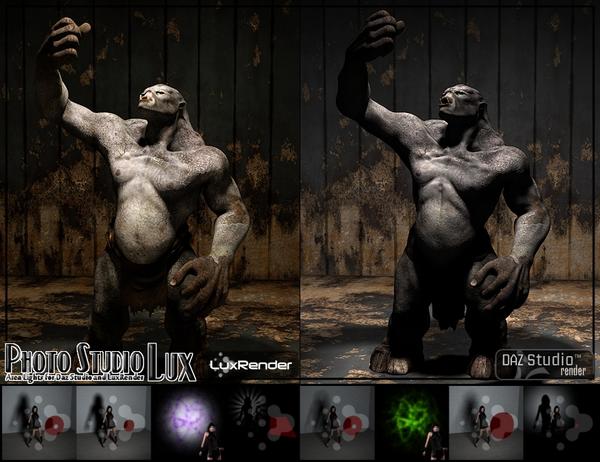
But now with the ability to create LuxRender materials from within DS that the Luxus plugin provides I can finally do what I’ve always wanted. In fact, I can do more than that. I can give you one single set of lights that will work perfectly in Daz Studio and also in LuxRender. Here are a few comparison render in both DS and LuxRender. On the right are promos from the original Photo Studio sets, on the left are re-renders of the (mostly) same scene using Photo Studio Lux and LuxRender. Now the one thing you need to keep in mind is I’ve been using DS for over 7 years now, I know surfaces and lighting in DS like the back of my hand. LuxRender I’ve been using less than a month. Lighting, I’ve got a real good feel for, surfaces not so much. Lots of what you see are actually default Luxus texture conversions.





Comments
InaneGlory's Photo Studio Lux
Price: Intro Sale Price $9.07
Release Date: 05-03-13
Photo Studio Lux will be a fully stand alone item (requires Luxus) but will also be a companion set for the other 3 Photo Studios.
A User Guide is included in the readme folder
InaneGlory's Photo Studio Bundle
Price: Intro Sale Price $48.27
Release Date: 05-03-13
Includes:
InaneGlory's Photo Studio
InaneGlory's Photo Studio 2
InaneGlory's Photo Studio 3
InaneGlory's Photo Studio Lux
All the installers have been updated to load into the same folder and all the users guides load in the read me folder
Looks great. Might have to pick this up! :-)
Here are a couple straight renders from LuxRender
Some images made with a beta version of Photo Studio Lux (posted before)
Personally, I like the the ease of use of the lights in this set. You can pick one of the presets and do some quick and easy adjustments and ready to go. Or select individual lights and make your own setup. A small DS preview render will give a good impression if the lights are positioned right. And once exported to Luxrender, you can do some fine tuning with the lights (colour, gain and - my favourite - black body temperature). Just don't forget to enable the Luxrender GUI in Daz Studio/Luxus.
For my renders, I used a fully enclosed space, Now while this may slow down the S/p count somewhat (takes more time to calculate the samples), in my experience it also reduces noise much quicker due to the higher Efficiency rate, In other words, more bang for your bucks...
And don't forget to try the various film response settings.... that's the nice thing of Luxrender; make adjustments while rendering and watch the effects....
(No experimenting done with the skin of the characters, a straight conversion of US2 materials by Luxus. So far I've not yet been able to get better results with all the various settings mentioned in other posts, still need a lot to learn in that area. Only done some minor adjustments for the eyes )
Excellent renders glaseye! The girl with the dog is quite charming, and I like the rim light a lot on the other one.
cheers!
I can not count the times I have used Photo Studio 2 and 3 in DAZ Studio.
Lux users are in for a real treat. :)
this sounds interestiing :)
Do I have this correct? TBA > Soon ?
Having purchased Studios 2 & 3, I would purchase this new set in a second.
Soon has always been kind of a dirty word around here so I generally avoid using it. And at this point I'm not exactly in control of just when but I believe it should be 'soon' as in sometime next week. At least that's the info I have right now :)
As promised... Purchased this morning and already have been playing with this.
These lights are wonderful, I wasn't getting anything at all pleasing out of lux until I used these.
Here are a couple of renders
Here's a couple more.
Couple more.
Wow Scorpio, those look amazing!
Dang Scorpio, every time you post a picture, I take a hit to my self esteem. You are a true artist. Excellent images, as always.
Thank you both, the lights are a pleasure to work with as always. I think if it hadn't been for thee Luxus would have been one of those things that sat on my computer unused.
An other one.
great pictures scorpio64dragon.
can you tell me what model (skin) you used for the red head in the first post? those freckled skin looks wondelful.
Thank you R25S, the texture is the Elite Amy one for V4,
http://www.daz3d.com/v4-elite-texture-amy
Oh; I have Elite Amy but never noticed that she had this beautiful skin... maybe because the resolution of my renders wasn't high enough... (I have to try higher resolution)
Thanks for the Info
Amy is one of my favourite textures.
I added a point light to this one for the candle.
I just bought the Lux set and I am looking forward to trying it out. I will post a render as soon as I have a chance to play around. I think this lighting solution is going to be a perfect compliment to the work I've been trying to do with skin settings.
Cross posted from the Luxus discussion thread
I used Photo Studio Lux for this render.
Very pretty
While testing Photo Studio Lux with backdrop props from Photo Studio 1-3 I started noticing that the background always looked very dark. It first I thought it was my ineptitude with LuxRender materials that was the issue but in the end the solution was simpler and more basic than that. Backdrop Lighting. Normally this is a staple in any photo studio setup but because of differences in light in Daz Studio usung a backdrop light isn't normally necessary. In fact most of the time your fighting to keep to much light off the backdrop. The basics of using a backdrop light is pretty simple, select one of the individual lights and place the light (or lights) between your subject and the backdrop facing towards the backdrop. You can place them to the sides or above or down at ground level just outside the frame of your camera.
Here's an example of a picture with and without backdrop lighting
- Both of these are unfinished WIP pics used just to illustrate the effect of backdrop lighting.
Thanks for including these instructions for those of us who are lighting challenged! That being said, I kind of like the unlit backdrop in this case. The backdrop lighting kind of changed the lighting on the girl, and the texture of the backdrop has a cool grungy look in unlit render. But I'm sure most of the time this would not be preferred.
IG, I'm trying to understand the concept of gel lights. I've never used them before. Is the idea similar to a gobo like we used in theater?
I bought it this weekend and try a little scene...
Another experiment with Photo Studio Lux and Luxrender.
Came to the same conclusion as InaneGlory regarding background light; for this render I started with the X1 set, but added an additional softbox for the background lighting.....
Again no experimenting with lux materials on the skin and hair- just US2 mats conversion done by luxus - but did experiment with the eye-materials, clothing and jewelry... (I guess I overdid it with the eyes..)
About 900 S/p but needs a little more.... (still some noise left)
For reference a screen capture of the scene setup, a fully enclosed room, but with the side wall set invisible for this screencap
The 2nd softbox isn't visible as it is position inside the 'window prop' , the backlight is behind the prop, shining through it.....