Mele Kalikimaka - need help applying custom shaders to plant model trunks
 Diomede
Posts: 15,182
Diomede
Posts: 15,182
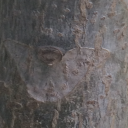
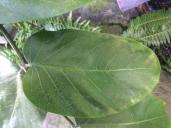
I went to the botanical gardens and took some reference photos of some Hawaiian plants. I used the photos to create leaf models, uvmaps, and texture maps. So far so good. Having a lot of trouble with the trunk. How is the trunk uvmapped? How do I use my trunk reference photos in a way that does not look like crap?
I have attached one of the reference photos of one of the trunks, and one of the reference photos of one of the leaves.
I have also attached a test render of a plant modeler trunk and of a plant modeler branch of leaves.
Meanwhile, Bing says Merry Christmas from Hawaii - which is where I wish I was.


Daz 3D is part of 
Connect
DAZ Productions, Inc.
7533 S Center View Ct #4664
West Jordan, UT 84084
Licensing Agreement | Terms of Service | Privacy Policy | EULA
© 2024 Daz Productions Inc. All Rights Reserved.
Comments
you may need to use Philemo’s triplaner plugin, can convert a tree to a vertex model to see how it is UV’d
I thinkit is box mapped and rather messy if I recall, most textures need tiling to look anything
Thanks, Wendy - good suggestion. Will take a look at the triplanar. I remember plants being one of the first topics brought up when the triplanar was being discussed.
After taking apart some plants from Howie Farkes, it appears that a tiling ratio of 3:1 for default tree size/shape might be OK to start with. For example, here is a bark applied with tiling of 6 vertical to 2 horizonal. Not there yet, but much improved. May be affected by some of the plant modeler settings. Maybe a non-issue if the triplanar works out.
Hi Diomede,
You may envision triplanar projection as if your object was a mirror and surrounded by a box where an image would be on each side (the object bounding box). It would reflect one or more images depending of its normal at the point.
The advantage for tree is that it is consistent for trunk, level 1 branches, level 2 branches and that junction between them is smooth. On the other hand, as the image has to cover the complete side, it doesn't prevent you from having a tiling texture if it doesn't cover the whole tree. In this video https://www.youtube.com/watch?v=b9hNcvCksPg, I use an UV transform of 0.05 which is the same as tiling it 20x20.
Strangely I'm texturing some trees at the moment!
The mapping is essentially that the trunk fills the UV square and the branches fill the UV square. So your image needs to be the height & circumference of the tree. Typically bark textures come in 2:1 or 3:1 ratios (e.g. 2048x1024). You'll need to edit the texture so that it's tileable with no obvious seam (ie right edge matches left edge, top matches bottom). Apply the texture. You'll need to tile it vertically, more or less depending on the size of the tree: 3 vertical & 1 horizontal is probably a good starting point. The 'seamlessly' checkbox flips each alternate tile, you'll have to see for yourself whether it looks better checked or unchecked. If you only photographed one side of the trunk, you probably need to tile 2 horizontally (unless you doubled up when editing the texture).
I generally go through several iterations of texture & tiling before I'm happy with the result. Once you're happy, don't forget you'll also need a bump/normal map, and maybe specular & gloss maps too.
Thank you, Philemo and TangoAlpha.
I am using the standard tree, but I think ramified would be better. For some reason the "ramified" tree shape is not allowing me to change the number of branches. So, I used the standard shape instead, increased the internodal length on the trunk and unchecked tip. I think this might be one of those move backwards to move forwards moments. I took my reference pics of the trunk in photoshop and tried to adjust on a filled background. Some of the correct detail can now be seen on the trunk, but other trunk areas are not so good. Really struggling with this one and haven't even gotten to the cool flower strings yet. Definitely making progress so I appreciate the help. This is the tree with just one leaf.
Here are sme pics from the web, as opposed to my closeups from the botanical garden.
It can be hard to offer advice without actually seeing (an image of) what the full trunk is supposed to look like when it's done.
For example, to me it looks like the trunk texture photograph is taken of a single, specific detail of only part of the trunk, which now is getting tiled, making everything look weird. When Garstor, evilproducer, and I were out taking texture photos in and near Madison, there were those times when something was so unique that I just needed to grab a shot of it. But then I'd also grab a bunch of more ordinary photos for doing main textures. I actually even think of making tileable maps as I shoot photos. It's one thing for the edges to tile together nicely, but if the center is completely different, that difference gets tiled.
That second attempt looks much better to me!