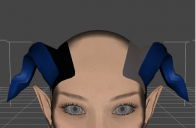
Transfer utility deforming my mesh
Hi All
I have modelled a set of horns that i intend to GeoGraft to a character.
using the transfer utility to fit the horns to the head is deforming the horns, i have tried a bunch of different settings combinations that would make sense, but so far no luck
hoping this is something simple that i am overlooking, i dont have much experience with these types of tools in daz studio
attached two pictures to show the before and after, you can see the deformation before the horn tips
appreciate any advice


before.PNG
642 x 326 - 220K


after.PNG
645 x 422 - 227K
Post edited by joseft on


Comments
Did you model around the base shape, or did you have any morphs applied?
i had all my character morphs applied, but it was at base resolution
i exported the morphed character at base resolution, duplicated and cut two pieces of the head mesh off, and modeled the horns into that, keeping the outer ring of polys in original state for geografting later
Do the morphs have something to do with it?
For a GeoGraft it is essential to model with the base shape, otherwise the weld vertices are almost certainly not going to match up when the shape is reversed out by the Transfer Utility (not to mention that a model that's distant from the base mesh is likely to be harder for DS to reverse cleanly).
I guess i should have thought of that before i started, good to know.
should be easy enough to re-do the base part of the horns from a re-exported character using the base shape
Thanks Richard
Well i originally though it worked, however it all worked well fitting to a base character in a scene, including the graft. But when i saved the horns as a figure/prop asset into my library, and then attempted to apply them to my morphed character, i run into the same issue. Horns deformed and graft doesnt sit right
Does the deformation go away as you dial the morph out? It could just be the way it is projecting the morphs into the horns - especially as the ears will be having an effect. You may need to also create a custom morph (for which your original model may work, if you kept the mesh the same). Also, are you sure th vertices around the graft exactly match the vertices on the zeroed base figure to which they must weld - it doesn't take much difference to break welding.
it is the ear morph that is causing the deformation in the horns. Dialing it out fixes that. edit - i got around this by going to parameters - display hidden properties on the horns, and manually dialing down the transferred ear morph on the horns to 0
as for the graft, i was sure that vertices around the edge were matching - when modelling it i cut one side base piece off the head, without moving it in any way, then attached the horns to it and mirrored the whole thing across to the other side to get two horns. The outer most ring of polygons had no interaction at all. I used wireframe view to check it, and it certainly looked like it all lined up. I will try again and use vertex snapping on all the outside verts to make sure
or maybe its possible i am missing a step in the geograft process?
fit using transfer utility
select horns outside polys in the geometry editor - > Geometry Assignment -> set graft faces for attachment
select character all polys under the graft area -> Geometry Assignment -> set autohide faces for attachment
save to library
is there something else in there i should be doing?
I think that sounds right. Mirroring dos assume that the base mesh is symmetrical and that relative order matches - it might be better to work in your modeller's symmetry mode (if it has one that isn't equivalent to deleet and mirror) rather than flipping a one-sided mesh.
ok, i tried again after trying vertex snapping to ensure all outside verts were in the correct positions - didnt work
then i tried re-making the base part of the horns, this time cutting both sides out together and re-attaching both horns to the base parts using symmetry, avoiding the mirror function - didnt work
this is rather infuriating
scratch that - fixed it!
turns out the two tutorials i had looked at were missing some steps. After some more searching through the forums i found another thread with some people having similar issues to me, turns out the two tutorials i had looked at were missing a couple of steps in the geograft process. Or maybe it changed at some point.
thanks for the help
I am not sure which of the extra steps was the solution, or if all are required
But basically in addition to the steps i was using above:
when using transfer utility check 'content type' and choose Follower/Attachment/-bodypartwheregeograftresides
Convert geograft to SubD after using the transfer utility, then set resolution on graft and figure back to base
after doing the geometry editor steps further above, you repeat with genesis character selected, but this time select the ring of polys outside/around the geograft area (instead of underneath it) - Geometry Assignment -> Set Graft Faces -> geograft
i suspect that the final step there is what solved it for me, converting the graft to SubD i think just makes it behave better once grafted and you are using subd on the figure