questions about UV mapping (Update: and everything else!)
Edit: I'm using this thread for general questions about 3d modeling instead of starting a new thread every time. For the most recent crisis I'm dealing with, scroll to the end. Thanks
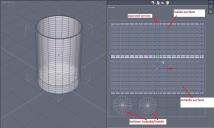
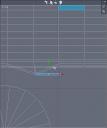
1. So I'm mapping a simple glass as shown in the attached picture. As I was unwrapping the UVs to make a map, I must have separated it in too many places. As you can see in the map, there is a line of vertices straight down the middle that are separated, even though they occupy the same space. I can't think of a better way to describe it. Anyway, the other picture shows that I can grab one of the faces and pull it out and you can see that it's not connected to the adjacent face. Is there any way to weld all of these back together? I just want one continuous map going around the glass, like a label. If not, is there a way to reset the whole UV map and start over?
2. Is there a way to get Hexagon to export a higher resoultion UV map? It only gives me a 488x488 image.


Comments
I think the problem you have has something to do with smoothing, its only a guess but I've does this myself. It seems to occur when you add a level of smoothing (just to see what it will look like) then cancel the smoothing and carry on modeling, Hex does not remove all the point (notice the dark blue points running down each side of your first arrow).
You can weld the points, move one of the points then press the "W" key and click on the point you want to weld it to. But, it may be quicker just to start again from scratch.
If my guess is right you can try the clone tool. You clone the object (edit menu), move one of them then add a level of smoothing, both will be smoothed, cancel the smoothing on your working object and keep an eye on the smoothed clone to see how the changes will look like.
At the moment Hex does not save out decent map sizes, have a look at UVmapper Classic or UV Viewer.
Sorry for the late reply. I had a family issue today. Those blue points running down the line represent the vertices that have been separated. I can click on each individual dot and pull the vertex apart as shown in the pic. I was just hoping there was a way to weld those all back together at once. I could do it manually, separating each one just so I can weld them together properly, but it just may be easier to start over. I'll just have to be more careful unfolding the UVs next time. Thanks for the help. Happy New Year.
Look up disassociate for Hexagon. Some how that has happened to your vertices.I don't know how to use UVmapping in Hexagon. So I don't know if it can be repaired from there.
Yep, I think I disassociated when I only should have unwrapped. I think I'll try UVmapper.
UVmapper is only for saving the UV,map. You unfold the object in Hexagon then save the object as a HXN and an OBJ. Then with UVmapper you import the obj and save the map out what ever size you want (square so 512*512 etc).
There are UV tools out there which will do the job, but the free ones are not as user friendy as Hexagon.
Unless someone out there knows better ?
Personally, I'd wait and see if the new version of Hex has better tools for mapping (fingers crossed).
I redid it and it worked. I was confusing unfold and disassociate on the other model. Anyway, the only problem I have now is the decal showing on the inside of the glass. I think I'll just have to make a blank copy of it just inside, to block the back of it. I don't think there's a way to make polygons only have a texture on one side. It shouldn't be hard to work around, though.
I think I'll be ok with UV mapping in Hexagon for now. I just have to remember to be patient and save my file before I make any big changes.
Insert a curved billboard in the glass to cover the images and give it its own texture.
Ok. I never thought about putting it inside the glass. I just put it right outside the surface of the glass, like a real decal. I guess inside would be better. No one should be rendering it close enough to see the difference, and it's probably simpler.
Under "Tools" there is the utility to "weld" the dots on the uvmap. Nothing to do with our uvmapping skills, it just happens now and then. It can happen intentionally too if one uses the dissociate option.
I made some more progress on my keg project. I decided to render the keg in one of it's natural habitats, a college dorm. Anyway, I tried to create some ice, but didn't do so well. I tried taking a flat surface, grabbing random edges and verices and pulling them up to create a jagged surface. The result looks like ice that melted and started to re-freeze, not really what I wanted. I thought about using support on copy, but that would make all the cubes facing the same way and it wouldn't look random. Or I could clone an ice cube and place them all manually, but I'm wondering if there's an easier way. Anyone have any ideas on how to create a pile of ice?
Thanks. I got the UV map problem solved. I'm working on the beer keg/ice problem, but I didn't want to start a new thread. I tried using support on copy and like I figured, it made all the ice cubes lined up too neatly. I want them to look random. Plus, the individual cube meshes collide with each other which will probably lead to other problems later. I may just have to clone a cube and position all the clones manually. *sigh*
It wont be easy, but I think I'd try using a grid (a very large one) then using a circle(s) on top for reference, delete the faces not needed. Then extrude random faces.
Subdivide your disc several times, then decimate until you're happy with the mesh. That gives you random faces to copy onto.
That said, which version of Hex are you using? In 2.5.2.137 the copy-on-support tool seems to be broken.
I'm using 2.5.2.137 64-bit. That was my first time using the s-o-c tool. There's a good chance I don't know what I'm doing.
I'll give both suggestions a try tonight. Thanks.
Meh! Then you try and learn. You've got results. Now go and make better ones. Try it with less elements. Try combining multiple copies with different settings. Try doing it with some more different shapes.
Same version here but for some reason for me it only ever copies onto itself, not on a different object. Strange.
I think I see what you're talking about. Select your object to be copied first, select support on copy icon, then select the surface you want to copy to.
Edit: Also, you have to be in object selection mode (as opposed to faces, edges, vertices.) It should work that way.
Today I learned:
Poser has rigid body physics.
I also learned:
Every object has to be duplicated and positioned manually before the simulation is run. I may have carpal tunnel syndrome/repetitive motion injury. Is that what it means when they say you have to suffer for your art? Anyway, dry ice cubes are a step in the right direction, I'll have to work more on this later. Thanks for viewing. Comments are welcome.
The thing that kills me about Poser is that I can't grab a bunch of objects and move them all at once. If it was possible, I could just save the scene, then move the cubes to a slightly different location, then save a different scene. Then when I merge both scenes, I'd have double the cubes, ready to simulate.
I guess for now, what I have is pretty good. If I add some water droplets to the metal surface and put some glossiness on the cubes, it'll look more convincing. Most of the ice should be in the tub surrounding the keg and I think that part will be easier.
I remember doing something similar with ice cubes using Carrara Pro 5.1's physics engine and a replicator plugin.
Nice. I'm going to get Carrara next time I can catch it on sale. For now, I've been sidetracked by another project, but I'll get back to this one soon.
I finally got around to modeling a tub and some ice for the keg. I decided to use instances to replicate the ice cubes, that way it would be easy to make changes later on if necessary.
It's a bit on the heavy side at around 20,000 polygons for the whole thing, so I guess I'll have to try to keep that under control in the future. I'm still planning to do 3dl textures then hopefully release it as a freebie. Thanks for looking.
Quick question(hopefully). How do I package/save a group of assets that are supposed to load together? For example, I have the tub and water as a single prop, then the ice is a separate group of instances that goes inside it. But when I go to Save As>Support Asset>Figure/Prop Assets, it only saves a single prop at a time, so the tub, ice, keg, pump, hose would all have to be loaded separately. Isn't there some way to make multiple items save/load together, kind of like a clothing set would?
I tried Save As>Support Asset>Scene Asset(s) and it sort of does what I want, so I guess that works for now. It created another directory containing the separate props. Do I have to keep that or can I just delete it?
Kitsumo, it is the Support Asset route. This is a question for the DS forum (if the MOD isn't watching, I'll try to answer).
You create a folder where your Keg is going to be stored, beneath that you have another folder called (for example) Zeroed Props. Inside the Zeroded Props folder you have each part saved at 0.0.0.
Then you create a group and place all the objects into it. Move each part into position (here I normally save the scene in a working folder just in case I mess up). Go up to the Main Keg folder and click on the "+" and save as a Scene Sub Asset.
Hope that helps - WDJ :)
Thanks. I'm going to try this today. For some reason I have more trouble trying to package the product than I did creating it.
It may not have worked so well for the ice, but it's great for salting margarita glasses! I tried using soft select to pull some of the lower faces downward, so the salt cubes would fade out gradually, but it always ended up crashing Hexagon. This is the best I could get with this model. Next try, I'll be more careful with the polygons, plus make the salt cubes bigger (and use the right type of glass for a margarita) but at least it works.
I'm not going to suggest bump maps because I think you're having fun experimenting - the best way to learn :)
Bump maps on the glass surface or the salt crystals themselves?