I need a bit of help...
 static
Posts: 325
static
Posts: 325
A lot actually, but that's another story...
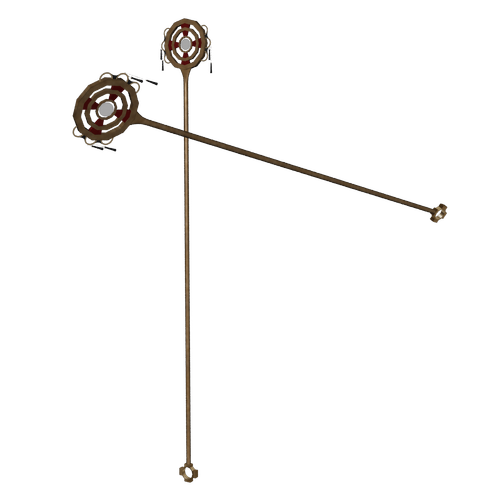
I am trying to find out how to modify an existing prop. The prop in question is the Staff from the Magus set.
The staff looks kinda cool and all, but if your wizard holds it at any kind of an angle, its problem becomes readily apparent. The four dangling bobs on the head of the staff do not, and cannot be made to, conform to gravity.
I want to change this, but I can't seem to find a tutorial which tells me how.
I need to, as far as I can tell, add bones to the prop so that I can give the bobs this ability. But, how?
Any help would be greatly appreciated.
Daz 3D is part of 
Connect
DAZ Productions, Inc.
7533 S Center View Ct #4664
West Jordan, UT 84084
Licensing Agreement | Terms of Service | Privacy Policy | EULA
© 2025 Daz Productions Inc. All Rights Reserved.
Comments
I don't have a tutorial... but have you considered maybe just hiding the "bobs" with the alpha channel in the shader...
...then parenting some other danglies to the staff? If you are animating you could do a whole physics thing on them..., but for stills you could just set the hotpoint of your new danglies where they would attach to the staff, then use the rotate tool to tilt the new danglies -- either pointing to the ground or turned like as if in motion.... You might even be able to add a POINT AT modifier to the danglies so they always point downwards or to an invisible helper object....
Maybe it's just me but I think that might be easier than bones.
OK, well that sounds a bit complicated to me. Understand that Ihave only recently gotten into doing more than just moving pieces around a scene and posing characters. When it comes to doing actual work in Studio or Carrara, I am a complete newcomer.
I am probably wrong, but I was under the impression that adding bones, and rigging models was a simple task, but I couldn't find any tutorials on how to 'open' the project. But I gather from your response that there is more to it than that.
I was watching a DAZ YouTube video on making a sash more flexible, and all he did was add a bone to it (I think), but when I tried to do it myself, I couldn't get started. He didn't explain the steps he took before hand and I am beginning to think out was much more evolved than he let on.
So I guess what I really need is a step by step instruction for this.
How do I begin?
Okay, ready? Here we go!
Double click the staff, which will launch it into the vertex model room.
Look in the panel on the right (I don't have Carrara on this little book) and find the Morph tab.
What you want to do is create a minimum of four morphs - but four should be enough to complete the description of what you wanted.
If the staff is a prop, and doesn't already include morphs, you may need to add the ability to accept morphs.
It's really easy - but again, I don't have Carrara open for reference. I think that you simple create a surface to be morphed (which tells Carrara what you can and cannot select and manipulate during morph creation) - so the quick and easy route is to select all and create your morph target. Now you can select and move/edit any of the polygons.
Alternately, you could select just the danglies and create a target for just them - or you could select one danglie - target. Next danglie, target, etc., so that you'll have separate things to select during the animation process. Keeping them altogether will make it easier on you, however.
Now you select that new target that you've just made. You'll select it in the Morph tab on the right.
Now click the "+" sign and give the morph a good name. Ffor this, you may want to call the four morphs Front, Back, Left, and Right.
Press okay, and you have a new morph that you can (and will) make. At this point, you could just keep adding the rest of the four morphs - if you like. That way you have all for asigned to the staff, and all you have left is to click the little paint brush icon next to each morph's name, which puts you into edit mode - and you carefully create the angles you need. Don't be afraid to go a bit overboard - because with Carrara-made morphs, you cannot go past "1" on the dial. If you do, no further change will occur.
Now... once this is all done, and saved, then you'll have your four morphs: Front, Back, Right, and Left. Dialing combinations of those will sway your danglie doo-dads naturally between them. Like: Front = .62, and Right = .43 (or whatever) and you'll get a beautiful in-between sway - just as you'd expect it to.
You'll find that you can make Dynamic-Style morphs in this same way for clothing and hair, etc.,
You can add further quirky expression enhancements to your character for uch more real looking aimations, etc.,
You must do this - so if you get stuck... ask and someone should be here to help you through. I've been away from electronic devices lately... but I'll try to check back and see how you're doing with this.
I would say: Good Luck... but you won't need it. The most difficult part will be rotating the line of beads(?) far enough - and then moving the bunch back to where they belong. Because they won't be rotating where you want them to. So just do your rotation - then slide the whole works back to where it belongs. After you get that, select all but the one'sclosest to where they're attached, and do that a little bit more - in the same direction. Then make a smaller selection closer to the end, once more (at least) and do it agian - so that instead of staying in a straight line, they actually swing a bit more, the further they are away from where they attach to the rigid part. You know what I mean, right? Get a sway in there.
If you do that same swaying effect on each of the four morphs, you'll amaze at how natural your animations will work out :)
I recommend starting with more or less what holly suggested. Make separate objects from the dangly bits and parent them to the staff. Should be relatively easy though I've never done this in Carrara, I'm sure someone else knows the exact steps. (In Blender there's a command that separates the selected parts of a mesh into a new object)
Rigging would of course give you more flexibility, but that is also something I have never done in Carrara.
I agree...do what Holly suggested. Quick and easy. But use the Point At part of her suggestion, and point at a target helper.
Another option might be to figure out how to apply a rotation constraint so the danglies are always pointing to the floor, even though they are parented to the staff or whatever and move with it. But make sure you also change the hot point of the danglies like she suggested.
And then a third option might be to use physics, since the first option will probably result in the danglies passing thru the staff at some point. But you can deal with that pretty easy.
Really?
The main reason I bought Carrara in the first place was to simulate this whole process using morphs.
If you wanted to use the rig method, then you could simply paint your bones onto the staff, attach the skeleton, and do it that way - without having to parent anything.
If you did go through the (rather simple) process of removing the danglies and bringing them in again separately, I'd use the Bullet physics engine to perform the gravity calcsfor me - in soft body. I've not done that yet - but in that other thread - it's looking really good for something like this. But... what can I say- I'm a morph-loving nut! :)
BTW, good seeing you again, araneldon!
Ahh- cross post -
Hi Joe! Good to see you back, too!
I'm going to start trying these concepts more. I have in the past... but preferred the control of morphs - but I'm always open to try something again - or something new. But whenever I wished that I would see more of this happening insteadof that... I could always just tweak a morph or add a new one.
Dude what are you on about, I was here yesterday x)
Morphs are certainly an option, but it's more work for less flexibility.
Personally, if the danglies were an important part of the scene, and their motion was more than just simple hanging and slight motion, I'd without question use physics. That's the only way to get a believable jangling and swinging and bouncing around of the danglies. Otherwise, a simple Point At is all you need to keep them hanging towards the ground.
Take the dangly object, change its hot point to be at the point where it connects to the staff (using the CAPS LOCK key and just move the manipulator), parent the dangly to the staff, then add a target helper to the scene, place it below the floor, and apply a Point At Modifier to the dangly and have it point at the target helper. That's it.
No idea.
Well it's the thought that counts. Nice to see you too, and don't you be going anywhere either. This forum needs all the positive energy it can get.
The Rings+Dangles+Chain are almost 37k polygons(loading .duf file). The easiest way I see to animate them is to separate them from the main model(which I found to be a test of my mouse skills). Once separated, I agree with above suggestions to setup up hotpoints as a pivot, and then use a modifier or track target helpers.
To separate vertex modeler parts into separate polymeshes(instances), there are a couple of ways. Duplicate polygon selections in the vertex modeler, then use Edit->Split Object in the Assemble room for that object, or,...Copy/Paste selections from one vertex model window to other vertex model windows. You can then manipulate/animate each object as needed with hotpoints, modifiers or track target helpers etc.
I am looking at the shader, and I can see the Dangles in the list, but it won't let me do anything with them (or, more likely, I don't know how to manipulate them properly).
Errr, what Paintbrush, exactly?
I don't see any. Are we still in the Model Room, on the Morph Tab?
Carrara 8.5.172
Model Room the one with the wrench icon in the upper right.
HI Staticdrifter :)
Do you want to learn how to add bones to this prop,. so you can animate the dangling bits,.. ?
or,.. just make them invisible ?
To make them invisible:
Double click on the shader for these parts,. ..it'll open a panel, (the shader) with a bunch of different shader channels and options.
Select the "Alpha channel",. and set it to a Value of 0
See pic 1
If you want to add bones:
Create a new "Medium scaled" scene,. then load the staff prop,.. it should load into the centre of the scene.
Change your view to the Quad view from the options at the top of th screen,. this will let you to see the object from different perspectives,. so you can see if things are in line..
Using the Front view,. Select the Bone tool,. and place a bone in the middle of the top of the staff. ( hold Shift, and click / drag the mouse while creating that bone, to adjust it's size)
This bone is the "Root" bone node,. and the other bones we'll add will come from that root bone.
Hit Ctrl+Z to undo anything you're not happy with.
With that root bone still selected,. Click again down the staff to create either a long single bone for the whole staff, or a few bones so you could bend the staff if you wanted,. using those bones..
Hold Shift and drag as you work,. to resize the bone nodes you're creating,. the size of the node, effects the width of the next bone you're drawing.
Once you've drawn some bones for the main Staff,. ..select the first, "Root" node you made, at the top of the staff.
Now click at the beginning of the dangles on the left, or right ,. to add a new bone, then drag it to cover both of those parts on that side.
Click to select the main root bone again,. then draw the bone for the opposite side.
Once you're done drawing bones,. you can adjust their position using the move tools if you want to,.
Now you have bones,. but they don't effect the Staff prop yet,..
In the Scene instance list on the right, Select the Staff prop,. and hold shift and click to select the bones, and the staff.
with both the prop, and the bones selected,. go to the "Animation" menu,. and select "Attach skeleton"
Now your bones will effect the model,. and it's no longer a "prop",. it's now a Figure, with bones which can be animated.
To seal the deal,.. the next thing you should do is go back to the Animation menu, and choose Create Animation Group,.
This creates a group with the figure and it's bones,. so you can work with it more easily in the scene by selecting that group and moving it,. or parenting it to a figures hand,..
once that's done,. yo can drag and drop that new "figure" into your "my Objects" section of the browser to save it,. and use it in other scenes.
hope it helps :)
Thanks 3DAGE,
I'm working your directions right now.
Question: Do the Bones require rotation or can they face anywhere?
Question 2: Should the Bones be the same size as the Dangles, or does it matter?
Sorry - memory meshes with dream, right now - maybe this can help:
In that last image, where you can see my selection, I'll set the selector setting on the top right to only select polygons. Then drag as amny as I can, without getting other polygons selected, that I don't want. Then click the Grow "+" Selection upper in the right, many times. Doing that, All I have to do is get one of the Polygons in a chain link, and grow selection will get the rest of that link selected, if I click it enough times.
Since you're learning new anyways, I'd probably do what these others are saying. I'm stuck in a bizarre delirium right now. But I can make morphs in my sleep. I live to morph!
What 3dage says above, is what I meant by adding bones without having to do any fancy delete this and parent that - just rig it and animate.
Should work perfectly for what you want. I need to start doing this a lot more. I'm good at it, but I'm just a morph-loving guy, I guess.
Thanks Dartanbeck.
I want to try your way as well. That way I can see the differences and how they work or don't work for a particular application. I really appreciate the input. I've already learned more in the last day here than I did all last week looking for tutorials.
I really appreciate all of you taking time like this. I doubt any of you have as much free time as I do, so extra-double thanks!
just a couple of things to note:...
Morphs,. will take the selected vertices of a model. and allow you to create an alternative shape for those vertices,. (morph target)
Morphs only translate from position to position,. in a linear way,. so, for example,. if you had a door,. and used a morph to open / close the door,. then the door would distort it's shape,. rather that arcing normally on a hinged edge.
Using bones allows you to deform parts of the model,. by adjusting the position or rotation of the bones,. so, in the door example,. the door would have a bone, which could be rotated, and could be key-framed, to open and close the door in an normal arc.
you can also set up constraints to limit the rotation of the bone,. and you can use a Target helper,.Plus the "point at" modifier to have bones which always point at a specified target,. which is handy if you want those dangling bit's to point at the floor when the figure moves around.
Hiding the part of the object is the easy answer, and it's useful to know how to change or edit the shaders, and morphs are an equally valid method of animating those parts,. but bones, plus a target helper,. is probably the best method for what you want to do, but it's not the easiest,.. although you'll hopefully see how easy it can be to take a model and add bones to it, then animate it.
Things I forgot to add :)
Weight mapping:
When you create bones and attach the skeleton to a model,. each bone has an area of influence over the parts of the mesh where the bone is placed.
Each bone effects a different part of the model.
These areas of influence can be edited in the vertex modeller, using the weight painting tools,.
You would do this to refine the Automatic bone weight influence areas.
when you initially add the bones to the staff,. the bones which should effect the dangling bit's, will also effect the Rings at the side of the staff head,. ..also,. there are delicate chains which attach the danglers to those rings
you could either use more bones that I did, to add better influence to those areas,. or adjust the weight mapping (like a sledgehammer wielded by a rock troll) as I did to make it work, without distorting the rings and chains too much.
Target helpers:
The bones which effect the dangling bit's,. can use a "point at" modifier (top right hand tab's)
this modifier can adjust the bones rotation, so that they always point at a specified target.
you can create a "Target helper object" , you can rename it to something better, like ground target
the select one of the bones,. go to the right hand Modifiers tab,. add a "point at" modifier, and select the target helper object you made.
Select the other bone and do the same thing.
Both bones should now change rotation to point at that target helper.
You can animate the position of that target helper as the figure and staff move.
Parenting :
When you create the Staff (Figure) by adding bones to it,. you should select the figure and bones and make them into an Animated group,.
Doing this allows you to "Parent" that animated group,. to the Hand of your figure,. so that when the main figure moves it's hand,. the Staff will move along with it,. and the hanging bit's, will still follow the target helper objects position.
Ok, I know how to Group (Ctrl+G). Is Animation Group something different? I'm not finding a command for that.
Missed these :(
Yes,. the bones should be the length of the area you want to effect, but the width doesn't matter as much as the length.
EG: you could have an Elephant model, with really thin bones, as long as the bone joints are in the right places, and the bone lengths are right,. it'll animate like an elephant
Hi :)
The option to "Create Animation Group" is under the Animation menu
Select your Model,. and it's bones, then go to Animation / Create animation group,.
then you can save it to your browser by dragging / dropping the animation group :)
Yes,. the bones should be the length of the area you want to effect, but the width doesn't matter as much as the length.
EG: you could have an Elephant model, with really thin bones, as long as the bone joints are in the right places, and the bone lengths are right,. it'll animate like an elephant
I see, thanks. Ok, so I've drawn in my bones and between the iso views (thanks for that tip, I caught it when you mentioned it earlier) and the Motion Tab, all of the bones are within the parts I have assigned them. So facing isn't an issue?
I ask because I created bones for each link in the chains (for realism) but I didn't change facing when I drew them, so every other one has the bone drawn down its opening and the others were drawn down the width of the link. Is that ok?
This is what I have so far, does it look right?
I'm trying to save it at this point, got the target helpers and the point-ats for each dangle and so how do I test this in Studio to see if it needs tweaking(which it probably does)?
Hi :)
I'm just confused a bit, because there are groups in the bones hierarchy,. or,. at least,. there's listings for "Group staff, Group short chain 1 etc. you shouldn't have groups like that in a bone hierarchy
the only group you should have is the Animated group, which should contain the Model, and it's attached bones.
It could be that you've just named the bones that way to help you select the right thing,.
but the bones should all be connected to the root bone by a basic hierarchy,. (see my earlier pic of the basic bones in the instance list)
Whether you're drawing the bones form the front or left views should only be an issue if you were using a joint constraint like axis.
You should set all the joints in the chains and dangling bit's to "ball joint"
You don't need to change which view you draw the bones so that they follow the mesh,. the mesh will bend at the bone joints and the weight mapping will control what part of the mesh the bone effects,
I think it's probably overly complex right now,. too many small bones you don't need,. the chains are so small that you'll hardly see them in the render,. and when it's animated you'll see even less detail,.
The amount of bones you have could easily be halved or quartered without making any visible difference to the final animation,.
But,... try it and see how it looks to you,. it's your thing :)
More often than not,. keeping things simple makes things much easier to work with.
Oops. I don't know why I did that. I was trying to work with other tutorials this week and one mentioned grouping parts together, and I think I did that without realizing it.
Can they be ungrouped?