This render has some issues...
 anise_leinen_390fa63a2b
Posts: 107
anise_leinen_390fa63a2b
Posts: 107
Hi all,
So I broke down and bought Matilda, because she's absolutely my favorite morph I've ever seen. She is honestly almost perfect for the character on my book cover. But I'm having a few issues with rendering her so that she looks the way I need her to look... some help would be good! :)
It seems like images can be posted directly here, but I'm not sure how, so here are the links:...
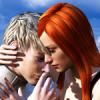
Here's a screen capture of the Matilda preview:

I'm going for a certain look, because she's destined for 2D renders. Her skin tone is perfect here.
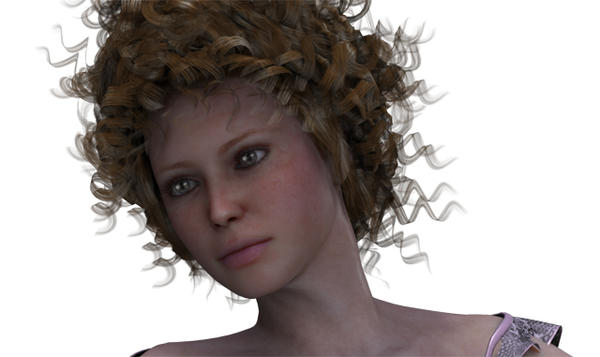
Now here's the firefly render with the default settings:

!! ALL wrong. Her skin tone and eyes are too smoothed out and kind of "blended in" and her eyes also end up looking too light and too reflective.,She looks too sophisticated, and she's lost all the vulnerability that the character needs. It's not really that there's something wrong with the render as such, but the LOOK is totally wrong for the artistic effect.
All advice is appreciated. :)
ETA: Both pics are showing up now, but just in case, the links above will take you there too.
Daz 3D is part of 
Connect
DAZ Productions, Inc.
7533 S Center View Ct #4664
West Jordan, UT 84084
Licensing Agreement | Terms of Service | Privacy Policy | EULA
© 2025 Daz Productions Inc. All Rights Reserved.
Comments
I would recommend checking your lighting and render settings above all else in this case. Your render settings may not be fully optimized to get the most out of the matilda morph. Also lighting is a major thing as well. What lighting setup are you using?
Also, what version of Poser are you using?
Wow! I didn't think anybody was reading this thing. ;)
Basically, it's the default lighting, default render settings... default everything with Poser 9. And I'm not sure if the problem is really that the render looks "bad"... if that's the look I wanted, I'd probably be very happy with it. But it's not pink enough, I'm not seeing enough details in the skin, and it just looks too slick for the personality of the character in the book. It's actually turning out a lot closer to what I want in Reality 3, if that helps.
Give EZSkin a try; it applies a skin shader that is closer to what you get in Reality. It's free....
http://www.snarlygribbly.org/3d/forum/viewforum.php?f=27
I don't know if the P9 default lights use raytraced shadows or depthmapped; the former is better. In the scripts menu under partners>dimension 3D a script called xlc gives you quick access to the light settings...
Very cute character!
Suggestions...
Alter lighting.
Poser 9 default lights are... adequate... but not great. They mainly follow the formula I describe below, but they're very generic and can be improved on GREATLY. The "not pink enough" is for two reasons... 1) the grey/shadowy cast to her skin is probably because the ambient occlusion value on the base poser IBL is too high for the scene. Either that or there's an AO node on her skin AND in the lights. That will make the AO effects multiply and make skin a dark quality. You can adjust this in the Diffuse IBL light's property tab. Dial down the ambient occlusion strength. And when you do this, be sure your Irradiance Caching in firefly is set very high. Slows things down, but smooths out dark spots. 2) the base Poser IBL is mainly yellow. Go ahead and look at it. Select the light in the material room and you'll see the image. You really want this light to reflect the colors you want in your scene. Lighting is REALLY important.
If you want to skip the manual setup, my ABSOLUTE favorite "available for purchase" light sets are the "Nike Shiny" lights, available at Renderosity:
http://www.renderosity.com/mod/bcs/nik-shiny/67543
http://www.renderosity.com/mod/bcs/shiny-2/69925
http://www.renderosity.com/mod/bcs/shiny-3/73898
http://www.renderosity.com/mod/bcs/shiny-4/76800
The first two sets are my favorites. The sets utilize my favorite base setup, which consists of:
1 HDRI light (or plain IBL) with AO. Any image can be used for an IBL -- choose an image with colors you want in your scene lighting and remember that if there's a very bright spot in that image, you'll get a bright spot in that same general location in your scene. The best results come from using HDR images (high dynamic range image) . HDR images are made by digitally "stitching" the same image of several different exposures together, thus making one image with a vast amount of light data (from very deep shadows to very bright highlights.) There are many free HDRIs available online so you can construct your own HDRI lights. Checking "Ambient Occlusion" on your light's properties gives a good natural shadowed effect where two objects are close together. One of the main lights in the poser default set is an IBL-AO light., so you can use it as an example No shadows on this light.
1 specular-only light. This light can be a spot, infinite, or point light. If you're working indoors, I prefer a point or spot. Outdoors, an infinite light is best. To make a light specular-only, go to the light's material settings and make the diffuse color black. Using a specular-only light allows you to adjust how shiny things appear in your scene by adjusting the light's intensity. No shadows on this light.
1 "sun" light. This gives the directional light in your scene -- the one which casts shadows. For outdoor/natural light scenes, use an infinite light with raytraced shadows. For indoor/studio lights (especially with backdrops), use a spot with depth mapped shadows.
I then add a very few "highlight" point or spot lights. Point lights are nice because you can set the "distance end," making the light fall off in a very small sphere -- perfect for highlighting a face or other feature, without altering overall lighting.
Remember... Make faces bright. Matilda looks a little too dark in your image. Tip: Check your render by setting a 50% grey background and opening it in any photo program, then zooming out so that the image is really tiny. If you don't see your face POP off the screen, you need more light. Even very dark scenes need light on critical focus points, otherwise they look washed out.
Texture adjustments:
Can you provide a link to the character's product page? Might help me dissect her for you, lol. To reduce the "smoothed out" look, check to see if there's anything plugged into the "translucency" node of her material. If there is, you can start by making the translucence value 0. Alas, if this helps, you will need to do this for all her material zones. I like WandW's suggestion about EZ Skin. It's a great help and is worth the time to play around with. I've seen amazing results with the shader. Hmmm... Adjusting the glossy reflection in her eye will mean playing with the alternate specular node. Word of advice -- if you ever don't like the eyes of one character package, simply find eyes in another character package and apply the mat pose! Eyes are eyes, lol. Sometimes this is faster and easier than fiddling with the materials!
Hope this helps!
I'll work on the suggestions and then post with any more questions. Yay! :)
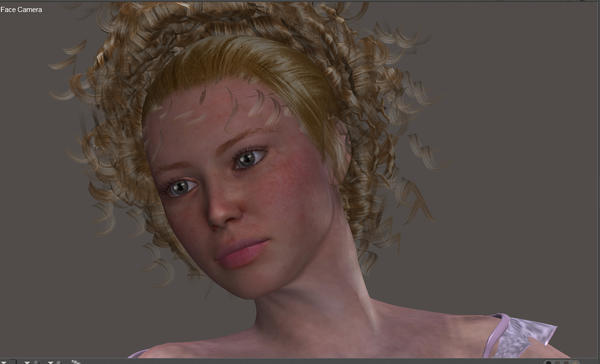
Update:
Here's Matilda. Yay! :)
http://www.renderosity.com/mod/bcs/vyk-matilda/99347/
I've tried pretty much all of your suggestions, and it's hard not to grab at the screen in order to get in there and ADJUST THOSE LIGHTS.
The last time I really worked with lights, they were real! But I haven't exactly figured out interdimensional travel yet... still a few kinks to work out there, LOL..;) I was thinking of getting SV's *Light Helper Tutorial and IBL Lights.* (I've done her texturing tuts, and they were very useful. I plan to work through her stuff-- I've used PS for so long that I really need to integrate it.) Have you ever seen that lighting one? Or has anyone?
I have, indeed, used the lighting tutorial! And yes, it is wonderful! The 40 lights included are really, really cool. And I have no idea how Matilda hasn't ended up in my runtime yet -- she's darling! I love all of vyktohria's characters. *adds Matilda to wish list...* Until then, I'll try fiddling with Mimi and Auria -- they have the same quality to their skin. Maybe I can offer more concrete suggestions...
Which version of Poser are you using? Are you able to use IDL? I think that's P8/Pro2010 and up...
Poser 9. And I just bought SV's lighting tut! :) Matilda is perfect... I really need to have characters that I can use for visual refs for my book, and she IS Victoria (the main character... yes, she WAS named long before I came back to Poser. ;) And yes, I'm able to use IDL.
I think I have to go through the tut and get a better handle on Poser's lighting before doing much more with Reality 3... it is amazing, but the way light works in it is so different from Firefly and other renderers. If I still had my photography lighting, I would try out some analog stuff, too, but that setup is long gone. :(