Which channel does this texture go into?
 scottidog2
Posts: 319
scottidog2
Posts: 319
LorienLipDif
Thanks
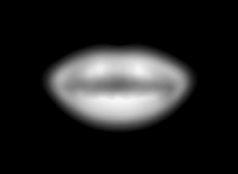
Screen_Shot_2013-07-31_at_3.09_.57_AM_.png
238 x 174 - 13K
Daz 3D is part of 
Connect
DAZ Productions, Inc.
7533 S Center View Ct #4664
West Jordan, UT 84084
Licensing Agreement | Terms of Service | Privacy Policy | EULA
© 2024 Daz Productions Inc. All Rights Reserved.
Comments
Well, Scotti, you didn't give us much to work on, so I'll guess....
By the name of the texture I'm gonna guess it goes into the Diffuse channel as an image map. In that case, the black/white value of each pixel of that image defines HOW MUCH diffuse color should appear. Black is no diffuse, white is full diffuse.
However, you'll probably want to multiply it (or with some other operator, depending on your goals) with some other parameter or map to define WHAT the diffuse color should be. Otherwise all you'll have is the HOW MUCH part, not the WHAT part. Maybe multiply it with a color......
BTW, how did your texture map get lost like that, with no home? Usually you just drag and drop and the channels get populated automagically..... :)
That's one of the textures from the character Lorien, made by Silver and offered over at Rendo (Silver does beautiful morph work, the shapes of her character's faces are usually very beautiful).
That partiucular texture is for use in the alternate specular channel for the lip material (obviously) in Poser. Carrara doesn't really have an alternate specular channel (though you could set one up) and for most purposes that map isn't something you'd need to use with Carrara. However sometimes I like to use these maps in the highlight channel with a multiplier, to control which parts of the lips have a more 'wet' look. You can use the standard spec map to show the exact ridges where the highlights should shine combined with this map to make it so your lips are more 'wet' towards the center and more 'dry' towards the outside edges, combined with an intensity to control the magnitude of the effect. Might be fun to play around with in the texture room.
But mostly in Carrara this is a texture you don't really need, IMO.
Oh if you want to know more about the alternate specular channel in Poser and what it does:
http://forum.runtimedna.com/showthread.php?23563-Alternate-Diffuse-and-Specular-Channels
the discussion is interesting, but about midway down the page there's a pretty good explanation.
He's right about the diffuse end. But by the looks of it, I have a feeling that it may be getting confused in suffix with Spec or a specular map - many I've seen are all fuzzy like that. So if your color channel is already populated with a diffuse color image map, try load that map into your highlight channel and bring the Brightness of that image map channel down until you get the right amount of gloss on the lips.
Higher values will give higher possibilities of gloss - which will also be controlled in appearance by your Shininess channel. Bring that to 15 to 20 or so for super high gloss - combined with a relatively high brightness setting on that map in the highlight channel - say, 30 would be pretty bright.
On the other end of the spectrum, try bringing the brightness of that image down closer to 6 or 7 and set your shininess closer to 0 (zero) and you'll soften out the look to be less and less glossy.
Know that if you set the highlight channel to "none", that's the same as making that image black. With a black value in highlight, you remove any possibility of having the shininess channel have any effect at all. Take it ever so slightly away from black, however - and your shininess is what will either make your shader look good or bad. as far as gloss is concerned. So let's look at the shininess channel next:
If you set the shininess channel to "none", that's the same as "0" or Black. None, Zero and Black are equal. Zero in RGB = Black. In math, black = zero. Full circle.
With an empty shininess channel, light can spread evenly across the surface until it cannot anymore due to the shape of the bend or edge. So a plane would allow light to spread evenly all the way across. Start increasing the number, but only by up to about thirty percent, and you will increase the fine tuning of the angle cutoff. Maybe it's just my scenes - since I have come up with a fairly standard look for my scenes - which includes my bizarre methods of lighting - but when I get beyond a value of 30i begin to lose the effect altogether - though it should really just keep increasing the tightness of the effect that it has on whatever is in the highlight channel.
So, in that example, I use Highlight = 100, Shininess = 21 for a super highly shiny thing. Like Dartan's sword. For skin, I'll be more inclined to bring the highlight down to 4 thru 7 with a near zero, or even exactly zero shininess to let that tiny amount of highlight spread all the way - to really lessen it's effect. For a glossier skin, I'd go closer to 12 for the highlight and 12 for shininess and see what that brings me.
LOL, sorry for the cross-post, jon.
You did a beautiful explanation - I could have just left!
Thank You very much everyone. I did drag and drop but some textures don't load automatically in Carrara, now I understand why. Jonstark, your explanation was very helpful.
The Character is Lorien. Amazing and beautiful.