Need Some uv mapping help
 Box8068_31c338ee4b
Posts: 292
Box8068_31c338ee4b
Posts: 292
Hello
If you check into this fourm you may have seen that I'm trying to get a fluid through a pipe look.
I've decided to test with a animated shader. I have it working , but it not great.
I created the animated shader first in carrara. ( that is fine)
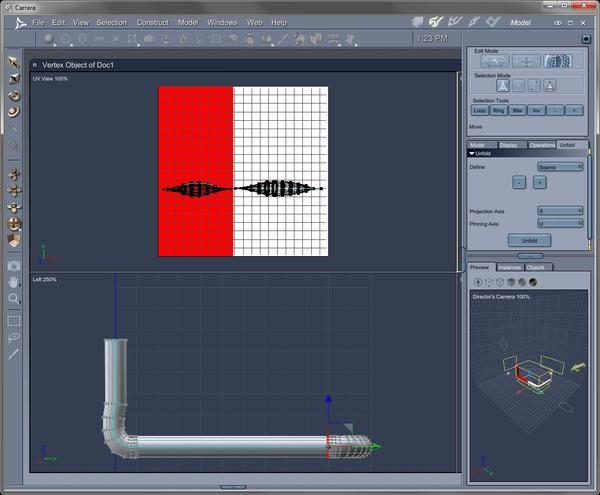
In the vertex room extruded a path for the pipe. Then I selected unfold the uv map.
The map oddly was at an angle to the texture map. I rotated that so it wasn't on an angle.
I selected The ends, and verticies running the length of the pipe and hit + to create seams.
Now this works, but the flow is very fast on the straight pipe and slow on the corners.
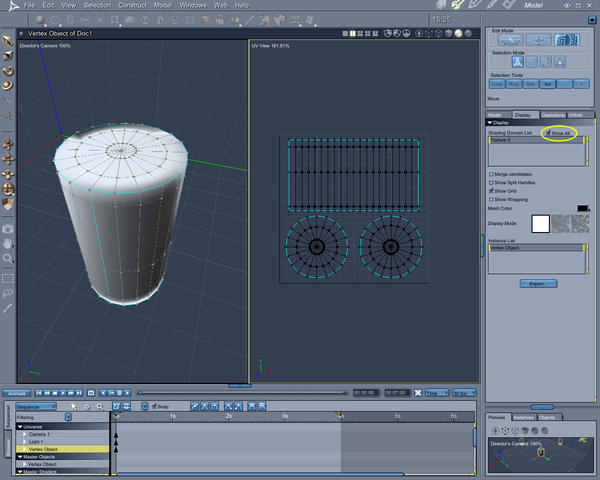
I noticed in a previous post 3Dage showed how he uv maped a cylinder. This pipe really is just a bent cylinder,
so it seems to me there must be an easier way to map this and it might have a smoother flow as well.
I've attached a shot of how I did it, and reposted the shot of how 3Dage did it as well.
Thanks for your insight.
Daz 3D is part of 
Connect
DAZ Productions, Inc.
7533 S Center View Ct #4664
West Jordan, UT 84084
Licensing Agreement | Terms of Service | Privacy Policy | EULA
© 2025 Daz Productions Inc. All Rights Reserved.
Comments
The difficulty you'll have in mapping that one, in the first example image of the bent pipe, is that you've stopped making sections in the straight sections. What is meant when folks refer to: "Good Topology" is that all of the polygons in the entire model are fairly uniform in size, without stretching or pinching, etc.,
I am not master modeler, but I do see 'that' as being a problem, right there. The reason being: You say you're making an animated shader? If this uses a map, imagine that when you stretch that pipe, that particular part of the map would need to shrink at the same rate - but only in that direction that the pipe is being stretched - which would be most difficult if it is supposed to have any fidelity in the end.
For this reason, we usually continue to extrude short bits, even when making long straights - or adding those sections in later by selecting a loop and using "Extract along" to create more sections along those areas until the polygons are more regular in shape and size.
Does that help at all?
I've been looking at one of your other threads last night and am really interested in dot_bat's approach to using 'coons' for the end cap. A skill I have projected as one of my main topics to learn today - as I would love to 'always' be able to map my circles with a plain, flat map, which his mesh example will truly provide.
as Dart said
you really want that pipe straightened out as a continuous line
I would myself create seperate shading domains all along it
planar map it on the "L" shaped axis
then detatch and translate/rotate each of those domains to form a continuous strip the animated texture can follow.
my biggest annoyance with uv mapping is there is no soft select option for moving vertices into place so lots of segments is the other alternative for the bend.
Okay, to better illustrate my original point:
See your second image above. The cylinder is standing upright. You see how the polygons are rectangular, much taller than they are wide. Now look to the right side of the same image to see what that has done to the map. It made them show the same, stretched way on the map. Stretch those polygons further and you'll have nearly no map area left. This is where, if those polygons were closer to square they could take stretching a bit better without loss of mapping structure. Richard Chaos made a comment not long ago about something along these same lines, and was pretty much right on the same thoughts I had.
Sometimes we can stretch the heck out of a mesh with no huge affect on appearance - but only if maps are NOT used. When you need a map, you'll also need to work hard to keep your polygons mappable during morph changes.
Some people have claimed to not like UV mapping in Carrara...
I don't find it a whole lot different - UV Mapping can be a PITA. This is why many Blender and other modeling software tutorials are strongly emphasizing proper topology. Over and again. It's to help with the mapping and overall fidelity of the model.
UV Mapper is a software that only does that. They have a free, Classic version and a Pro version with a free trial. If you really don't like Carrara's mapping, perhaps this utility will help.
Mapping really can tax your nerves. Some people are extremely clever in 'seeing' immediately and exactly how to create just the right seems - no matter how complex the model. IMHO, they deserve the big bucks that they get!
Ahh yes. In the top image you have a loop of edges selected.
With that selection you may use the extract along tool to drag new loops down the pipe to form squares. Goes pretty fast.
The big issue then is going to be "How in the world do I map all of this?"
The easier answer would be to only have one bend at the end of one pipe. Then you can create a seam along the side, perpendicular to the current selection on the top image, and unwrap it. This should give you a fairly straight forward rectangular map. If there are ends on the pipe, I would 'detach' them and map them separately.
Dartanbeck rocks
topography is the answer
I created a pipe usinfg path extrude for the curve and extrude for the lengths
I was ready to have to fiddle with uv mapping
but!!!
applying a cylinder one on y axis it was already perfect!!
just need to resize/ stretch it to fit texture square
which I did and applied an iClone avi
Okay - see? This is still different that what I was talking about. How did you get the texture to hold true? See where you have straight pieces of pipe? For good topology practices, they wouldn't extend as one polygon like that - but would be divided to make each pipe divided into cubes.
See the image below:
A = stretching the polygons to length makes it very difficult for any map to hold its fidelity as the pixels have to stretch with it.
B = maintaining a more 'proper' topology, like this, will help the map to remain true.
Edit:
Wendy's example is freaking Awesome!
While the polygons are stretched, as I was pointing out, she was still able to map it properly - so the texture map remains true. Stretching the pipes further will begin to deteriorate the mapping - but that goes without saying no matter how you morph/map it.
it occured to me you might be better off boning your pipe.
you can the use a cylinder with it's uv mapping intact.
fantastic work Wendy, You Rock too ;)
Hey everybody
Thanks, this all looks very helpful. Wendy that looks great.
I think one of the main tricks is to try to keep the bends on a single axis, and Dart you
are right try to keep the vertices equally spaced.
Thanks!
8068
Got it totally smooth, this GIF doesn't do it justice. Very polished and smooth looking in Carrara when rendered HD.
I think my colors and highlights were too wonky to make the gif happy so the dither I used adds all those speckles in the GIF.
Texture map is Isometric camera with colored plane moving across rear wall Alpha enabled with quicktime animation export.
Thanks for your help.
8068
:lol:
sometimes it is good to have a juvenile laugh or two.
Anyway, the thread has more good information on some topics I've been interested in lately. The screenshots are so helpful. But boning the pipe would distort the UVs at the joint. Other thoughts?