A SSSlight discusssion about SSS in Carrara...
 Jonstark
Posts: 2,738
Jonstark
Posts: 2,738
Hey, I love Carrara, it's definitely tremendously powerful and my favorite app by far, but if there's one thing that's driven me nuts over the years, it's trying to figure out Subsurface Scattering (SSS) in Carrara. I'm talking specifically here about SSS for human skin, for daz-sized characters, that looks decent. Carrara has SSS from way back before it was cool, so it seems a shame that the controls are so dang hard to use and understand, and to get good results.
I've bought every single product out there that has SSS settings for skin, and don't get me wrong they are all workable solutions, but one thing that's surprised me is how wildly different the SSS settings and approaches can be between vendors. These PAs are world-class Carrara experts like PhilW, Ringo, BTL, DimensionTheory, Fenric, etc, yet when it comes to SSS they all have very different approaches.
Every so often, I come back to it, fiddling with dials and trying to get that 'magic' result I'm looking for but never reach. So I thought maybe this subject deserved its own thread, where wiser, smarter, and more talented artists than I could chime in to give tips, feedback and criticism, to see if it's possible to zero in on what the ideal settings for skin SSS might be.
To start, here's my latest setup, do you guys think it's a good idea or am I just stumbling in the dark here?
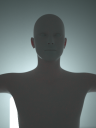
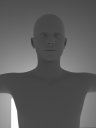
It's dead simple: I plopped a Genesis figure into the scene with absolutely no shaders except the standard 'gray' that it comes with, consolidated all the shaders so there's only one shader on the Genesis that controls everything you see. Then I put a standard cube in the scene, made it bigger like the same size as a room, so that the camera and Genesis were inside a enclosed space, then a 2nd cube shrunk down a bit in size and right behind the Genesis. Then I changed the texture of the 2nd cube so that it was glowing at 2000%, so that it will be the only light source in the scene. Here's a screenshot of the big cube from the outside, then making the big cube invisible for a pic of the inside setup:
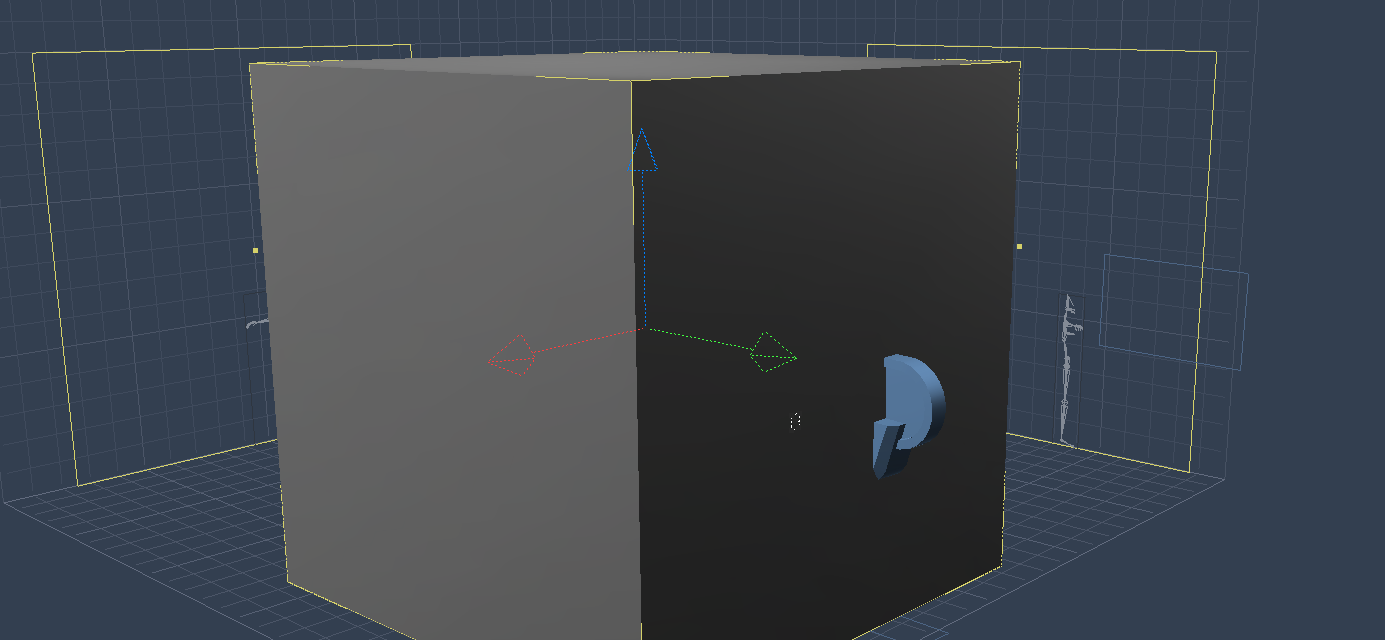

The camera is zoomed into the head area, and the whole focus I'm looking for is the ears, I want to see them 'glow' with SSS from being backlit by the glowing cube.
I have figured out how to do what I consider to be pretty decent SSS in the Octane plugin, this is not my own discovery but after studying several different Octane tutorials and then 'porting' the knowledge over to Carrara. Although the thrust of this topic is to figure out SSS in the native engine, I did the Octane renders on the same gray Genesis as a reference point for what I'm aiming for, and so I'll give a brief instruction on how to do SSS using an Octane Material shader in Carrara. Basically you need a Mix material where half of it is Diffuse and half is Glossy (50/50 split) and you only do SSS in the Diffuse channel because Octane shaders in Carrara are really really sensitive and putting the same SSS in both channels will result in too much SSS effect. You can also do Diffuse and Specular, or two different Specular channels as part of the mix, but the point is you only want to put SSS in one channel and make that channel's strength no more than 50% of the result.
The parts of the Octane shader that matter to the SSS are the Transmission, which should be set to a red color (I chose Hue: 0, Lumin: 50%, Saturation 100%) as this determins the color of the SSS effect, then the Medium channel which should be set to 'Scattering' as the type, and should have Absorption as an RGB color set to black (H: 0, L: 0, S: 0), and the Scattering channel should be an RGB which is the exact opposite end of the color wheel from Red (basically right between Green and Blue on the color wheel). Emission is set to none, and the Scattering Density is set as high as it will go, at 10000 (set any lower and the SSS effect is just too much), while the scattering direction is set to .5.
So I did the Octane renders first for comparison and reference, one with no SSS and one with SSS in Octane, it comes out like this:


Ignore the specular effect you see, I just simply forgot to turn the specular reflections down, but they don't matter to the purpose, which is to get an idea of what SSS looks like in Octane on a perfectly gray Genesis. You can see the ears are giving that slight red 'glow' of SSS, and the whole figure is every so slightly pinker, because of the scattering.
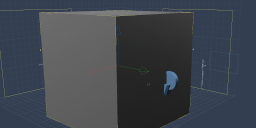
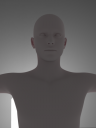
Ok, so I'm aiming for something roughly close to this, switched back to Carrara native renderer, used Global Illumination and set Gamma for 2.2, highest settings for really everything, and went to work, tweaking, testing, tweaking, testing. Here's where I'm at so far (again the first pic is without SSS for comparison within Carrara):


Remember I'm not using anything other than the glow channel for illumination, which is why there is not any specular effect, but I don't care about specular effect anyway, just looking to try to make the ear glow effect close-ish to the Octane render. Here's my current settings within the SSS channel:
Color is Hue: 98.3 Lumin: 6.84 Saturation: 100
Diff Reflection: 99%
Translucency: .5%
Intensity: 30%
Refraction Index: 30%
Fresnel Effect: 3%
What do you guys think? Am I in ballpark or way off the mark, and does my testing setup even make sense?
Daz 3D is part of 
Connect
DAZ Productions, Inc.
7533 S Center View Ct #4664
West Jordan, UT 84084
Licensing Agreement | Terms of Service | Privacy Policy | EULA
© 2024 Daz Productions Inc. All Rights Reserved.
Comments
Oh, and as a followup, here's what the same setup looks like when given a full character texture in both Octane (1st pic) and in Carrara (2nd pic):
Interesting. In the Carrara render challenge I was playing around with Light Mangler to achieve SSS using a map driven system. It may be a bit before I get a chance to play around a bit more. In the meantime, this is the image I made for the challenge. I used Indirect Light in the cockpit, and rendered with an alpha channel and then composited the planet and background in later. I only used Light Mangler on the A3 figure.
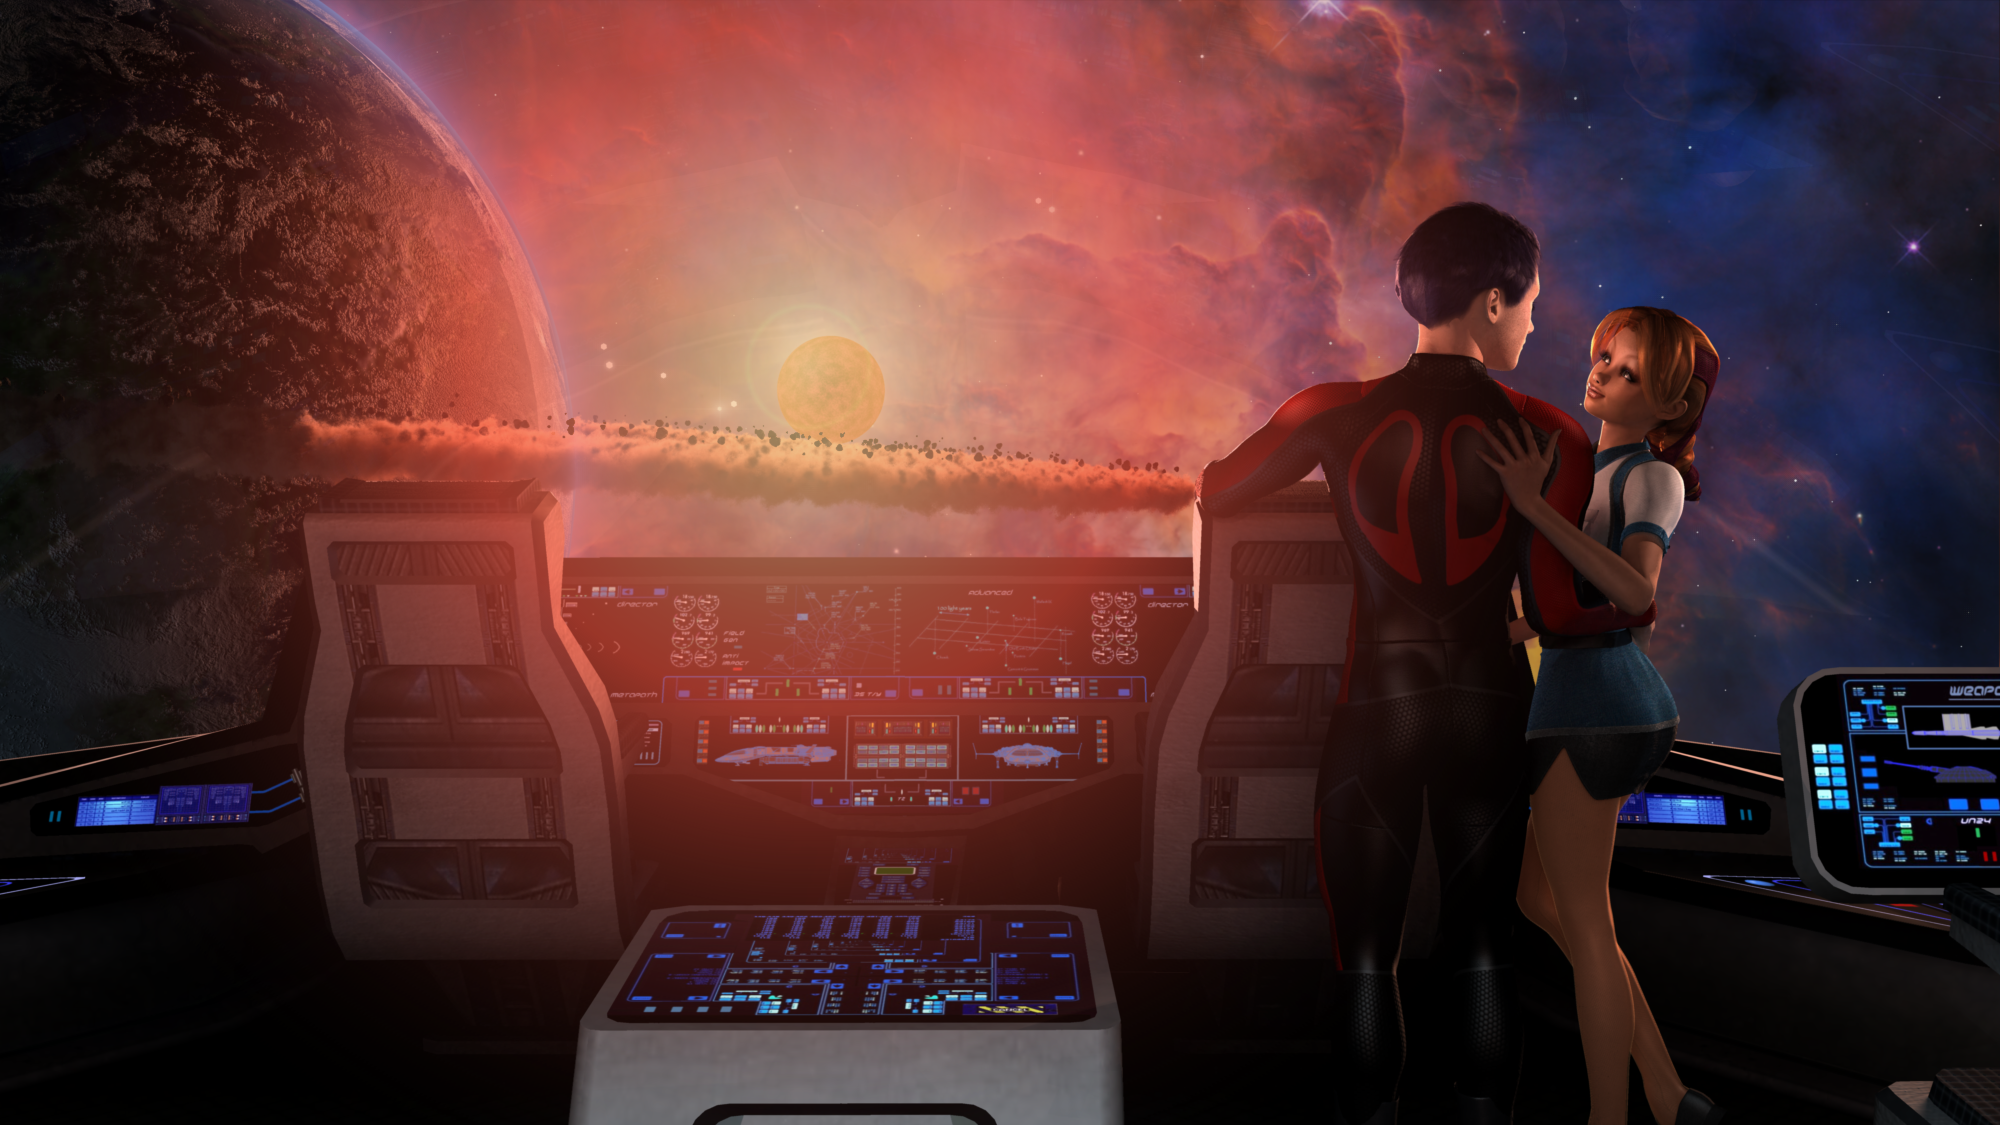
That's a gorgeous image EP, very well done!
You know, I forgot about Light Mangler, I remember DimensionTheory once mentioning that it could be used to put an image map into the SSS channel somehow. I was feeling guilty about not really having the time to participate in the challenge so I haven't been following the thread like I should, seems like I should go read up on what you did and learn how to use light mangler to see how to use it so I can do some more experimenting.
I got the idea from another user. Not sure who at the moment. I'd have to review the thread.
Ok, holy shnikeys, I've obviously been missing the train on this one, why oh why didn't I ever get light mangler before now? Just read Alberto's post on it with examples of with/without, and it's obvious that the ability to multiply the normal SSS effect with an image map to guide the effect is a game-changing leap forward. Only problem is where to find an image map designed to drive SSS for a Genesis1 character (since that's my goto figure right now, and I'm being selfish). Or maybe I can figure out how to make my own...
BTW quick aside, I've become a believer in having separate eyebrows that are conforming. For a long time I would just make an eyebrow opacity map and put the eyebrows in a layer list in a differnet layer that didn't have SSS, but actually SSS still bleeds through, I think having the eyebrows in their own separate conforming figure gives a much better effect (unless using actual dynamic hair for the eyebrows). For those curious about how difficult it is to do this, there is an Eyebrows for Genesis product in the DAZ store which serves ok, but it's super easy to make your own conforming eyebrows. For me, I just exported an .obj file of my unmorphed Genesis1 from Studio with skinning intact, imported it into Carrara and scaled just the head area up just ever so slightly, not even half a percent bigger, then deleted all polys except for the skinface, then even deleted all the other polys except those that were obviously going to be the forehead/eyebrow area, reimported into Studio and used the Transfer Utility to give it the same rigging as Genesis1 so that it was essentially conforming clothing, added maps and opacity and saved and done. Easy-peasy. Oh and a good product to get tons of Eyebrow opacities that can be used with the eyebrow 'clothing' you made is Zevo's Skin Builder product, which incidentally can be used to make lots of skins for your character too, skins that don't have eyebrows painted on (so no work in removing eyebrows involved either).
If they come with Elite shaders, you may find maps for them. I would even look in the texture folder for the character and see if they are there for the regular textures. I know for the V4 Elite Reby Sky, there are image maps for the SSS that don't load in Carrara automatically. For A3, I used the Mulberry character and tectures, and loaded the spec map into the SSS channel.
I like dynamic hair eyebrows for most things. It can be a bit of work, but I use the face image map as a template for the hair length shader or was it density? Either way, works pretty well, and if I use the image map for the face for the eyebrow color, the blend is very close.
I believe all of the mil4 'elite' skinsets also include Carrara shaders as well.
@jonstark, I'm also a Genesis1 holdover, so any progress you make on finding or creating G1 SSS maps would be of great interest. I would bet A) that the various SSS driver maps that exist for Poser and/or DS would probably be useful in this endeavor, even if they need to be rescaled match the Carrara Light-Mangler range scheme, and B) that there would be more options available in Mil4 UVs. The SSS maps that I've seen are all fairly simple 'more-or-less' greyscale maps - the question for each platform, is where 'zero' SSS is (0, 128, or 255), and which way 'more' goes, etc. inverting and/or rescaling should be pretty straight-forward. The V4-based RDNA Vanilla Sky (for Poser first, thn DS?) product was revotionary when it first came out for its detail and use of SSS mapping. Might be a good one to look at, and may be on sale for a good price in the current sale.
And thanks for your input, EP! I agree that this is a whole new way of looking at SSS in Carrara. I appreciate Ringo's skin-shader work, but have honestly never loved the results. I've simply assumed it is a Carrara limitation, and that Ringo's products are the best that can be done in native Carrara (at least in my hands...).
cheers,
--ms
.
Great stuff! I think @MDO2010 had a post about finding ways to use a map with SSS, but I might be mixed up.
I didn't have to look too far to find SSS maps; V5 Bree texture has both transparency and SSS maps included, and M5 Philip has transparency maps (though not SSS) so in effect the same V5/M5 maps that come with Carrara already have at least transparency maps. Also I saw that DimensionTheory has a product in the store called Interjection in the store which has SSS maps for M4, V4, and V5. Since I was using V5 already I just had a quick play using Light Mangler for the very first time, multiplying the standard SSS times a multiplied combo of both the Transparency and SSS maps for V5 Bree. All you really need is a Transparency Map, but you can really enhance the effect by multiplying it by a SSS map.
All I can say is Light Mangler is a MUST HAVE GAME CHANGER when it comes do doing skin SSS, all it took was just a few tests to drive this home. Without Light Mangler, the SSS shader has to apply equally to the whole character all over, which means either you have too faint an effect on the parts of the character where SSS should show up (like the ears) or too strong an effect on parts of the character where SSS should be nearly as apparent. But with a transparency map guiding the effect, it's a whole new ball game, and I have full control of making the effect appear only where it should appear, it's terrific! I am kicking myself that I've never found and used Light Mangler before.
I kept all my SSS settings the same, except that I kicked the intensity up to 200%, now using Light Mangler and the image maps to guide the effect:
At first glance it might look similar to my prior render above, and yeah the SSS is too strong really (but that was on purpose to exaggerate the effect and really see what's going on), and the intensity was hiked up a ton, so the ears are 'glowing' much more, but the rest of the figure is not too blown out, meanwhile if you look close you'll see the SSS effect in the nose area too.
That's actually brilliant EP. I once tried to put some dynamic eyebrows on a character just to see, but forgot that you can drive it with a texture map, and the polys weren't in the right place, it was more difficult than I thought so I threw in the towel, but the idea of using an image map to drive where the hair appears sounds like the way to go for sure, going to have to give that a try.
Just judging from the transparency maps I'm seeing that have been made by vendors for various characters, I think you're basically right, could use either a bump or a spec map (as long as its a bit dark), then just use Gimp to 'whiten' certain key areas like ears, nose, fingers, so that you drive where the strongest SSS effects will show up in the render. Just looking at what the pros out there have already come up with, they don't look too finessed, so I don't think the maps need to be all that refined or precise :)
Between a 'common sense' approach (ears, noses, hands, etc.), and learning from existing SSS maps, I bet you are right about being able to rough in enough SSS information in a map with GIMP to get pretty some good results, based on maps that most of us already have floating around our runtimes. I'm getting pretty excited about SSS in Carrara again! Thanks for the 'Bree' SSS maps tidbit. I wonder if there's a native M5-based male skin SSS map equivalent available.
--ms
Yes they do, but since Carrara natively doesn't use image maps in the SSS channel, they aren't loaded. The Carrara optimized shaders reference the same maps as the Studio shaders and Poser shaders. If you notice, the image maps are stored in a runtime textures folder.
Hi Jon, what I've done in the past is open the face image map in an image editor like Photoshop or Affinty Photo (highly reccomend!), and make a new layer. I then use the base face layer and trace the eyebrows in the new layer. Sometimes I'll use the selection tool to do that, and then feather the edges and fill it with white. I then add a new layer beneath the layer I created and fill the entire layer with black. I make sure to rename the file so that I don't overwrite the original image map's file, and save it to a Carrara friendly image format such as .jpg, .png, or .tif.
Once that is done, I open the hair shader and apply the original face image map to the root and tip colors, and then the black and white image map I just created to the hair length shader.
Just a quick note, I'm actually thinking after playing around with it that the greyscale transparency maps are all that's needed, the SSS color maps are just a way in Studio to try to drive/enhance the color, but we already have the color being driving by the original SSS channel, so my original approach of multiplying the greyscale transparency map with the SSS color maps only has the result of diminishing the effect, doesn't really change the colors of the SSS at all. And I also realized that M5 Phillip has SSS maps included as well as transparency maps, I missed that the first time because the SSS maps included with Philip are also grayscale, unlike many of the early SSS maps we see for M4/V4 characters, which are essentially that the PA just added some blotches of red color over the nose and ears :) But the greyscale map approach seems to me the better way to go to more precisely drive the SSS effect.
Also it's worth noting that DimensionTheory's Interjection products:
https://www.daz3d.com/interjection-surface-injections-for-daz-studio
https://www.daz3d.com/interjection-booster-shot-one
are both on sale today, and include precise SSS greyscale maps for M4, V4, S5, V5, M5, and Hitomi. I went ahead and picked them up, haven't had any chance yet to try them out, but just at a glance they seem much more precise/detailed than any of the other rough SSS glow maps I've seen for earlier products.
Thanks EP, I actually have a fair amount of experience at creating eyebrow transparency maps in a similar way (I use GIMP) at this point, but I just had totally forgotten that the dynamic hair could be driven by a map (doh!) which makes putting the eyebrow hairs in the right place much easier, I'm very grateful for the tip lol and will definitely be giving it a try. :) I also have tons of eyebrow transparency maps from the product Skin Builder Pro by Zevo: https://www.daz3d.com/skin-builder-for-genesis-and-genesis2-female-s ; which I picked recently during the PA sale, got to say I recommend it a lot, very very detailed eyebrow transparencies there and a lot of them too.
wondertful of you both to share your knowledge thank you
My personal findings are that SSS makes your whole character have a glow. To make ears and such glow when backlit, I use a dark red in the translucency channel and no SSS.
Quick test with the Milenium Elephant with back light, and with light facing forward (same settings).
I feel dumb. i know this much about SSS -- It stands for subsurface scattering. that's it
That's a brilliantly simple and elegant solution McGuiver. There's no instructions for using the tranlucency channel anywhere that I could find and I've had problems using it before, but just gave it a whirl and found it seems to accept texture maps ok, so that I can guide where the translucent effect is, however there was still some overspill to other areas. But it's easy enough to simply select just the ears of my character (for example) create a new shading domain there and put in a texture map multiplied by a dark red color to guide the effect, and it seems to work quite well for backlit 'glow' effect. I'm stealing that and adding it to my strategy, using it in addition to SSS.
I did some experimenting with the SSS....For me to make it work, and preserve the Diffuse color/texture map I had to keep the Diffuse reflection very low (1%-1.5%)
Translucency will control the thickness of the SSS....keep this value low to only affect thin parts, such as ears. If this value is too high, thicker body parts will be affected. -- My setting:18.94
Intensity....With the diffuse reflection very low, I had to crank this all the way up to 500. this may vary with the individual item, but if it is too bright, crank it down a bit.
Refraction Index...keep this value low (3-10) to get full brightness of the effect....higher values will dim the effect and a value of 0 will slow things down (alot).
Fresnel Effect Higher values will darken the diffuse color...I left this at 0. If you turn it all the way up, your diffuse color will turn black.
Ouch!
Glowing hot metal using bright orange as my SSS color, and a turned metal shader.
I haven't mastered it, but 'know' what it is... Think of what light does through wax candles, green grapes, or your ears when lit only from behind (or your hand trying to cover a lit flashlight). Somewhere between complete reflection and absorption, light sometimes goes partially into a material and bounces around in it, showing itself near its entry point. Without it, some things just don't look right. With it, most things that do it, look way better. Human skin, teeth, hair are all biggies - uncanny valley stuff without it.
cheers,
--ms
Preserving the diffuse texture is really key, I agree, it's so easy to turn it to mush with too much SSS effect. I appreciate you sharing the settings, I did some play-testing and I found 500% intensity was just giving too much effect, making my characters face too red in direct lighting, here's an example shot:
I was thinking my original idea of just looking at the way the ear glows in backlighting for translucent effect is not the best approach to SSS, especially now that you turned me on to using the Translucency channel for that purpose (it works better than SSS and gives a better/stronger effect, and as long as I control it with a texture map there isn't overspill, nor does it seem to affect direct lighting but instead only seems to display itself in backlighting, which is great). Instead I'm thinking I use Translucency to get the backlit 'glow' if needed, and let it add its effect to the SSS but not rely solely on SSS for that effect since I might have to crank SSS too high to get the same effect, which may not work well in direct lighting of the skin. So I'll rely mainly on Translucency for the backlit effect and only use SSS for the purpose of making skin look more skin like.
I took your settings and only changed intensity, toning it down to only 200%, and I thought it looked terrific. Actually it's astonishingly close to how my character looked with the SSS settings I had been using previously, but after squinting back and forth between the 2 I actually like your settings a bit better, yours lighten the skin up every so slightly that I find appealing. I'll console myself that I got really close, lol, but yours are better so I'm stealing your approach lol Here's a pic of my original settings, then one of yours, hopefully this shows up side-by-side in the forums so it'll be easier to compare:
I guess it's probably also important to acknowledge there's probably not one SSS setting that's right for all skin, there's a natural varience in the SSS effect different people have in their skin anyway, so it's more like using all the tools in the toolkit to try to land right in that realistic range.
Edit: I'm already realizing I should have rendered these examples as something other than jpg, as I can see the quality falloff is quite a bit seeing this in the forum rather than in the render room. Also I should mention I'm using fake fresnel combined with glow channel to give the edge falloff white effect you outlining the had, that's not a result of SSS at all and I'd better mention that for clarity's sake.
You can post .png, which isn't a lossy format.
Yeah I usually remember to post .png, for some reason I just spaced it. Not even sure why I was even rendering in .jpg, I usually render in .png. Ah well :)
Some good experiments on here - and I'd be the first to admit that I never found the "right" formula for SSS, in fact I concluded that the way it was implemented in Carrara's native renderer just didn't produce the right effect, It is much easier to achieve in Octane or in Iray. One thing I would add to the discussion is that the diffuse maps are generally produced assuming little or no contribution from SSS, and if you are using a reasonable level of SSS, that can mean that the skin gets too red. One way to offset this is to reduce the amount of red in the diffuse maps, either in an image editor or by using a color adjustment plugin. Good luck with the experiements!