Wings 3D tutorial - "TopMod"-style Interlocking Stars Model
 Fencepost52
Posts: 509
Fencepost52
Posts: 509
Another TopMod style tutorial for Wings 3D. This one is somewhat involved due to some initial setup I go through to help you finish the model. Once you get the steps down, you won't need the setup steps anymore.
@GussNemo: I don't have a mike yet, but I typed pretty slow for you! LOL
Special thanks to David Brinnen for reviewing the tutorial and catching some errors.
Click Me!: http://youtu.be/RUGVutV3XvU
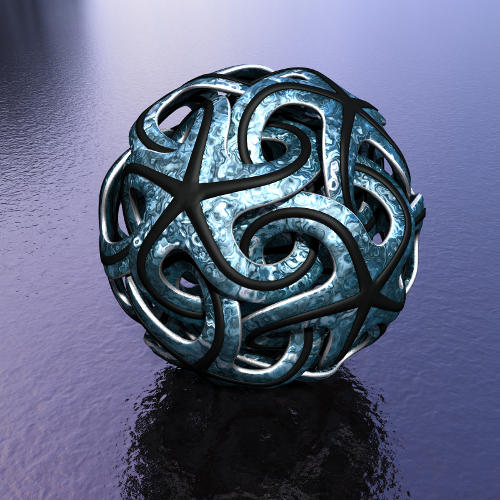
InterlockingStarsResized.jpg
500 x 500 - 318K
Daz 3D is part of 
Connect
DAZ Productions, Inc.
7533 S Center View Ct #4664
West Jordan, UT 84084
Licensing Agreement | Terms of Service | Privacy Policy | EULA
© 2025 Daz Productions Inc. All Rights Reserved.
Comments
Thanks for the tutorial.
I attempted your other tutorial over the weekend and posted the result in the "Show us your renders" thread :-)
You're welcome! I saw your render and it's great! Very inspirational. Let me know how this tut works out for you. :)
Here’s my attempt at this tutorial using David’s http://www.bryce-tutorials.info/bryce-tutorials/pearlescent-paint.html for the render.
The second one I used shell extrude and materials from the presets.
There is a slight error at 8.04 after Extrude you have “Tab enter -45 press ok” but it should be “Tab enter 0.75 press ok” It’s a slight error and I'm sure if I could work it out others will too but I thought I will just mention it.
Although I like the results I got, I don’t like the “button-like center”. I must have done something wrong at an earlier stage. Any suggestions will be appreciated.
Thanks I really enjoyed doing this tutorial.
Looking good Mermaid. As for the button-like centre. This may be a result of the inset and move - it is similar to beveling edges. You can test this yourself in Wings. Create a cube and then apply different level of bevel to the edges and smooth the shape a few times. Sometimes - depending on the level of bevel the corners will get softer and sometimes they get sharper - which seems a bit counter intuitive at first. Try it and see. This same effect could also explain the "buttons".
Edit: a different version from the direct RTR IBL shadows.
I like the way they came out! Really nice. Thanks for the feedback about the error. I'm new to the youtube thing, but I see you can add comments to the videos and I will make that correction. Another thing to try with the "button" in the middle (which I don't really care for either and I'm looking for a better solution) is after using the inset tool, go into the face menu and collapse it, which will leave a vertex in the middle of the face. Then move that single vertex out a little. I'm going to try using magnets as well and once I get it the way I like it, I'll provide a quick video on that portion only.
Next tutorial(s) will be how to create these:
Thanks David and Fencepost for your suggestions.
Looking forward to more tutorials from both of you, since at my age I can't "think out of the box" but still having fun working thru tutorials and getting nice results. ;-) :)
@fencepost: Well I sure thank you for typing slow, it was just an adjustment to get my eyes to move that slow. :cheese:
I've been wanting to know how you made this one and will definitely watch the video when time permits. Thanks for the work.
Everyone's results look great. I'll post mine when I get time.
Finally made it through the tutorial and came up with these three so far. I've another one to finish where the stars aren't welded.
Guss- lovely models
Fencepost-I tried what you suggested but could not get the star shell extrude- like my previous renders. It was fun playing with Wings 3d
Here’s my result
I've been playing with Wings for a few days now, - thanks for the tutorials David - . Are you exporting these then rendering in Bryce, or rendering with Wings? I ask because the render doesn't work for me in Wings. Either on my laptop or on my desktop. Are those separate plugins?
Though I haven't had the time to do all the beautiful shapes, I can nevertheless answer your question: export the object(s) or scene from Wings3S as Wavefront OBJ and import it into Bryce. Give the thing appropriate materials and render away.
@mermaid: Thank you very much. I also had a terrible time making these until I reread fencepost's instruction. It's one of those zig instead of zag things, right click instead of left click.
Nice work, Guss and Mermaid! Mermaid, sorry you had trouble with some of the steps. I know it's a lot of information in a short amount of time, but you'll get it. Soon, you'll be able to model one in your sleep. ;) Trust me, I've been doing it!
@Guss: I like all of your renders, but I'm really partial to the second one. Great work.
Thanks for trying it out and posting your results.
Also, I found a way to round off the ends of the pentagons better. Instead of doing the inset, then move, simply select the face and move it .2 or so in the Normal direction. That seems to look much better....at least in my eyes.
You have nothing to be sorry about Fencepost, I'm having fun playing with Wings 3D only because of the tutorials you and David have posted.
I was referring to your suggestion:
Another thing to try with the “button” in the middle (which I don’t really care for either and I’m looking for a better solution) is after using the inset tool, go into the face menu and collapse it, which will leave a vertex in the middle of the face.
I didn't get the effect I was after, but I ended up with a nice shape nonetheless.
I look forward to your other tutorials.
@fencepost: Thank you. Like usual, I was surprised with the results of that second image. I can never visualize how material will turn out so I have to wait until the render completes. Sometimes things end up in the recycle bin, and sometimes they're eh, but not worth posting.