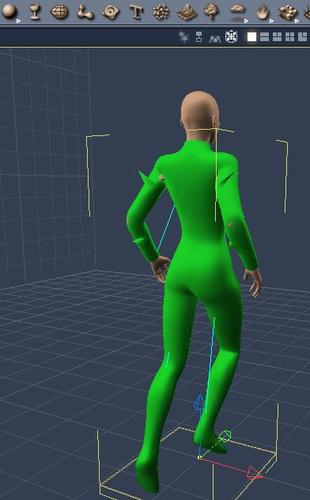
spikeys on conforming models
I'm trying to take the next step and create my own conforming clothes for use in Carrara. That is, not just attach a prop to the same skeleton in Carrara. In C8.5, I modeled a bodysuit for V4, then used Poser Pro's fitting room to rig and create a conforming figure and saved it to a runtime library. I then loaded the figure back to Carrara from the content tab. On the whole, decent results.
However, I'm getting spiking trails from the back of the shoulder/arms. I'm pretty sure this is from vertexes not being included with any bone (but not 100% sure), but is there any way to anticipate this and prevent it from happening?


Conforming_Spikes.JPG
392 x 632 - 40K


Comments
here is something that explains why it happens in poser
http://www.evilinnocence.com/xd-pose-fix-tutorial
I usually hide the offending polys if I can't fix it ;)
Thanks. I got one spike fixed by following those directions, so it is just a matter of diligence now. That was spot on, as usual. I will have to try a similar strategy in Daz Studio, and see if that is better. I was being lazy and wanted to let the fitting room do the grouping.
Ahhhh.... no!
When you first create the model in zeroed position, possibly even before UV Mapping - because the selections can be of value - enter edit mode for the base figure and select body parts, and not where they are. Starting from outside and working inwards can really help - as once a selection is created, it can be removed from the current selection, which helps. Just to be sure, I never use symmetry when selecting and naming polygons. On the body suit, therefore; start with feet and work your way up to the hip. Start from the hands and work your way to the Abdomen, etc.,
Name them exactly the same as those used by the base figure. Now you can use the DS tools and add the rig - or add skeleton in Carrara.
@ Dart - Aaah is correct.
I repeated it by naming the polygon groups without being lazy. I then tried to go to Daz Studio 4.5 and add the rigging, but the tutorial I was following must have used a previous version because the interface and tools were not the same. I tried Daz documentation, got frustrated by the lack thereof, and went back to Poser and used the Setup room instead of the Fitting room. Better results, but still got some spikeys.
I did figure out, however, that the spikeys can be fixed in Carrara by using the bone tab under the edit-animation menu. The vertexes are just assigned to the influence of the wrong bone. You can fix it pretty easily. In the attached pics, the spikey was when the influence was to the wrong bone in the y dimension. It went away when I set it to the correct bone.
Didn't have to go back to Poser and adjust the joint zones.
I did note that the edit-animation tab was not letting me create a new morph target even though I made sure to create a morph zone for the whole mesh before saving and exporting the obj to Daz and Poserfor rigging.
Aaaah, indeed.
Ahhhh:
Here's how I do it in Daz Studio 4.6 Pro except that I also open the "Show Options" in the below dialog and get specific with what I want to do. I'm still in the learning mode, since I get very little time to play :(
I've only done it once - quite some time ago, but if you never need to take the clothing outside of Carrara, the attach skeleton command in Carrara with perform a similar deed of auto-rigging and mapping, that can then be edited as you've been discovering.
Hint: Weight Map adjustments can be quite tedious at times.
I find it faster to weight paint than to try and guess the numeric value.
I find it faster to weight paint than to try and guess the numeric value.Abso-freaking-lutely! ;)
Still no luck, but thanks for all of the help. I usually use the attach skeleton method within Carrara, and I'm trying to branch out.
Unfortunately, in Daz Studio 4.6, I can't get the transfer utility to work for my bodysuit for V4. In the transfer utility dialogue box, it has menus for Source/Scene Item and for Target/Scene Item. I have loaded the V4 development rig in the scene and imported my obj of my bodysuit at the correct scale. When I try to use the transfer utility, the V4 development rig does not show up as an option in the Source or Target menus. I tried again with the base V4.2 in the scene. It did not appear in the transfer utility menus. I tried again with a V4 character I had made. Still no luck.
(in the online tutorial, step 4 copied below does not work because the V4 figure is not an option even though it has been loaded in the scene as instructed by step 1).
Step 4 : Transfer Rigging Information
Launch the Transfer Utility dialog, by choosing Edit > Object > Transfer Utility...
Select Genesis as the Source : Scene Item
Select your object as the Target : Scene Item
Select the type of content it is, from the Projection Template drop-down
Click the Accept button.
OK - here is one solution to the problem that V4 does not show up in the transfer utility dialogue (there may be others).
1 - load V4 in Daz Studio 4.6 Pro from the normal content libraries.
2 - "save as" figure asset so that V4 is saved as a .duf file. In my case, I saved it to the default "My Library" folder under figures.
3 - delete the content-library-loaded V4 from the Daz Studio scene.
4 - Still in Daz Studio 4.6, load the V4.duf version that you saved in step 2.
5 - in Daz Studio, import the obj/clothing model that you created for V4.
6 - as per Dart (thank you), follow the steps from the Daz instructions, found at
http://docs.daz3d.com/doku.php/public/software/dazstudio/4/userguide/creating_content/rigging/tutorials/basics_initial_rig_with_transfer_utility/start
7 - save the conforming figure that you created in step 6 as a figure asset .duf similar to step 2. The default is "My Library".
(edited to remove an option later discovered to have problems)
8 - Open Carrara
9 - load the .duf conforming figure you created (in my case, from the content tab, "My Library" - "Figures") in step 7. In the instances tab, the new conforming figure will have a double figure layer before it gets to the model and bones features. Don't worry, that will be condensed to one when it is saved in Carrara format under the "objects" tab.
10 - Save the conforming figure in a folder of your choice under the "objects" tab in the browser tray.
11 - Delete the figure from your scene, then reload it, but from the "objects" browser that you saved it in step 10. Now your conforming figure has the traditional figure-model-hip tree in the instances tab.
12 - Load V4 from your traditional content directories (it does not have to be the .duf from the "My Library" in step 2)
13 - select your conforming clothing figure and use "fit to" to conform it to V4.
14 - happy posing.
Celebration!
Thanks to Dart, Headwax, and Evil, I have successfully used Carrara and Studio to make conformable (in both programs)
- test bodysuit for V4
- test boots for Genesis (and it morphs reasonably well when Genesis morphs)
and I can fix spikeys using the joint tools in Poser
Woohoo. More tools in my toolbox.
and here is a useful thread that collects links/threads related to making clothes for specifically for genesis
http://www.daz3d.com/forums/discussion/14421/
I'm glad you got it to work!
For example, I made a suit for Genesis 2 Female. I didn't completely like what happened when I dialed up V6 so I took the original Carrara model, before exporting it for rigging, and reshaped it myself over a V6 Base model - then imported that OBJ as a morph with the exact same name as the Victoria 6 dial. Somewhere in there they have instructions for finding all of the various JCMs in Genesis.
The whole caveat here being that I have never tried any of this for V4 - only Genesis. I'm grateful that you've discovered and reported a way to make it work for V4 - and likely any other figure that you can load into Daz Studio. It really is a great tool!
There is a very simple method in Studio to get your home-made clothing to conform to Gen4 figures.
1. With the figure selected in scene view, open the drop-down menu and select edit ->rigging ->convert figure to weight mapping ->triax weightmapping.
2. Bring in the clothing .obj and with it selected, select assets ->transfer utility.
3. Transfer active morphs, then back in edit ->geometry ->apply smoothing modifier.
This is the work of but seconds to get the clothing conforming.
I don't have C8.5, so can't test whether DUF will bring a working model into Carrara, but it does open it back in Studio, working perfectly so should work in Carrara.
May be worth testing by those of you who have C8.5
Thanks Roygee. I did a quick test by making a simple shirt for M4 and applying strange torso poses. That 3 step method you provided worked fine in Carrara 8.5 after I saved the shirt back out as a figure asset in .duf format. It did not work in Poser when I tried to save it out as a cr2 file (figure exploded), but there could be a lot of reasons on my end for that.
Much better. Muchas gracias.
Happy it worked for you. I also tried making the my test shorts into a .cr2 to test in Carrara. The file loads, but no geometry. I'm either using the wrong scale to make it in Hexagon, or 8.1 doesn't recognize TriAx.
I'll keep experimenting, because this method is so much better than the old FST.
Cheers :)