Dark scene; stays dark
 May Dawney
Posts: 139
May Dawney
Posts: 139
Hello, everyone!
I'm a new DAZ user and I am stumped on lights. I have an interior scene I'm trying to render (Sci-Fi corrodor B) with a bunch of cyborgs in there. I have a couple of issues whch are probably related.
- When I render the scene "as is," straight out fo the box, the render is black
- When I add lights, it's really, really dim
- I seem to be unable to load a probe light/light preset
So, my questions:
- Is it even possible to just... environmentally illuminate the scene or do I have to add a ton of distance and spotlights to get some light in there?
- How the heck do I load in a preset (double clicking does nothing either in view and doesn't get added to the scene list, although I am not sure it should be).
I'm running a slightly older rig, but man, it shouldn't render to black/not add lights because of that, right?
Processor: Intel Xeon W3530 2.80 GHz 2.27 Ghz max 3.06 GHz (4 cores, 8 threads)
Memory: 12GB DDR3 ECC
Hard Disk: 120Gb SSD + 1TB HDD
Videocard: Nvidia Quadro 2000 (1GB)
Any advice is appreciated! I'll screenshot anything for you that you ask me to ;-)
Kindest regards,
May
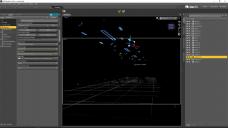
Attachments: Current view in DAZ (I tore out the lights again because I'm trying for environmental lights) and a render with three spotlights and three environment lights. Errrr....

Daz 3D is part of 
Connect
DAZ Productions, Inc.
7533 S Center View Ct #4664
West Jordan, UT 84084
Licensing Agreement | Terms of Service | Privacy Policy | EULA
© 2025 Daz Productions Inc. All Rights Reserved.
Comments
Go into Tone Mapping and adjust the camera settings for an indoor scene.
Any recommendations? It doesn't exactly have an "indoor setting" as far as I can tell. I did tinker with tone mapping (I found another post in this forum that suggested it), but the environment stays dark. I'm currently rendering with a bunch of lights, just to check another bit of advice I found here, but I'll tinker more with tone mapping once it's done. Thank you!
A couple of ways.
Drop the Exposure Value.
or
Lower the Shutter Speed and F/Stop and raise the ISO Try 60/4/400
OK, first thing, if you're looking to light your scene entirely with emissive surfaces and you want to see what you're doing while you're composing it, go to the Window menu and make sure "Preview Lights" is not selected. Preview lights don't take account of emissives, which can leave you looking at a black hole.
You need to give the surfaces high values in the Luminance parameter for them to light the whole scene - the default value of 1500 really doesn't cut it. I generally put my scene into iray mode, then increase luminance amounts by factors of 10 until it's too bright, then drop them down till they're right.
Interior scenes often need a bit of help though. One option is to add spotlights (increase the "Luminous Flux (Lumen)" parameter if you want to make them more powerful). Another is to use "ghost lights" to supply some fill-in lighting. There are a couple of Ghost Light Kit products in the store that make it easy to use them, but you can brew your own free ones too - see this thread: https://www.daz3d.com/forums/discussion/127056/ghost-lights-interior-lighting-tutorial
Finally, you can use tone mapping to make your camera more sensitive to low light. I tend to adjust the EV figure - lower numbers = greater sensitivity. Note, though, that Iray tends to render faster in lots of light - so you can get faster results by boosting the amount of light to unrealistic levels than by keeping it real and changing the exposure, even if the resulting pictures look much the same.
Dropping these to show what happens when I do add some lights, then going back to comments.
Thank you!
I'll try these, thank you! Numbers help.
This I had discovered! Ha! Still, I found the only way to get even a sense of what the lighting does is to drop a camera and look through that. It's annoying, but it'll do, I suppose?
Half of that is gibberish to me, but I think I can sort that out. Thank you!
It seems that my issue is that I can't get from black to the image without the ghost lights in the tutorial, but I like the idea of ghost lights, so I'll test them out. Thank you!
I'd read that before and I think I understand the technicalities behind that, just not sure where to go with the numbers to get there. I have dropped some screenshots of my current tone mapping settings above and the result it delivers. I'm not sure where to boost to to even have a shot at "too brightly lit." Can't even imagine gettign there, to be honest! Ha!
Well, I'll tinker and wait two hours again. Thanks! :D
Can you make a screenshot of the surface tab of one of the panels that is supposed to give light? It might be possible that you accidently loaded the 3Delight version of the product, rather than the Iray version? The surface looks rather glossy, I'm not sure if that is the metal, or 3Delight at default conversion.
EDIT: You might find this thread useful; it's a bit older, but most sill works the same: https://www.daz3d.com/forums/discussion/110771/natural-iray-lighning-for-rooms/p1
Entirely possible with my knowledge level and DAZ's lack of labeling ;-) I'd love to show you anything at all but "the surface tab of one on the panels that is supposed to give light" is beyond my capabilities to navigate to at current. Could you tell me where to find it?
EDIT: That link is very useful! I'll give that a go first and foremost!
The Distant Lights wont give you light inside unless there are spaces in the walls for them to shine through.
Good to know, thank you :)
Select one of the things in your scene which is supposed to radiate light. Maybe one of those light blue panels in the ceiling.
Click on the "Actors, Wardrobe & Props" tab along the top of the screen, then on the "Surfaces (Color)" tab down the left hand side.
You should see the item you selected named in the tab. If you drill down from it, you'll get to all the surfaces that the item contains - there'll be at least one, there can be very many depending on how the object was created. Hopefully, there'll be a surface (or surfaces) specifically for the lights. If you select "Tools > Surface Selection" from the menu, it'll highlight the borders of surfaces you select in the viewport.
The first thing you need to check when you've found the right surface is that it's using the iray shader. This appears right at the top of the Surfaces tab - it should say "Shader: Iray Uber". If it says "Shader: Daz Studio Default," that's the old 3Delight surface properties that can't do Iray things like emitting light.
If you are using the Iray shader, scroll to near the bottom of the long list of properties. You'll find one called "Emission Color." Set the color to be anything other than black and the surface will (when rendered) emit light of that color. Other properties will appear to control other aspects of the light source, most importantly Luminance. Have a play and see what they all do!
*Snort!* Well, I managed to turn the lights on! No idea how, but I'll have a look. I added two ghost lights to the roof, as per the tutorial.
Yep, that's exactly what it reads. Hmmmm... Okay, issue. I suppose I need to set up the sceene again with whatever is the iray compatible material? N00b question: is that the MDL or RSL version?
That's MDL:)
I'm not using Smart Content, so I'll guide you through loading the scene through the Content Library pane.
In the Content Library pane, open the DAZ Studio Format. There, go to Props --> Architrecture --> Sci-Fi corridorB --> Scenes --> Iray. In that Folder you should find exactly one file labelled "SFCB !Pre CrB Ir"
Load that with a double click. I just tried rendering that one with "Scene Only" lights, meaning that it just uses the lights that come with the set, and it looked pretty good and bright, even with default settings for the render.
Please let me know if that works, or if that file also cause problems?
As for the ghost-lighted render, the larger the ghostlight plane you create, the more light it will give. It needs a bit experimentation to give it a good strength.
EDIT: Here's how the material should look like (including a render with scene lights only):
If you scroll down further in the light's surface information, you'll find the emission settings.
The MDL/RSL thing really winds me up, I can never remember which one is which. Why can't they label them 3DL & Iray? If you find the product in the Content Library, often the different materials will be arranged in different folders for 3Delight and Iray - the distinction can be lost in the Smart Content tab.
Older products often have only 3Delight materials. It'll still work in Iray because the renderer does a conversion on the fly, but you can't edit useful properties like emission. Fortunately, there's an easy way to convert old materials to Iray: Select the object(s) and the surface(s) that you want to convert. Then, in the Content Library, go to Daz Studio Formats > My Daz3D Library > Shader Presets > Iray > Dax Uber. Once you're in that folder, double-click on the !Iray Uber Base shader - it'll convert the selected surface(s) to use the Iray shader.
Obviously, if the product comes with proper iray materials, you should use them in preference.
Thank you!
DAZ seems to have a tiiiiiny problem with labeling their stuff in a way that actually makes sense--like this, but also what, exactly, XYZ axis do (and which way they move when you drag them left or right). It's been a tiny friustration ;-) Thank you for explaining! I'm soaking it all up like a sponge!
Found it, put a bunch of cyborgs in it, and it's now rendering. See you in htree hours! XD
Seriously, though, thank you! If this solves my issue and just gives me basic lighting, I'll be over the moon! I only need it to throw into photoshop and edit. I'm wicked behind on my delivery deadline because of this BS! (Which is of course absolutely my own fault because I like to promise things that I'm not sure I can deliver on :P)
You have all been wonderful, I appreciate it!
I'll report back.
One suggestion, that would save you hours of waiting for the result with possible disappointment, it would be a good idea to change in the general render settings, the Renter Target from "render to file" to "Render to Window". That way, you can see how things progress, and interrupt, or change the render times on the fly, and also some other settings, without having to rerender everything. You also can use the render preview by selecting "nvidea" rather than the preview surface mode. You can do that in the top right corner, left hand of the box where you set the camera or preview.
Ah, that is good to know! I did try that (both of those) early on, but the results weren't lining up with the final result in such a way that I could extrapolate the final result (yet). I think that once I'm more experienced with the tech, I should be able to. I appreciate the reminder!
Okay, progress has been made! This is.... decent in terms of lighting. That graining is terrible, though. What would you suggest? (Spot) lights? Rendering it bigger (4000 x 2250 now)? I'm terrified of adding lights. That seems to be what kills the environment lighting XD It would get me some shadows, however. Save me the hassle ;-)
Make sure the two figures that are supposed to be on the ground are. Select them in the Scene Tab and Ctrl/D them which should drop them to the ground which should show you shadows, depending on light direction of course. The graininess could be because the render hasn't ran long enough. In the Render Settings/Progressive Render set the Max Samples and Max Time (secs) higher. Mine are at 15000 and 7200000 respectively.
Sorry, double post,
Brilliant, thank you! I'll try those settings ^_^
Errrr, so, how long does a render ususally take at these settings, because it's been six hours and it's still at 0%....
I'll leave my computer on tonight, to see if it'll get to the end ^_^
six hours is a long time. The scene is rendering in GPU mode? How many iterations has it completed?
With such a high time setting, Iray will keep going until it hits the convergence perentage, even if the image looks fine. 7200000 works out to 2,000 thousand hours of rendering if the image doesn't converge.
Generally when you set the time threshold that high, you render to a window and check it occasionally. Once it looks good, you can cancel the render and save the image.
I have had some renders that look fine but report a very low precentage, as well as the opposite where they ended as converged but still have too much grain.
I've had renders run for two days and others twenty minutes, CPU only, it just depends on the scene. There are some I have stoppedbefore they show that they are fully converged because they looked fine.
I find a lot of long renders are caused by numerous things :-
Too much Glossiness or reflective surfaces.
A lot of bright areas in the render window like lights or looking into the sun.
Lights that are too bright. Rather than use more Lumen I use Tone Mapping as I would using my camera in real life.
Too much Translucency.
Setting the Nominal Luminance for the Firefly Filter too high. I have mine set to 1500 but change it to suit the lighting if I need to if fireflies are still there in the render.
There are others but I find these are the main ones.
We are now at 13 and a half hours, still at 0%, and it's at iteration 608 XD
Edited to say that I am not sure about CPU mode. I'm fairly sure I've selected both somewhere.