Conforming to Genesis figures and Morphs
 Sparrowhawke3D
Posts: 102
Sparrowhawke3D
Posts: 102
Creating conforming costumes for Genesis is now quicker and easier than ever. I've been perfecting my workflow but I've got problems when it comes to the final fit in Carrara. The problem is that I can't control how the morphs are applied to the conforming costume - nor can I seem to add any morphs to fix the problems inside Carrara. I haven't explored all of the options inside DAZ Studio yet but once the costume is in Carrara 8.5 it appears to be in some sort of protected state with morphs hidden at the scene level and inaccessible in the model room. I'm a bit rusty on morphs so maybe I'm doing something wrong. I can add a new morph target but when I try to edit it or load into it nothing happens.
Briefly the process is:
1. Drag a Genesis base figure into the Carrara scene and make sure to zero them and don't use any body morphs or characters.
2. Model the costume and export it as an OBJ. There is no need to do body part groups.
3. Run DAZ Studio (4.6 Pro) and add the same Genesis base figure to the scene.
4. Import the costume into DAZ Studio using the 'from Carrara' scale preset.
5. Use the Figure Transfer Utility to make the costume for the Source Genesis figure fit with the Target costume mesh.
6. Test the costume in DAZ Studio then add the costume to my Content Library as a .duf then return to Carrara to use it.
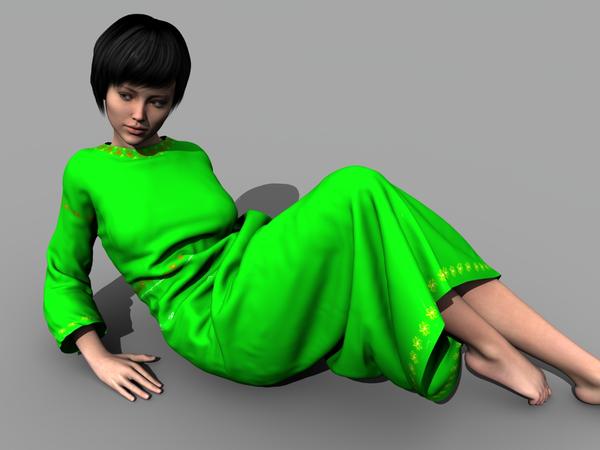
In this example I've made a dress to use with my Cloth Deformer plugin. When I did a few simulations the collar on the dress was passing through the neck - so by making it conform to the figure I can get a better result. Once I dial up a few breast morphs on the figure the nice uniform mesh of the dress gets messed up. The cloth simulator relies on the initial state of a mesh for its data so having facets folded under and stretched like that is not what I want.
The sort of quick easy fix that would be good is to export the unwanted morphed mesh then add it as a -1.0 morph to undo the problem for that particular figure - but I can't add the morph in Carrara. I can add morphs in DAZ Studio though - not an ideal solution but once I'd settled on a characters body proportions it would be workable.
I turned up the breast morph dials to exaggerate the problem in the first image. In the simulation shown the result its not so noticeable.
Daz 3D is part of 
Connect
DAZ Productions, Inc.
7533 S Center View Ct #4664
West Jordan, UT 84084
Licensing Agreement | Terms of Service | Privacy Policy | EULA
© 2024 Daz Productions Inc. All Rights Reserved.
Comments
Apparently, anything Genesis or triax related is not accessible through Carrara. You will need to work on Genesis in Studio, I believe.
Someone correct me if I'm wrong.
Great result!
you are correct .
Yeah, following the DS method, you can refit your OBJ in Carrara to fit the different shapes and such - then export > import as the FBM or JCM of the same name on Genesis - and it will follow to your liking. You can just keep adding them and saving the resulting conforming cloth. Out of curiosity, have you tried naming polygons to match Genesis groups before exporting?
So this thing is going to perform some dynamic deformations in Carrara to cloths that conform? Will it work for animations too? How cool!
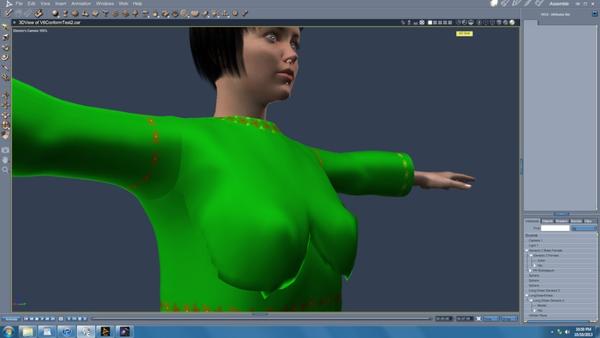
I was wrong and it can be done in Carrara - just not how I expected - and you have to be very careful what you click on. It didn't make sense that I could see the morphs in the vertex modeler but be unable to add any and then edit them. I was hoping to avoid putting in the hours and going through all the possible buttons to hit and contexts to try it in but after a number of retries I could see that I'd made an incorrect assumption about the Genesis figures and how to create morphs and that it was a Genesis issue. I did try with some other content but none of them worked for me so I wasn't sure if they were protected in some way or not and I'd be wasting my time to try. A DAZ studio back and forth wasn't looking like an attractive solution.
I've got to find the exact safe procedure and the specific fix for my case but I have been able to add and edit some morphs now - so long as I dont click in the wrong place. Do the wrong thing and you can't edit the morphs or you break them.
Dartanbeck, for use with the DAZ Studio Figure Transfer Utility I didn't have to set up body part groups. That's one of the great things about that utility. My Cloth Deformer has a bit of a long history - look on my website for more information and in the new Laboratory Notes section for the latest if you are interested. That dress conforms only at the collar, the rest is all dynamic.
Hi Sparrowhawke,
You know what teasing is :-)
I've been looking for the same thing, without any success so far.
I'll be very grateful for any procedure you could tell us (and I'm sure I'm not the only one)
Here is the outline of the safe procedure that I have tried for making morphs in Carrara with Genesis - first for a Genesis figure (I hadn't tried that till now).
1. In the Assemble room select the Actor of the Genesis figure and enter the vertex modeler. You'll get a warning about protected topology but it should be okay to proceed whether this is disabled or not.
2. In the properties tray switch to the tab and then you will get a list of body parts and areas.
* Do not add a new morph to the 'Actor' area in the list - they won't work.
* Do not select anything on the mesh then try to create a new morph area. A vertex can only belong to one morph area (right?) so you'll kill all the other morphs if you do.
Gen 4 figures have a Figure area in the list which allows you to easily add a new full body morphs but Genesis only has body parts and areas like nose, mouth, torso etc. That can be limiting but you can make a lot of useful morphs. For the Current Area=Nose I was able to Create Target which added a new morph to the bottom of the long list.
3. Hit [Edit] for your new morph - the button changes to [Valid] and the colours change on the model. From here be careful what you click on. Use the available tools to move the vertices in the morph area to make your morph. Hit [Valid] to finish and store the morph.
* If you do not validate the morph before you finish this could cause the whole morph system to lock up. There may or may not be bugs here. Some actions will make it valid for you.
4. My morphs did not show up in the Parameters tab back in the Assemble room for the Actor, parts, or anywhere I looked. You need to switch to Animate mode in the vertex modeler to find and use the morph.
I tried to add morphs to some content and the procedure worked the same but for some the mesh came out crazy in the vertex modeler.
So now for my specific fix in the original case above that I had trouble with. I've made the costume in Carrara and then rigged it in DAZ Studio on the Genesis 2 base figure, but when I fit to Victoria 6 or a custom morphed character I want to get rid of the unwanted morphs for my simulation. This is a different problem from making custom morphs and fits for general use - that would be best done in DAZ Studio (itself) or using the Hexagon bridge or exports to Carrara.
1. I bring in Victoria 6 from my content library then add my dress and fit it to her. All the morphs are projected onto the dress and when I dial up the Genesis 2 figure's proportion morphs I get the unwanted changes to the clothing mesh
2. With the Model part of my dress selected in the scene hierarchy I choose File | Export as an OBJ. In the Options I change from the defaults to also check Export objects in Local Co-ordinates and Export objects with Morphs and Skinning as well as Map Carrara Z axis to OBJ Y.
3. Now enter the vertex modeler. In the Morph Area List for my dress there is only a choice of Figure and Actor. Actor does not work but I can create a new morph target for the Figure area. (For other costumes where there are body parts a full morph will not be so easy.)
4. Edit the new morph target and use the Load button to select the OBJ I just exported. Careful with the settings, from the Default Preset un-check AutoPosition and check Disable Auto-scaling for a 1:1 import size. The morphed dress will change in the modeler view. Valid the morph.
5. Change the vertex modeler to Animate Mode then find the morph at the bottom of the list and type in the box value to -1.0.
6. Return to the Assemble room and the morphs are now gone giving me the dress how I want it.
So the above last part just effectively removed the extra morphs that the morph follower applied? This could be really useful. With those workarounds, I am now very interested to see what else is possible to Genesis stuff in Carrara.
Thanks Sparrowhawke!
There were errors when I had the beta and creating Genesis morphs. Don't know if any of the following were fixed(I don't have 8.5 yet).
-Morph targets import not working.
-Parameters Save component not working.
-Genesis newly created morphs not showing in parameters tab.
-Can't validate new Genesis morphs(error and force quite needed).
Just a brief(and vague) description I had written down before the 8.5 release and the bug tracker went offline. These probably need fixing before editing morphs for Genesis in Carrara.
I decided to test out a few more features while I was at it. I'm hoping next that for costumes with separate body part groups and morph areas that morphs do not have to be made and managed separately. I've got a few tricks for doing that when I've worked with Poser that make life easier. The DAZ Studio-Hexagon bridge tool might be better suited for that purpose.
We have to be careful not to confuse workarounds with bugs. Genesis and the conforming costumes made with the transfer utility with projection morphs are all working as they were designed to. The workaround I have outlined was for the unique case of trying to remove the projection morphs.
tbwoq - 8.5 morph target import and save and validate all appear to work when used correctly. Newly created morphs not showing up in the parameters does not work for me.
I had a more complex costume design to try and make after that with conforming and dynamic parts. If the MS Expression Encoder screen capture tool doesn't give me any grief I'll record the process...
The last tip/trick I can share for now was the case where you have got a conforming costume for Genesis and you want to make morphs for it in Carrara - but the mesh has got multiple morph areas. There is no apparent way to create a full body morph in Carrara for this case. I don't like the idea of doing those morphs one by one. I want to be able to work on and move the whole mesh. For Gen 4 figures you can select the Figure as the area and not worry about the separate areas in the list.
Another case you might want to use this for is to create a morph for a Genesis figure where you want to cover more than one part of the face and not be limited to the existing areas for nose, mouth etc.
This is the outline again of the method I came up with for trying to adjust some pants from my content folder.
1. Bring in the clothing and zero the figure, don't fit it to the Genesis figure.
2. Select the Actor of the clothing in the scene hierachry then enter the vertex modeler or edit the figure in the scene preview if you are making a fit for a character. This time you will need to turn of protected topology. Use symmetry and the available tools. The Magnet is often the best way to do this job or use the Displacement Painting tool. The vertex soft selection will not be able to spread over disconnected belt loops, buttons etc. With the magnet choose Edit | Select All then change the magnet options to (*) Attract Only Selected Vertices to push and tug the whole costume into shape.
3. Now comes the trick. We've made a full body morph but in the case of these pants there are 3 morph areas; Hip, Legs and Feet. Choose Edit | Deselect All then Selection | Select By > Morph Area and start with the Hip. Now choose Edit | Copy.
4. Return to the Assemble room and choose Insert | Vertex Object then in the new vertex model choose Edit | Paste. You probably won't see the body part there unless you pull the camera back.
5. Now choose File | Export. Include the morph area name (hip) in the filename and use OBJ format. Use the default options making the change to [/] Export objects in Local Coordinates.
6. Repeat from step 3 for all of the morph areas, except for Actor.
7. We've messed up the original pair of pants so we need a clean pair. It might crash if we don't start a new scene at this point or delete them. Now the process is similar to the ones above to load up each of the morphs. Select the Actor of the costume in the scene, enter the vertex modeler and switch to the tab in the properties tray.
8. Select a morph area to add the partial morph target to, eg Hip, then Create Target. Find the new morph target and hit [Edit] and then [Load...] to get the OBJ for that area we exported earlier. Change the default import options with AutoPosition off and Disable Auto-scaling ticked with 1:1. Hit [Valid] to finish the morph.
9. Repeat step 8 for all the morph areas that you needed to create and load.
10. You'll have to switch to Animation mode to dial up the morph for each of the areas individually.
Carrara can't save DUF and if you are making general purpose morphs for your own costume or figures I'd be doing that as a DAZ Studio project. If you export the whole costume mesh from step 2 you can simply use the morph loader in DAZ Studio Pro to get it all done in one click then resave it as a DUF to the library.
That's really cool - thanks for reporting this to us.
What I was saying earlier seems easier and faster to me - but this is a great optional method.
In the method I was talking about, in the above example with the pants, after you finish making the morph, you'd just export the obj and import it to the pants in DS. DAZ has some nice instructions here on how to do it. It even includes instructions for making JCMs where you can alleviate issues during certain poses - which is very cool. But you can also create special shapes for when certain dials are used on Genesis. Like V6, for example. Say you want it to look different on her - not the way the morph follower does it. You can model a specific version around V6 in Carrara (same vert count, of course) and import that as a morph with the same name as Genesis uses in the dial in question.
It just seems to me to be a lot less messing around. Plus you have the advantage of having the dial every time you load the item.
On a side note - I noticed that I have a Sparrowhake plugin named "Cloth". I bet that's this! I really need to find some time. I want to dig around at the Sparrowhawke website and see if I can figure out how to work this thing! So very cool!