UV mapping a Cube in Carrara
 Storyteller
Posts: 80
Storyteller
Posts: 80
so, Im more used to Hex, but my UV skills are not advanced. Ineed to create a playing card model and export it using Carrara to FBX for use in Unity. A simple cube is chosen and flattened to very thin. the back and 4 edges make 5 spaces which is one shading domain (material zone in unity). the last face, is the 'face' of the card, so each card can use one back image and different front images to save some space.
Here is the problem, mapping in carrara is funky weird.
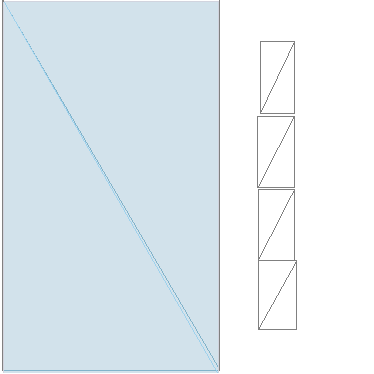
the uv desired is attached, with back and front taking the left half of the image and the edges off to the side.
any tutorial, screengrabs or help would be appreciated.
Daz 3D is part of 
Connect
DAZ Productions, Inc.
7533 S Center View Ct #4664
West Jordan, UT 84084
Licensing Agreement | Terms of Service | Privacy Policy | EULA
© 2024 Daz Productions Inc. All Rights Reserved.
Comments
This should work the same either way, but I prefer to use a Vertex Object in the modeler to one of those primitives made up of tri-gons.
Ahhh yes. I see the difference after trying a primitive converted.
If you wish to mess around with that, I would export the template and manipulate the image to fit the unfold. That is much different than the endless possibilities you'll get from doing it the other way:
Go to the assembly room and: Insert > Vertex Object (sends you to the Vertex Modeler Room)
Inside the model room go: Construct > Insert 3D > Cube
Use any dimensions you like.
Going from this to the UV Mapping tab (Upper three icons on the right - the one furthest to the right), the first tab you can have in the right panel is "Model"
This is a selection of predefined UV Map setups. The one you might want is Box Face. This makes the whole image one face.
I know what you're saying... "I need the two faces to be different"
No worries. Leave this UV Mapping. It's set.
Now go back to Modeling Mode (Upper three icons on the right - the one furthest to the left)
Half way down on the right panel, you'll see four tabs: Model, Morph, Bones, and Global. Go to the global tab.
Deselect everything. Now select just select one of the faces you want to map.
with that selected, scroll down in the global tab to Shading Domains Management and click the Add button.
Do you want to? "Yes"
Repeat this for the other side.
Otherwise, if you wish, you could simply select the faces while in the UV Map editor and scale them to fit where you want them on a single map. Selecting the edges separately can help you make sure which side is up, right, left, etc.,
Noticed that the cube in the UV had triangles. One can untriangulate in the modeling room to get a cleaner UV and all quads.
model > untriangulate polygon
After it is untriangulated, just hit the UV editing mode icon on the top right and you should get the default UV map as seen below.
The rest can be done as Dart suggested with shader domains.
thx guys, I got it now. Carrara's UV editor is a mess! It has some really nice features, but carrara's interface and mouse controls are so hard to make sense of. I so wish there was a hexagon compatibility mode for carrara, so it would operate the same way. still, i got the job done!now off to program card game logic in unity!