ReCreating a Beta Render - Sunlight Through A Glass Door
 franontheedge
Posts: 342
franontheedge
Posts: 342
Hi,
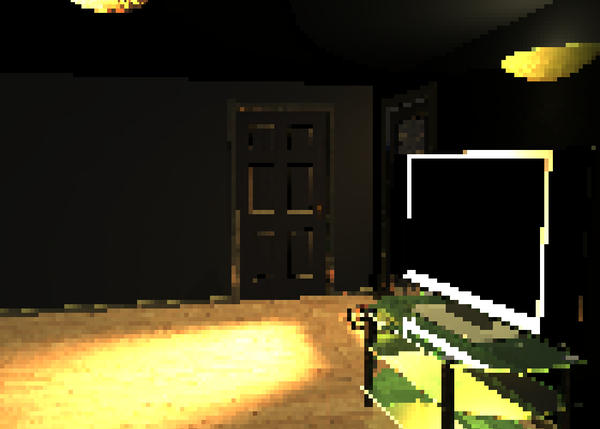
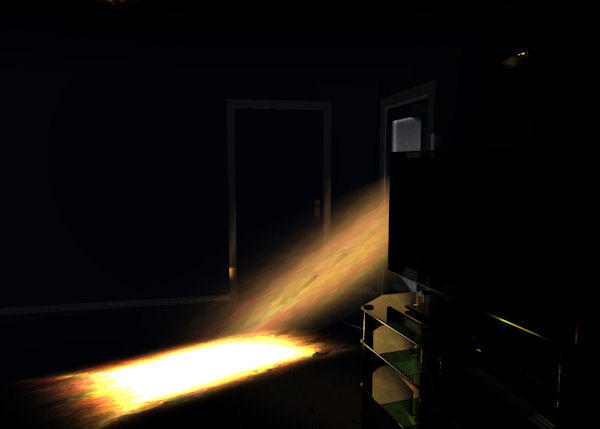
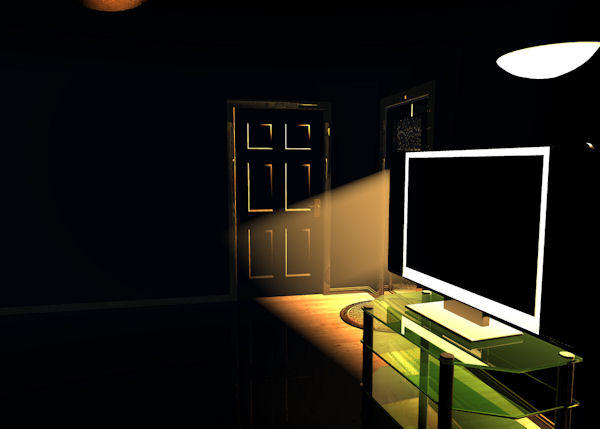
I made these lovely effects back when we had the Beta version - when the new lights were being tested.
So... Bryce now loads these scenes without the very thing that created these lovely effects.
Is it possible to recreate something like this with the current version of Bryce7Pro?
If yes, then HOW?
PS, I liked the last one best of all and I didn't even get to finnish rendering it, if that could be reproduced and rendered completely I would be so happy!!!
Daz 3D is part of 
Connect
DAZ Productions, Inc.
7533 S Center View Ct #4664
West Jordan, UT 84084
Licensing Agreement | Terms of Service | Privacy Policy | EULA
© 2024 Daz Productions Inc. All Rights Reserved.
Comments
There were no changes made on the legacy lights. Domes and truly parallel lights, distant lights and fill lights were added. Your scenes uses spot lights as it appears and they haven't been changed. You may miss one or two settings that were not saved with the file. It happened at times that a setting was not collected for saving.
Unfortunately loading any of the scene files that created these effects in the Beta version concerned, loads everything in the scene - EXCEPT the light - Bryce says it's loading the scene without one object - and when it's loaded, a plop render of part of the lit area comes up dead black - so the missing object must be the parallel spotlight.
It does say " missing object" not missing setting. (shrug)
I remember this being one of the very first Beta's where the lights were being changed/added. I wish I remembered the settings. But I don't have that kind of mind and a very bad memory! Lol.
I do know that I had 2 spotlights in these scenes both in the same sort of position - I think the new lights were hard or impossible to see in the wireframe view, so I was using an old one to remind me where the invisible new one was sitting - the old light had all it's settings turned off and only the new one was working.
This leaves me totally guessing as to what I had set up and it'll probably take me a few months - if ever - to find out how to do sunlight again...
I just hoped you or David might have some little bits of knowledge that might make it a bit quicker for me, that's all.
Okay, I still have no idea how I did the original images, but here's my latest attempt at sunlight on the floor:
I've used a gel on the parallel light - which is the same gel as I used in the original. However I can't get the effect of the rays streaming into the room, not at all.
I've tried setting the parallel light to volume, surface, infinite on, or infinite off, and I've fiddled with other things in there - nothing changes. I even reverted to using a sphere with a cloud or fog material on it - it looked rubbish.
I don't say the original rays were all that great, they were much too obvious for one thing, but I would have liked to know how to do it.
I also don't like the pale cold look of the sky - just glimpsed through the upper glass panel of the door - I did have a 2d image plane there, but for now I've hidden that.
Plus the sunlight is disabled, I didn't want that getting in the way.
Anyway, I'm not really happy with this, but thought I'd post it as showing progress... a bit anyway.
@franontheedge - have you tried a cylinder with a streming rays material like the one from Frozencry free at http://www.bryce5.com/details.php?image_id=1144?
You could also try to use the parallel light with a procedural gel - or just give the light a volume material. Make the light a visible object, volume, infinite and cast shadows. As for the material try a cloud or stone texture from the texture library (alpha only) in object space and for base density of the volume material. Set all colours to white (or diffuse a bit yellow), diffuse to 100 and ambience to 20 as a start. Don't use edge softness but a fuzzy factor of around 160 and quality/speed about 2/3. If this gets you somewhere, adjust the values. This is not my idea, I got this from a Bryce 6.1 file and I don't remember where I got it from. I opened the file in 6.1 and 7.1 and the result looks the same.
I've tried the Frozencry material on a cylinder - which does produce rays... but...
And then I tried the parallel light again. Tried the procedural gel, tried the cloud texture, tried stone - could not get any change whatsoever, until suddenly the light went black - and that's all I've managed to change.
Nothing looks anything like the original.
I sent you a PM.
I just got that, thanks. As soon as my render of some of David's weird cubes is done, I'll go take a look at this.
Here are some of my latest renders of sunlight effects, in Bryce7 Pro:
The lighter versions have a radial enabled in the ceiling light in the centre of the room, which although lightening the cube itself very nicely has unfortunately also lightened the shadows under the cube, I might try a negative light under there...
The other change I've made is to turn on 'Volumetric World'. In the lighter versions it's set to 86 in the darker ones it's at 96.
@franontheedge: Those are looking nice. I personally like the last image best.
@franontheedge - volumetric world: I should have thought of that option, too. Though a render hog, it can produce excellent effects as you've proved here. There is still something I doubt is fully natural looking: the light is coming from the right and we would expect a elongated shadow at left of the cube object. Not a black one, a soft gray one. Perhaps the radial on the ceiling is too strong. Try to use Diffuse very low (1 or 2), no Falloff and disable shadows for it.
Nice experiments with rays. Very inspiring.
That looks very good. Have you ever tried a fill light to enlight the other parts of the room? It is a bit fiddeling but works very well.
@GussNemo,
Yes I prefer the last one too.
@Horo,
Yes, I can see that there should be a shadow to the left of the image, and I don't know why there isn't one, but is a soft one under the cube. I felt something was wrong and I was trying a render with a negative light under the cube to darken it there, which looks better but you are so right about the lack of any shadow to the left. And why isn't there one? Why is the shadow directly under the cube and not under AND to the left?
Here are my settings for that render:
I have 2 small close parallel lights directed at the floor to provide 'gel using lights' at the correct angle to come through the 2 glass panels of the door – plus I have a single large parallel light some distance away: see screen capture pic:
(The front door is in pale blue and the cube is in dark blue – so you can see where they are in relation to the lights)
Ignore the other yellow lights – they are simply rads in position for other purposes but all are set to 0 so should be having no effect whatsoever.
Here are the settings for Volumetric World (Atmosphere) (SunMoon) etc:
And render settings:
There is no IBL and the sun is disabled, however SunMoon shadows are on – is that the problem do you think? Hmm maybe not, since without SunMoon shadows the whole thing just floods with light, no shadows at all. Why is that? Why don’t the shadows caused by the lack of light (Object in the light path) from a parallel light work without 'SunMoon' shadows being on? That's weird!
@Mermaid,
Thank you. As you can see it's not quite there yet, but it does produce some nice effects, a bit grainy in places with normal render settings so I've turned premium render settings on and upped the rays per pixel (64) & max ray depth (8)... thinks...
@Horo,
Maybe it's the TA Optimisation, maybe that's a bit high at 484? Both close parallels are set to that, but not the Large parallel light – however, when I tried that lower at 200 and then turned that off completely it seemed to have no effect whatsoever, but I haven't rendered with that off, since I'm waiting for the negative light render to finish first.
@ electro-elvis,
I've used fill lights before – of my own making, by that I mean setting radials to different settings and colours and positioning them, then grouping them and saving as a set.
I've done that with a 'Light Sliver' and with a 'Light Dome', with some of the lights set to white, some to a pale yellow and some to a pale blue.
I've also tried a 'Sun Light', this consists of a group of radials positioned very high up in the sky, with an arrow (hidden) down at ground level showing the direction of light being cast. The brighter of these uses 448 lights; the paler version just 224.
I have one set of lights set up with 1 white rad, 1 blue and 1 yellow, aka 1 key light, 1 back light and 1 fill light.
Slivers are similar but just use more radials set up as if they are a sliver cut out of a dome – which they are...
But I've only tried one of the 'Sun Lights' in this scene.
What I haven't done yet is play much with the new lights in Bryce like the fill light.
You sound as if you've used these fill lights, can you show us any results? I'd like to see those. Settings too if possible. I do hope you're not one of these people who throws a scene file away, that's so exasperating! Lol... looking around innocently.
@franontheedge - I'm not sure why you use blurry reflections. Do they make any difference in this setup? Sun/Moon Shadows at 90% means that every object in your scene is 10% transparent to light and it increases render time. Better strategy is set it to 100% and if shadows get too black, use a light.
Fill lights are great but a bit tricky to use in my opinion. I used to random replicate a couple of radials limiting to the inside of a room and gave all of them a negative distance response, i.e. they are dark near but bright in the distance, falling off linear anyway. This prevents radials that are near a wall create bright blobs on the wall. The working of the new fill lights is similar and automated.
I'm not sure you really need 2 parallel lights but anyway, make sure they cast shadows. The light source that is responsible for the light on the floor is also the one that should cast the shadow. The shadow under the cube appears to come from a light source directly above.
@franontheedge: Have look in my gallery here. Both of my indoor scenes use fill lights. (I don't think it will be a problem for you to find them, because I have only five pictures in my gallery ;-) The easiest way to find my gallery is to insert "electro" in the second search field of the gallery. I mean this one with the labels "Categories: Figures Environment Object Vehicle Fashion Mixed-medium" on the left side)
Here the mentionned scenes with the light setup.
The first one with the basement is not a fill light but a dome light. It is quit big. Bigger than the room at least.
The second scene with the living room uses a fill light. I try to write down, what I know about the single fill light options. It may be a bit simple, but nevertheless I hope I can make myself clear: The "quality" ruler determines with how many light sources the fill light is filled. The higher the value the less you can recognize them. The "bias" ruler pushes to light sources to the top of the fill light. The higher its value, the more light comes from above. The "randomness" ruler should spread the light sources in the fill light more randomly. My simple conclusion for this ruler. A higher value makes the scene a bit darker and the light a bit smoother. The gradient option is set due to a hint of Horo. To achive a very smooth light with nearly no banding, you should switch on "gradient" and change the places of the both gradient rulers to the opposite. And the last point. I have learnt, the fill light should be nearly as big a the room, but should not touch the walls nor the ceiling nor the floor.
I hope it helps.
1. Picture: Setup for the living room scene
2. Picture: Living room scene
3. Picture: Basement scene
4. Picture: Setup for the basement scene
@Horo,
If you look closely at all the renders I just posted you'll see that there are curving lines in the beams of sunlight, I tried Blurry Reflections because I was trying various things to try and get rid of those lines. It's also why I turned on Premium effects, I've tried 48 bit dithering too – anything that sounded like it might smooth out those lines, but I haven't tried everything yet...
I forgot about it when I noticed the problems with the shadows.
Yes, I'm thinking that way now myself – I started using 2 because 1 wasn't giving me light beams going through both panes of glass, so I got 2 lights (parallels) and positioned them both so that they absolutely HAD to cast light on the floor in a nice square.
But with Volumetric World turned on I'm getting beams of light from just one light and it's going through both panes... it could have just been a matter of positioning the single parallel light correctly but I was going nuts trying to get it to work before using Vol' World.
They all do...
Yes, I know it looks that way but I assure you there is no light above the cube. Not directly above. Never has been. There is a radial above and behind the camera, but in that last darker render it's switched off anyway (set to 0).
There are 7 radials in the scene and they are all set to 0.
Even with deleting all those radials completely this makes no difference whatsoever, (so it's not them.)
I've now turned off all lights in this scene except the single large parallel light in the distance. I'll post the result as soon as Bryce gives me back my PC so I can start another render..... It'll probably be a day or two... sigh.
In the meantime I could post teany tiny previews but that's it.
@franontheedge - electro-elvis gave you good advice how to use fill lights. I mentioned the setup we used before we had them. Create a radial, random replicate it. In the random replicate dialog you can set the limit. Group them all, then you can resize the space they're in and place the group into the room. Ungroup but keep all selected, then set the gradient to inverse, see image. Set to gradient and edit. The inset above shows how it looks. Select the colour dots at both ends and change the colour so it looks like the lower inset.
Okay – done that.
1. Picture: Setup for the living room scene
2. Picture: Living room scene
3. Picture: Basement scene
4. Picture: Setup for the basement scene
Interesting and thank you very much for posting this information.
By the way I looked at your gallery, and when I saw your image 'Two Bridges' I immediately thought of 'Durdle Door' on the Dorset coast. Only your image shows just the end of the promentary. How did you do the rock formation?
Is it something that comes with Bryce?
Is it possible to keep the yellow colour I had in 'Colour' before I changed it to 'Gradient'? I tried to, but the black seems to be dominant.
I'm not sure what the transparent is doing and what the black is doing. So can I put the yellow colour where the black is, or should it go where the transparent is? Only won't that stop the sunlight/parallel light's beams from fading as they do presently?
Oh, by the way getting rid of the 2 close-up parallel lights seems to have stopped the lack of shadow to the left of the image – with just 1 parallel light I now have shadow on the left – of course there's now too much shadow in the room and not enough light, the beams are too faded, and the detail of the cube is almost gone... but at least the shadow is where it should be...
But I've also still got banding.... sigh.
Sure, you can mix colours, left green, right red if you wish. The transparency is what you have set. Set the dot to Adjust: Color, not Transparency - see above.
I am sorry, but I have to answer your other points later. I got work to do ;-)
Well, I spent most of yesterday trying to get an effect like the one you're looking for, so I'll share my set up for this render.
I'm still not happy with it because I can still see some slight banding in the light ray and the contrast is perhaps a little too much on the girl caught in the beam of light.
The basic set up is a positive cube with a smaller negative cube inside it and another negative cube to make the window opening.
A single regular spot light was then positioned to make a nice shaped light pool on the floor and wall of my 'room'.
Vicky 4 was added, sized and positioned to be lit by the light beam.
Then I copied/pasted the inner negative cube and changed it to positive and added a material much like Dan's Fog material and spent a good long time messing around with the settings to get it look anywhere near right (and got some very odd results along the way which I didn't save).
Finally I added a single regular radial light set to give out only the slightest lighting to give some detail to the inner walls of the room (without this, all the walls, ceiling and floor are pitch black).
It took nearly 4 hours to render using the render settings below.
Hope this helps. :)
Continued from above:
I am sorry, but I have to answer your other points later. I got work to do ;-)
Yeah, me too... got a lot of jobs to do. Catch you later...
@franontheedge: Thanks for your explanation how to use hardness in Wings3D and of your scenes. Now I can complete my last posting
Banding: I tried to find out something about the banding and made therefore a scene with sunlight through a window. I am afraid I did not get noticable banding. I used a cube dome light and a cube for the sun beams.
Durdle Door: I am afraid I have to confess that I did not know this beautiful looking durdle door. My island is out of my imagination. To build the rock I simply used terrains which I not even tried to fit exactly together. I was lucky with the material I took. You find it in the Pro Materials and it is called Lincolnshire Wolds.
@Dave: Nice sun beam.