Depth Map For DOF
 stu sutcliffe
Posts: 274
stu sutcliffe
Posts: 274
I have had a go at these in the past.....it is all a bit hazy these days. I gave up on them because it was all a bit complicated. Two stumbling blocks I seem to remember were a jaggedy edge and hair would not render.( this is using the multi-pass rendering.)
I think I just had one of those cartoon lightbulbs appear over my head.
See what you think....
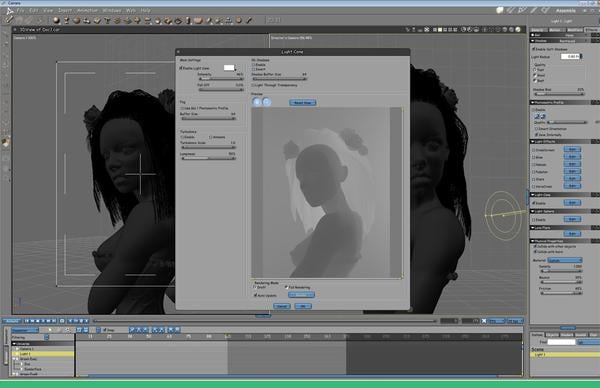
I am experimenting with a light cone for my "Sugar Skull" girl,and I just wanted the rays and nothing else so I could try and composite it in photoshop. So I made all the textures black and did a render. Now, this render looks suspiciously like a depth map to me...mmmm may be I could use it as one? It has no jaggedy edges and the hair is there! What could possibly go wrong.....
I will have a play tomorrow when I am awake. Just thought I would share it,feel free to tell me it wont work...or even have a go and tell me how to do the rest! ( I know its a bunch of shennanigans in photoshop layers....and they do my head in!)
Daz 3D is part of 
Connect
DAZ Productions, Inc.
7533 S Center View Ct #4664
West Jordan, UT 84084
Licensing Agreement | Terms of Service | Privacy Policy | EULA
© 2025 Daz Productions Inc. All Rights Reserved.
Comments
There is a render pass that will display hair as a silhouette, but off the top of my head I don't recall which one. Since I'm gong to use the function shortly, I'll experiment with it in the next couple days to let you know which one.
What I do, since the silhouette is sold black, is to extract it by drawing a poly line around it in PS and copy it. I then paste it into the depth pass and adjust the brightness value to roughly correspond to the head's values.
Your method looks like it should work great as well. The only issue I can see is if you were to have a background it may not work quite correctly. The way your scene is set up at the moment makes your method perfectly viable.
As to the light cone, if you want a blacked out figure, the multi-pass option may work better as it's a solid silhouette, but as I said, I have to experiment a bit to figure out which one it is.
Yeah, I know the one , its one of the Volumetric check box's. I just noticed the light cone option seems to struggle a bit with hair also. I guess the there is no easy way to do this .Apart from spending a day rendering with the built in DOF.
Good point about the background. I dont do very many backgrounds but if I do I will do it as a layer,these days,it gives options later.
You may be disappointed with the built in DOF as well. It also does not handle hair well.
If you use a relatively modern version Photohop, go to Filters--> Blur--> Lens Blur. It will open a new, large window with the lens blur parameters. There's a pulldown menu that gives you the option of selecting a layer with depth information. It's pretty simple. If it's an old version of PS, such as PS 7, then you won't have that option.
In the example I posted, you'll notice the hair in the depth pass is a uniform grey. I traced around the hair with the poly line tool in the colored layer, feathered the selection one pixel, then switched from Layers to Channels and found my depth pass. I then painted in the poly line with a shade of grey similar to the head. Took less than five minutes.
Thanks...I think I will go back to my old way of just using the blur brush in PS.
My original task for the evening was to do a light cone.But that seems totally broke with hair. oh hum....I will have to figure out that one in PS.
It's far from perfect, but what I've done for the light cone and hair, is render the figure without the cone, then enable the alpha in the render room, enable the cone and hide the figure. I sometimes will put a light gel on the light and enable the shadows option and the light gel option in the light cone editor. See the moss example pictures.
The other option that I like is to use a volumetric cloud with low opacity to generate a "real" light cone. The image with the airship uses this trick.
try rendering out object index and use that to select things to blur and not to blur
It's far from perfect, but what I've done for the light cone and hair, is render the figure without the cone, then enable the alpha in the render room, enable the cone and hide the figure. I sometimes will put a light gel on the light and enable the shadows option and the light gel option in the light cone editor. See the moss example pictures.
The other option that I like is to use a volumetric cloud with low opacity to generate a "real" light cone. The image with the airship uses this trick.
great renders evil
ta for the input fellers!
I have come to the conclusion photoshop is the way to go! ( its for stills)
I Youtubed lightrays ,there are a million tuts to get glazed eyes over.
I added a few subtle rays to my movie comp entry..10 mins in PS. I will post it in the final entry thread when it appears.
Funnily enough, I just did a portrait render with Carrara's DoF but I used the Full Raytraced rather than the Fast version - good news is that the Full version DOES deal with hair properly, the bad news is that it is REALLY slow. I ended up doing two renders, one with minimal lighting with Depth enabled (for the hair and background), and one with full indirect but no depth (for the face), and then combined the two in post.