Armored Sphere - Wings 3D Tutorial
 Fencepost52
Posts: 509
Fencepost52
Posts: 509
As promised, here's the tutorial for the armored sphere in Wings 3D:
Let me know if you have any questions. Enjoy!
Art
ArmoredSphere.jpg
800 x 800 - 417K
Post edited by Fencepost52 on
Daz 3D is part of 
Connect
DAZ Productions, Inc.
7533 S Center View Ct #4664
West Jordan, UT 84084
Licensing Agreement | Terms of Service | Privacy Policy | EULA
© 2025 Daz Productions Inc. All Rights Reserved.
Comments
just some variations
Thanks Fencepost for the tutorial
Nice variations user.operator
@fencepost: Another nice tutorial. Have to give it a try.
@user.operater: Your version of the object are real nice.
this is just a question for anyone who might know, but does hexagon have a line hardness option to lock lines in place like in the tutorial? I can't say how many times a feature like that would have come in handy.
New shapes look great, user! Keep experimenting.
I don't have Hexagon, although I may purchase it to learn a new program, so I can't answer your question directly, but here's something to try: With the edges selected, use the bevel tool and either set your bevel to zero or something very close to it. This can be done in Wings too and what it does it places the edges so close together, they would hold the shape in place. Let me know how that works out.
Guss and Mermaid: You're welcome! Looking forward to seeing your renders!
Here’s mine –Hdri using a custom sky, Rpp 64 soft shadows and TA
Hopefully I will experiment with this,using different values for the sections and slices and maybe different shapes. I got a bit distracted by Horo’s render and spent the rest of yesterday trying that out.
Looking forward to the next tutorial;)
Here is my attempt at the armored ball, although with an experimental twist.
I'm not sure what happened to my post from earlier today, but it's gone. I commented and told you both that I really like the renders and the experiments. They look really nice. I appreciate you trying out the tutorial and sharing your results.
This one?
No, it was addressed to mermaid/dangerlad. I read the posts after I hit the send button, but they're gone. Thank you for checking though. :)
Ah it looks as though you hit one of the dreaded forum glitches, Sometimes you may think you have posted, but it doesn't actually take
Can't wait till we get the new improved forum software, maybe those will then be a thing of the past.
Actually, I don't think we can blame this one on the forum. I responded to you immediately after you made your last post and my work computer (I wasn't posting during work hours, BTW! LOL) showed the post had been uploaded. When I checked a little while later, it wasn't here. I'm guessing I need to give the browser a good boot and it'll work like a charm. Thanks for checking. If it happens again, I'll let you know.
I've been known to THINK I hit the submit button only to find out I didn't. Sometimes part of me goes to sleep while the rest whistles merrily along. I've also been known not to spell correctly, too. Darn dictionary.
I've been fooled up by this forum software enough that - as a rule - I write my comments in a text editor and copy it into the post field. If it goes awry, I don't have to write everything again (most of which I forgot meanwhile anyway).
I do the same ;)
Wow Dangerlad - now that's what I call a cool, awesome experimental twist. How did you do that?
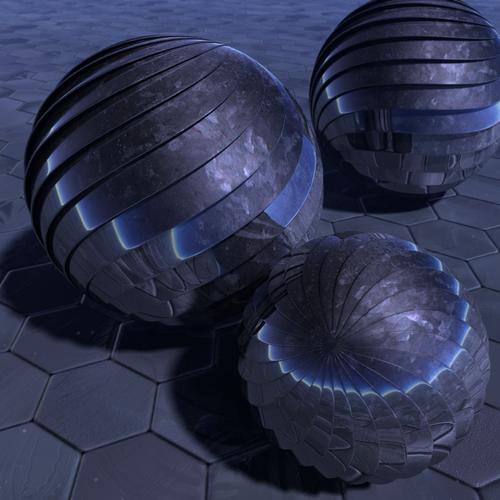
@Mermaid010 - I basically followed Fencepost52's instructions but before I started I manually rotated the horizontal rings of the sphere by increasing increments of 15 degrees. Th top most and bottom most rings where rotated 15 degrees. The next pair of rings were rotated 30 degrees and so on. The equator ring was rotated 90 degrees. To do the rotation I selected an edge in the ring I wanted to affect, looped it and then selected identical rings (so click on edge, "L", "I"). Then right click to call up menu, select ".Rotate.", select ".Y.", and rotate to the degree you want or manually type it in. Repeat as needed.
In my render, the left most is the resultant object fron my changes and Fencepost's instructions. For the other three, before I did my rotation trick I selected slices and gave the different materials so I could have different materials in the final render. Continuing from left to right, the next shape I smoothed with Doo Sabin Subdivision, the third shape is the regular smoothing, and the final shape is also regular smooth but I before I started the steps I did a loop cut at the equator and rotate one entire half 15 degrees. That gave me the offset pattern of the rightmost object.
I hope that helps.
Thanks Dangerlad for the info, much appreciated. :-)
Finally took the time to try fencepost's tutorial. I tried rendering the scenes using Obscure lighting, but using TA blotted out the slits on the spheres. Plus, it gave the scenes a look I didn't like.
Guss- cool renders
These two were done using Dangerlad’s twist, same setup, different materials.
Thanks Dangerlad and Fencepost for the tutorials. :-)
@mermaid: Thank you. You've got nice results following Dangerlad:s method.
@mermaid010 - stretch them up and they could go as soft ice. :-)
Guss - thanks
Horo -Will try to make soft ice. Thanks for the suggestion
Nice work, mermaid! Thanks for taking it for a spin! :D
This one ain't your fencepost tutorial one, but it turned out nice.
Somehow, Guss, I missed your first renders. Sorry for not commenting. They all look very nice! Great work!
No sweat, fencepost, and thanks.