Particle Body Experiment
 Joepingleton
Posts: 746
Joepingleton
Posts: 746
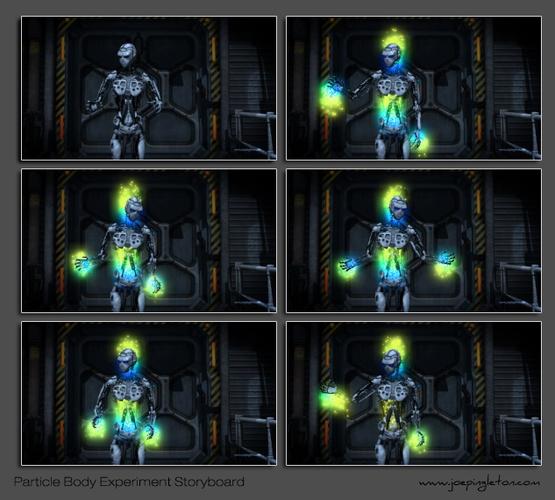
This is another experiment with Carrara Pro eight point fives particle emitter attached to a DAZ figure. The particles collide with all parts of the figure and the figure is animated with a motion capture aniblock from DAZ Studio converted to a nonlinear animation clip. I think it works better than the last experiment.
View the animation on YOUTUBE.COM by clicking here.
View the Stereoscopic 3D animation on YOUTUBE.COM by clicking here.
Click here to see the 3D animation on 3DVisionLive.
Daz 3D is part of 
Connect
DAZ Productions, Inc.
7533 S Center View Ct #4664
West Jordan, UT 84084
Licensing Agreement | Terms of Service | Privacy Policy | EULA
© 2025 Daz Productions Inc. All Rights Reserved.
Comments
View the animation on YOUTUBE.COM by clicking here.
This is another experiment with Carrara Pro 8.5's particle emitter. This time I used DUDU's technique of attaching the emitter to a Genesis figure and applying the Dissolve modifier. There are four experiments each using a different force applied. The first is a downward force, then an upward force, then a point force and lastly a flow force.
Which one do you like the most?
Heaven forbid having so much fun in Carrara, eh?!!! What a blast!
So anyways, first impressions for me has me liking the upward force when leaving and downward when returning, but I think that all of them would have their purposes. Very cool!
If it is a "transporter" like Star Trek, then I like the particles moving "up" or towards/from the other location. There is a sense of traveling in a direction...
Visually I like the particles going in/out from the center of the person, but it implies he is doing it under his own power (teleportation).
I like all the particles, but I don't like the way the person materializes as a grid over the skeleton. It seems too "video edit" and not molecularly organic. Also I would maybe suggest the skeleton not be so "matter-of-fact" skelly standing in the room under room lights with room shadows... I would think a glowing skelly or just a hint of skelly would be better as an "energy" that is building up denser layers first... Maybe bring that glowing effect to the skin too, to help that transition feel all more "as one" with the particles...?
Thanks for the comments and feedback.
These were a few quick experiments based on a technique I saw at CarraraTors Forum and there are many problems with my implementation of them. I had never tried the "dissolve" modifier, so I thought I would throw that onto the figure, clothes, and skeleton . I tried the atomize modifier, but I didn't like my results. I rendered the figures and effects with alpha channels and added the backgrounds later in the process, so the the lighting and shadows didn't match. I only rendered the transportation effect once for each effect and then reversed the frames to see how they looked backwards, so the physics look strange.
I like the ideas you suggest and will give them a try since these effects render so quickly. I think the effect would be better with some character movement and maybe some camera movement as well.
Is there a good way of changing all the shaders for a figure in Carrara or do you have to modify them one by one?
Is there a good modifier in Carrara that would produce a more "molecularly organic" effect?
As a general rule, if a shader function has a slider in Carrara, it can be keyframed.
I haven't tested this, but to get the materialization or dissolve effect, you could use one of the Cellular shader functions in the Alpha channel and adjust the scale or brightness/contrast to do the effect. Or you could use a 1-100 slider in the alpha channel to control the appearance / disappearance of the figure and an animated cellular function with a color or color gradient in the glow channel for zing.
Thanks for the information. I thought about key framing the shaders, but I was trying to see if I could create the effect easier with modifiers.
When I was thinking about using a shader I was deterred by having to keyframe changes for all 26 shaders on the genesis figure, 15 shaders on the skeleton, 6 shaders on the tunic, 2 shaders on the pants, 6 shaders on the boots, 3 shaders on the belt, 2 shaders on the vest, 6 shaders on the hair. That would have been a minimum 66 shaders to key frames (if I only changed the glow channel). Is there a way to modify all 66 shaders at once?
This experiment was only three sets of key frames on the dissolve modifiers for genesis, the clothes, and the skeleton. That's why this experiment only took 1 hour from initial idea to final movie.
I haven't used it, but isn't there some kind of reference shader? That may be something to look at.
View the revised animation on YOUTUBE.COM by clicking here.
This is an update of yesterdays experiments. I added one new render of the figure, clothes and skeleton in another file with the shaders converted to simple shaders with animated opacity and glow. This render was overlapped on the previous renders in After Effects. Its a subtle change, but I think it works better. What do you think?
Consolidate shaders so I have less to change
Go to each shader that I want to change during the animation and:
Change the top level shader from Multi-Channel to Multi-Channel Mixer (Under Complex Shaders in the drop-down)
Now your original Multi-Channel shader will be in Source 1 and you'll have an empty Source 2 and another channel below called Blender.
If you wish to switch to a procedural shader, simply copy the shader and paste it into Source 2
If you wish to change texture maps, but keep the same settings otherwise, Crtl Drag Source 1 onto Source 2, which will copy it there
Go into either Source 1 or 2 and load in the new texture maps where applicable
Under Blender at the bottom, use Value 1 - 100 slider. 1 will be Source 1 and 100 will be Source 2 and everywhere in between will be in between.
It is this value slider that you'll change along the timeline and you can then select any sort of tweener that does the job best.
Thanks Dartanbeck,
This is very useful information.
Wouldn't I still have to make 66 key frames to animate all the scene shaders using this method or am I missing something?
Or are you suggesting I make Source 2 a reference shader on all 66 current shaders?
Is that 66 shaders after they are consolidated?
I would think so as it would still be 26 shaders on the genesis figure, 15 shaders on the skeleton, 6 shaders on the tunic, 2 shaders on the pants, 6 shaders on the boots, 3 shaders on the belt, 2 shaders on the vest, 6 shaders on the hair. Only each shader would now be a Multi-Channel to Multi-Channel Mixer with a source 2 of a reference shader and a value slider. Wouldn't the value slider still have to be keyframed for each shader?
Bear with me, but are you saying Genesis has 26 shading domains? If that is what you are saying, if you go to Edit--> Remove Unused Masters--> Consolidate Duplicate Shaders. Now, any domain that uses the same image maps and has the same settings will be consolidated. So for example, if I consolidate shaders on V4, I will have the same shader listed under the domains for Neck, Torso, Nipple, etc. The same with the limbs. I still have the same number of shading domains, but I have reduced the number of master shaders.
Thanks evilProducer,
You are right that I was thinking I had to keyframe the shader domains. Your suggestions should make things more manageable.
View the animation on YOUTUBE.COM by clicking here.
This is a quick experiment in Carrara Pro using 2 particle emitters (smoke, sparks) attached to a M4 Skeleton animated with an Aniblock from the Carnegie-Mellon Motion capture collection.
I wanted to create a cloud of smoke that crept across a room, but I couldn't figure it out. So I just attached a couple emitters to a figure. Then consolidated the skeletons shaders so I only had to key frame the alpha channels on 3 shaders.
Is there a good way to get smoke to creep across a room? Maybe a volumetric cloud?
Thanks for looking.
View the animation on YOUTUBE.COM by clicking here.
This is a quick experiment with Carrara 8.5 Pro and a few particle emitters to have smoke fill a room.
Thanks for looking.
View the Stereoscopic 3D animation on YOUTUBE.COM by clicking here.
Click here to see the 3D animation on 3DVisionLive.