Carrara Hair Help....
 LinkRS
Posts: 168
LinkRS
Posts: 168
Howdy Everyone,
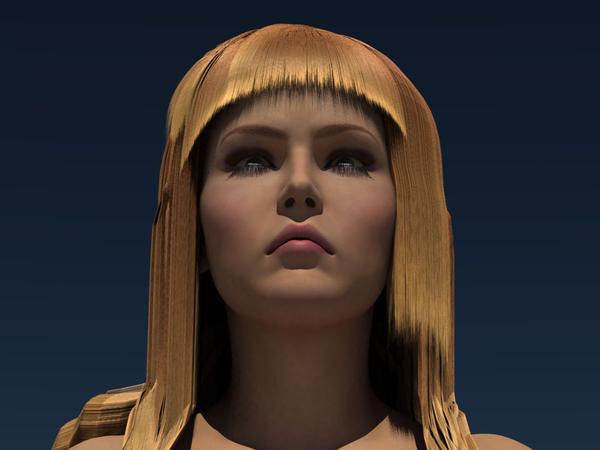
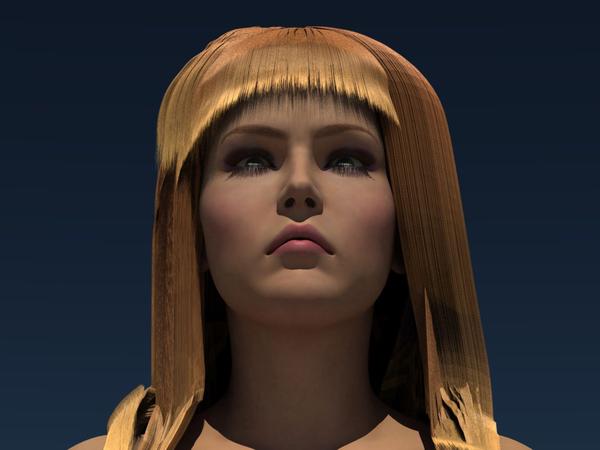
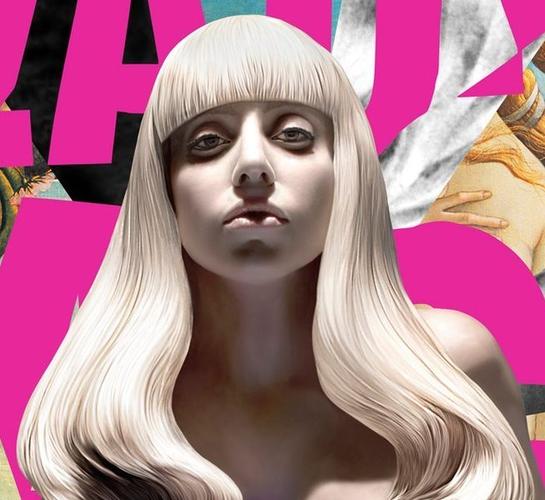
For the past two weeks, I have been trying to use the Hair room in Carrara to create some hair for a render that I am composing. The image is based of the cover of the Artpop Lady GaGa album, and I have attached a crop of the picture, as well as two different attempts I have done so far. I am not using any kink settings or shaders, just the main tools at this point. However, I cannot get it to look right. The ends are ragged, and the hair just won't fall the way I want it to. Any advice will be greatly appreciated :-)
Rich S.
Daz 3D is part of 
Connect
DAZ Productions, Inc.
7533 S Center View Ct #4664
West Jordan, UT 84084
Licensing Agreement | Terms of Service | Privacy Policy | EULA
© 2025 Daz Productions Inc. All Rights Reserved.
Comments
Here's where modeling in the assembly room can really help. Try adding a vertex object, and keeping it really low poly - then shape it around the head somewhat resembling the smooth shape of how you want the hair to actually land. That's a bit of a cheating way that I can think of. I used poxy figures made by Phil W (comes with advanced training course) and shaped it to ensure that the hair never drapes where I don't want it to. Now onto some other stuff:
3DLust has taught me that messing with the gravity settings can help for animations, but It sure doesn't look like you need more gravity. But on that note, you can add subtle forces to your scene and have your hair set to be affected by it. I had some pretty cool results using forces. Especially if you're going for a still - because you could, perhaps, set up a simulation and pick the best frame of them where the hair looks best. Even without forces, if you lower your character, physically, over a couple of frames, you might get that extra body lift you're looking for.
I've read where people had some great success with using "Push" in the hair room, but I could never get it to do what I expected - but I must admit that I ended up loosing patience. I guess that you can actually work on styles after draping. Push from the bottom up might work as well.
Since I take it this is still image, you don't really need to drape the hair, or at least it can be styled after draping. That's the only way you're going to get the ends the way you want.
Also, you will want to open the hair shader and look at the hair length shader and make sure it is off, or that it is set to no variation. Personally, I would make sure it is on, and the length is set to 100% with 0% variation. That way you know that you are forcing the hair to be even. My tests looked positive. You'll need to either up the density or size of the hairs to fill out the bangs.
Just an aside here, but the image you posted is as heavily processed as they come. Besides the heavy duty image editing, that is clearly a wig. Which means that it is also not real. I have no doubt that the hairline in the reference image has been helped along digitally. I also doubt the hair fiber in the wig is real. It's more than likely synthetic, which also adds another layer of possible unrealistic behavior.
Carrara's dynamic hair can be used for a lot of things, but it is meant to at least simulate hair in how it looks and behaves. If you can't get the hair exactly like the picture, remember that what you are modeling your render on isn't exactly real either. ;-) Postwork can be your friend!
I have the opposite problem...I like my hair shaggy and with uneven ends (Paleolithic people didn't have hairstylists!).
If you make her fringe (bangs) a bit longer, you can untick the generated hairs box so you only see the guide hairs. Then select only the fringe so you don't mess up any hairs on the side, and use the scissor tool and run it straight across the front so all guide hairs are the same length. Pull them into place with your mouse, not the brush and I don't drape. See below.
Add extra guide hairs for thickness and extra segments for smoothness and use the "even segments tool" in the toolbar (the one with the little "o" in in. That should help with the boxy look towards the ends on the shoulders. If you "push" just do it the smallest increment you can put in the push box tool, just to lift the crown for a natural look. Too much push given an uneven crown. And pushing without adding segments makes more boxy hair bends.... which I have struggles with a lot! I never ever use drape anymore, I keep the generated hairs hidden and style the guide hairs using my mouse, pulling, curving, etc. I even avoid the brush when I can. The mouse on the guide hair lets me move one or more hairs in the direction I want. And if you have Pro you can use symmetry, but I don't. I want natural hair.
And as EP said above, be sure the hair length shader is OFF and that the thickness shader is OFF as well. Once trimmed you can then decide if you want to make the roots a wee less than 100% thick... for a more naturalural progression from root to tip. Even the top might need a wee reduction.
Holyforest Real Furs has a cool white fur shader...have a look. I use Holy's furs for hair all the time because of the tone mix. You can adjust that and change the colour, too! Just choose Long Hair instead of Fur.
http://www.daz3d.com/real-furs
xx :) SileneUK
Hi Dartanbeck, evilproducer, and laurenwbr,
Thanks sooo much for the advice. I purchased and have been watching the Phil W Tutorial (not the advanced one), and working on this image for the past couple of weeks. It took me several days to get the posing just right, and I found that directly manipulating the values under "motion" directly was easier to get the exact angles I was looking for. Once I got the pose just right, I purchased and used the terrific Olympia Carrara Shaders, and then decided to do the hair. I was unable to find a pre-built hair that had the look I wanted. I am not trying for an exact match to the reference, but I do want the bangs and general shape. I was not aware that the shader modified the hair length and variation I assume makes the hair length flux. I guess I need to go back and re-watch Disc 3 LOL.
I have been having issues with styling the hair, as the brush tool always brushes it into the mesh, and when I use "Push" to fix it, it adds kinks and other "frizzies." I am wanting that straight look. I am going to try evilproducers suggestions first, and mess with the hair shader. I am afraid that Dartanbecks' suggestions jus went over my head LOL.
Thanks again, the friendliness and willingness to help in this forum is fantastic. I hope to be able to give back to the community as my skills improve. Thanks again!
Rich S.
In essence, here's where I was going:
When you drape the hair (if you drape the hair) you have physics follow the rules that you've set up for how stiff the hair is at the root, throughout the rest, and how well it retains its current shape. You can hit the esc key to halt the drape, and keep it anywhere along the drape process. This is my technique for getting my overall shape of the hair. Once it drapes close to the shape I want, I hit esc, and change the settings to help hold that shape.
In Phil's Advanced Training, he covers the idea of using a Proxy model for your hair. The Proxy is basically the same shape as V4, but has a lot less polygons. He gives you two versions of the Proxy: One that you use all by itself, and one that, instead, you conform to V4 like clothes. So then you set up V4 to NOT collide with the hair. You do this with the clothes as well. This has the affect of giving the hair much less to calculate for collisions, which is what it does during draping.
He also gives you a face shield that you can use to help keep the hair from simulating into and over the face - if you want to use this sort of thing. It's really well thought out, and his instructions are very cool!
So anyways, using this idea of 'giving the hair something else to drape upon' - something that will actually be invisible in the scene, I have tried to pretty good results making simple models shaped around the figure in the shape in which I want the hair to lay after a drape.
3DLust, an amazing DAZ 3D Published Artist, told me to use primitive spheres, and only allow the hair to react with those - and not the model at all. I am now wondering if the hair works best on triangulated mesh, since all Carrara primitives are triangulated meshes.
So using what 3DLust was saying, we can add a primitive sphere and place it where the head of the person is and scale it to match closely. We can then add another, or duplicate that one, and position them into a glob of combined spheres to create a shape for the draping hair to follow. I'm probably not making much sense - I could show you so much easier than I can type...
When I get back to Carrara I'll see if I can make some illustrations to help.
Wendy has taking another step in this direction entirely, and used conforming hair to use as the draping template. I also think that she's actually used the conforming hair as the thing that she grew the hair on.
Carrara hair isn't a real mesh at all, but just a shader that follows where it's told to go - I think. Something like that.
So given all of that, you could make a nice, smooth mesh that has that mellow undulating curve as a template for your hair to collide against as it falls during a drape. That can help to give some very predictable results, indeed.
When I say this compared to what I'm reading that others do, I realize that I have an entirely different method than what appears to be the popular method around here. I usually set my hair length as it sticks straight out from the head and cut it while it's in that shape. Then I brush it into a position that I want it to be in as the start of the draping sequence. I like to let it fall into place - largely due to the same reasons you mention regarding the difficulties in getting it where I want with the tools.
When I start the drape, I might give the roots a little less stiffness, then esc, and crank the stiffness back up. In the same principle, I'll leave the shape at zero during the initial drape process. But if I see a shape that I really like, I'll esc out and turn the shape up a little, and then I'll usually stiffen the roots too - of course, I'm saying this because of the specific look I was going for. Using my method, you really need to play with the idea of helping the hair be where you want the physics to take it.
Carrara includes directional forces that we can use to help manipulate the behaviors of physics and particles. You can use these for hair as well. By adding a very slight upward force that faces slightly back or forward or left or right... whatever, you can use this in conjunction with the amount of force you set for the scene gravity. Forces and gravity settings can also help to create something for your hair to fall against.
With Phil's Proxy conformer being a mesh that we make invisible during renders, I stretched mine around and made it account for clothing and also how i wanted the hair to behave, like making the nose really huge so the hair doesn't keep covering the face, etc.,
The biggest woe that I've encountered with Carrara hair is that the shader options for making the hair curly totally wrecks an animation.
3DLust's idea of using spheres and higher gravity might help me to fix that, I hope. But it makes for some beautiful still images!
Dart. that is a great idea. Thanks for that... great for bed-head hair. I am going to give that a go...less fiddly that what I am currently doing!
I was actually starting to use some actual hair model objects, and leaving some of the hair in place, then blending weaving in Carrara Hair so I can have the hair's morphs for different still scenes, but will try doing my own with your tips. I need to get Phil's second IS tuts..... as well but might miss the sale as I have other commitments at the moment. I had done the Carrara hair weave before when I needed a braid, but I didn't like the scalp style....I created a more natural scalp for a man, and then had the braid hanging down.
Cheers, xx :) Silene
Howdy Everyone,
After months (and months) of playing with this, I ended up finding (and purchasing) a pre-made non-dynamic hair that works (mostly) for my original design. So, I am putting this render to bed (so-to-speak), and plan on starting my next project. I still am going to try and get a hang of the dynamic hair, and I think that the best solution is to attempt to place the hair guide-hair by guide-hair into place, vices using the automatic tools. This sounds tedious, but I am not sure of any other way maintain control over every strand. The biggest problem I am foreseeing is going to be that I am not a hair stylist LOL. I am posting my final render into the gallery. Thanks so much everyone!
Rich S.
It's very difficult to paint down guide hairs exactly as you expect them. After that, you still don't really have much control over the generated hairs that are not guide hairs. You're right. It can be frustrating!
I intend to get back into trying my hand at dynamic hair as well. I think that it takes experience working with the many settings, scene forces (like gravity and, perhaps others) and overall scene content. One day I'll look back at my failed attempts and laugh at myself for over-thinking everything! :ahhh: I hope!