Granny Panty issue
 rol3d
Posts: 40
rol3d
Posts: 40
Granny Panty Problem.
This is my first attempt at creating a model, so pls be patient.
Steps:
- To create the mesh, I brought the Basic Female over in zero pose.
- I created the mesh from scratch in Hex and brought it over to DS via OBJ.
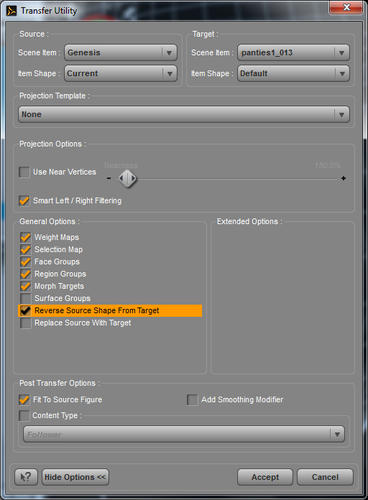
- Used the transfer utility to fit (see screen shot).
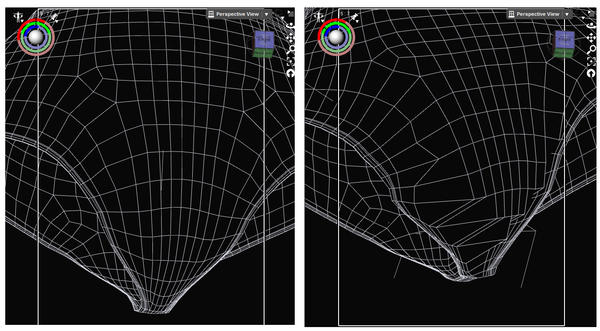
- It looks just fine … until I pose: then the mesh distorts; it looks like it pulls a very limited number of vertices rather than spreading the change of a number. (see screen shot: top row: un-posed)
What steps am I missing?
Thanks
Daz 3D is part of 
Connect
DAZ Productions, Inc.
7533 S Center View Ct #4664
West Jordan, UT 84084
Licensing Agreement | Terms of Service | Privacy Policy | EULA
© 2025 Daz Productions Inc. All Rights Reserved.
Comments
without getting your Knickers in a knot
oops sorry!
maybe use near vertices
and start with Base genesis
Ha, no knotted knickers here :)
Thanks Wendy; I tried to import to the base genesis character as you suggest but got the same results.
What do you mean with "maybe use near vertices" please?
on your third image
under projection groups above Smart left/right filtering tick Use Near Vertices and move slider, more takes longer and could crash studio but is more accurate, have to judge it a bit
Interesting: If I wind up the slider enough to reduce the distortion, the rest of the mesh no longer fits.
Bend out just one leg (or whatever direction of that thigh bend that's having the most issues), take note of the color of that slider.. look up and find the x y or x translation that's the same color, that's the easy way to keep track. Select the same bone (left or right thigh in this case) in the panties and change your tool to the weight mapping brush. Open the Tool tab if it's not, I dock mine with my content library. Find the applicable rotation x y or z that you figured out before and click on it to select it. Up at top of the tool tab you'll see 3 or 4 (I think it's 4, don't have it open at the moment) little icons that change which kind of brush it is, you want the 2nd from the left, the smooth brush. The size is probably fine but you may need to change the strength. Left click and drag over the areas that are not playing nice to smooth out the transition from bent to not bent.. best way I can explain it, you will see what it's doing in real time so it'll make a lot more sense doing it than reading about it. Don't do too much or you might get issues with other areas or the same bending in the negative direction. A dab'l do ya. You can also check the bulge mapping, sometimes that needs a little smoothing, it's harder to tell which one is effecting which way though on those... but you'll be able to see if it's jaggy on the red/blue coloring. If it's jaggy then smooth it a bit, if it's not then it's probably fine.
Apparently the technical term for your rigging problem is "crunchy crotch", around from the 3rd gen era.. though it manifests itself slightly differently with Genesis than the old style rigging it's the same basic problem.
Oh, once you've smoothed out the biggest problems you should turn on the smoothing modifier, that's what it's made for. You likely won't get it 100% perfect, or even 95%, it's really hard especially in that area and with legless things like that.
Scene tab, select panties, upper corner pull down menu, edit->geometry->apply smoothing modifier. Try 3 or 4 and collision of 1 or 2 to Genesis. Higher than 4 might mess up your edging. Also try both base shape matching and generic,often times one will look better than the other and you never know which ahead of time.
Well. I didn't quite understand the first part, So, I simply tried what you said in your second message (' ....Scene tab, select panties, upper corner pull down menu, edit->geometry->apply smoothing modifier.. ) and it worked. Thanks so much!
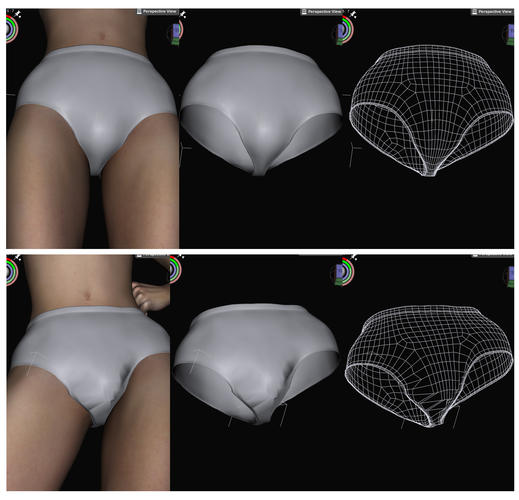
I've experimented and I'm just not getting it. So, I took a pair of commercially available bikini bottoms and bent the right leg out: nice, even mesh displacement (see image). Then, I compared with my Granny Panties: horrible stuff, even with the smoothing modifier. How can I get mine so that the mesh is nice and even like the bikini? I even tried refining the mesh in Hex, still a problem.
What program are you using to edit the mesh?
I'm using Hexagon 2.5.1.79. Exporting OBJ, I'm not using the gateway due to texturing issues.
I may bring the Bikini into Hex, port it back to Daz via OBJ and see what happens. I though this would be easy, ha!
Look at not only the number of polys, but how they are distributed between your mesh and the commercial one. Also, it kind of looks, to me, at least the weights in the commercial one are adjusted so that the leg has practically no effect on the crotch area of the bottoms. The net effect of that would be that moving the leg doesn't move them at all.
Good point. That Bikini is also cut high on the thigh, that may be why?
You need to adjust the weight mapping in that area. I wrote out instructions, that was the part you didn't understand above. I would suggest looking up videos on weight mapping in DS, it will be a lot more clear what you need to do seeing pictures than just reading my words.
One of the advantages of having more polys in certain areas of clothing meshes, is that any distortion is going to happen over a smaller area. Another is it gives more room to do things like intentional wrinkles.
But taking what Fisty said along with your observation about the 'cut' of the item, yes, the bikini probably has little/no influence from the weight maps for the leg, but your mesh has to, or you will run into distortions on the 'other' side...the outer leg, instead of in the crotch area. The trick is going to be how to achieve a balance...and that's where weight mapping becomes an art, over a 'science'.
Quoted for truth
>Good point. That Bikini is also cut high on the thigh, that may be why?
Of course it is one of point, because if you cut more edge area, the area need not get influence of weight map
usually it make you more easy ^^; the area should be stretched strongly.
transfered weight from genesis, it often cause the problem around the area.
Anyway,, I strongly recommend if you really hope to make it better, read fisty suggestion
once again.
In eather case, weight map is art or math,
we can not escape from weight-mapping when try to make clothing for triax figure, or give up.
At start point just change tool to weight map, then compare two. with selecting the node of cloth,
and rotation , which now you bending. you may understand the difference clear.
Without trying it by ourselfs we can not grab it as same as modeling tools.
and can not talk it is art or not.
Try using some template in transfer utility, like bodysuit - tight.
Ben I hope so, but I think
it can not work about his problem. and if you use genesis as donner, it is almost same with body suit template.
though body suti template can translfer FBMthick.
when I do samething I must find same problem around the area with any template daz default offered user.
I thought it is only my modeling problem, then try to correct topolozy, mesh density up,
keep clean mesh line, sometimes along genesis line perfectly,
yes it can reduce, but not far from expected..
in my pic, I used old handmade obj,then TU with bodysuit template. (almost every option I have tried before)
I know it was not good work at all, but not problem of topology or mesh density etc.
(though I have not good skill, I can make more clean if I make it now ^^;)
after all, I must need to check both rotation and buldge wieght map.
if try to smooth only rotation weight , it can not smooth at all. if buldge work.
or somtimes, the buldge map make the problem. not rotation map.
adjusting weight map is at current.
though we can rely on smooth modifier, but if the base shape much better, it can work more easy.
or we can only use them for more difficult case.