Ask in the Carrara Forums ... right so okay here I am ...
 Catherine3678ab
Posts: 8,360
Catherine3678ab
Posts: 8,360
It is possibly a good thing that there are not yet real one way tickets to the Moon or undoubtedly somebody would give me one.
In downloading all my Carrara content it arrives in several 'baskets' ... the required elements for various .car files are not immediately found, esp. under certain circumstances ... so now, yes I have the required jpegs but we have to do something here to enable the .car to find the files ... and possibly to do something about having so many 'baskets' to contend with in the first place.
So. ALL the content is to go into one folder called what please?
And then if I put all third party .car files into one folder which one that they will find whatever it is they need to?
Pictures welcome.

Daz 3D is part of 
Connect
DAZ Productions, Inc.
7533 S Center View Ct #4664
West Jordan, UT 84084
Licensing Agreement | Terms of Service | Privacy Policy | EULA
© 2024 Daz Productions Inc. All Rights Reserved.
Comments
how mine is set up ( everyone will have their own setups ) is to find the 'My Presets' folder .. then within that folder you should find a 'My Objects' folder. What I did is create more subfolders in there using Windows Explorer to do so.. Name the folders in categories eg. People Props Buildings ect... create as many subfolders as you want.
Then I copy with Windows Explorer any freebies I download into a folder that best represents it along with any textures.
Then when Carrara is open you can drag and drop from the Objects tab in the Browser window at the bottom of your Carrara screen into a new scene, adjust the textures if needed in the texture room.
Also any items you may model in Carrara can be drag and dropped into an Objects folder in the browser window of your choosing.
Any purchased Carrara products should be installed into the Carrara directory ( if you have DiM set up for that, if not just manually install.) if DiM isn't set up correctly your files could end up anywhere. Manual is the way I do it to make sure.
see the screencapture of my structure of folders.
Okay thank you. Will work on sorting it out hopefully tomorrow.
Hi,
welcome to the forum
Once you extract the zip files to a folder, they need to be added to the Carrara tabs.
here some screenshots of each tab, and their associated preset types.
https://www.daz3d.com/forums/discussion/362626/reference-for-adding-folders-to-tray-etc-etc-etc
most of the plug-in files go under the Carrara program folder, under extensions
i have carrara program installed on hd partition
It is always helpful when someone resurrects these basic issues... I may well be reloading everying again, but hope I can just copy my existing folders and not re-download all. Ugh. Am awaiting my new hard drive and hoping they were able to clone the important stuff on my old drive. It was the E one, not C, but is just started dying, so it's in the shop.
Good luck and welcome, Catherine... enjoy Carrara!!!
I give it a whirl every now and then ... still waiting for something to "click" and Oh that's how it's done! to lock in.
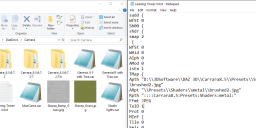
In the meantime I put all those content folders into one folder ... I edited the .car file so it wouldn't look in non-existing places for stuff - and when I imported said file it actually asked me to locate the .jpeg, and I did, and golly, it still loads RED. So presumably something isn't registering in the program correctly yet. I dunno.
Will go over those instructions again and hopefully by week's end it'll all be ready to use, I can dream.
I give it a whirl every now and then ... still waiting for something to "click" and Oh that's how it's done! to lock in.
In the meantime I put all those content folders into one folder ... I edited the .car file so it wouldn't look in non-existing places for stuff - and when I imported said file it actually asked me to locate the .jpeg, and I did, and golly, it still loads RED. So presumably something isn't registering in the program correctly yet. I dunno.
Will go over those instructions again and hopefully by week's end it'll all be ready to use, I can dream.
That's the way it looks for me also.
Some of the shaders seem to be missing from the download.
It also prompts for a missing HDRI file when loading.
Okay ... so then the way to go would be to figure out how to make it um, not red. Or decide what we really wanted was a red tower. It's the symbol used by the local pizza shop too. It's not red either though.
I realized that I had a set of files in with the program, which have to be there in order for the wizards to work ... so moved the entire bunch over to the program files. Will be saving new files to the D drive though, C drive kinda full.
Once I got the tower loaded [p.s. I love this tower!] I resaved the file so next time it can find its own images. If we do not check 'compress' it is faster then to be able to read the files in a text editor so we can find missing textures, etc. Compressed files can be decompressed with 7zip which is free. Unzip "here" and then add ".txt" to the end. If replacing a .car file, simply replace the .txt with .car
And I figured out how to get the horse to pose and receive mats. One does not "click" on the icons like we do in D/S ... one drags and drops the items into the scene, onto the horse ... and hope some silly error message doesn't appear.
Next puzzle ... how come for why opening a sky and opening a land makes for 2 open projects instead of one project with a land and a sky.
as I posted in the freebie thread, the shaders used are Carrara's shaders from the rocks & stones folder in the Shaders Tab ... just reapply them to your liking.
the grass textures are the ones I made which are just for the grass.. you can use Carrara's grass shaders on that as well if you prefer.
select any HDRI file you like that you have in the Scene/Background tab.. if you don't have a HDRI file then you can use one of the other options available in the tab. I use bi-gradient a lot for quick scenes.
In the assemble room ( where you set up your scene ) you can select a shader from the Shader Tab ( on the right hand side window ) and see what item it is applied to..
then in the Texture room you will see the shading domains... just drag and drop a shader of your choosing into that domain that needs a shader. Adjust any settings if you like ( I usually always do ) and experiment from there till you get what you like.
You can load by double clicking.. eg. the Daz Horse.. but then to apply a texture make sure the horse is selected in the tree on the RH side then double click a texture to apply.. or you can drag and drop if you like.. That's how I do it..
then the textures need to be adjusted/tweeked in the texture room.
When opening a sky scene that's what it is a scene.. you then need to add stuff to the scene to populate it, Same as a land scene it is also a scene then you need to apply sky presets and add stuff to populate it.
I usually double click on poses and materials with the target selected
but I do drag and drop content I am loading expecially with top view selected as it will place it in the XY position I choose unlike DS that loads 0,0,0
Regarding this bit, just wanted to offer that when you're going to the scene tab to open one of the presets of a scene, you're essentially opening up a whole new scene, separate window, which won't have anything in it but the sky scene preset, or the terrain scene preset, and all of your current scene that you've already set up will be in a different original window. Since this is fairly useless for adding sky and terrain elements to an existing scene, there is a way to do this, which instead is in your current original scene setup to click on the 'Scene' at the top of your Instances lineup of things in your current scene. Then in the 'Atmosphere' box/tab that appears in the lineup of scene options above the instances box, select on 'Atmosphere' which is by default set to none. Dropdown to 'Realistic Sky' and now you can edit the realistic sky preset as you like. If you want one of the premade presets for realistic skies, there's a little bitty clickable box (3rd from the right) at the top level of the atmosphere bar once you've selected Realistic Sky that gives the option to load one of the presets. And voila you will now have the sky you wanted in your existing scene.
For terrains, process is different. On the top bar either click on Insert and then select Terrain from the dropdown, or click on the Terrain symbol (looks like a mountain) and click in your scene where you want the terrain to load. It will automagically take you to the Terrain modeling room where you can play with changing what type of terrain you want and filtering it however you want (lots of fun to play with this btw and will give you tons of options) or to load a preset of one of the terrain types just click on the 'Load' button at the very top that will bring up a window where you can select from all the various preset terrain types there are.
Also you didn't ask about this, but in your example pic of the horse (which looks quite nice and naturally posed btw, well done) you may also want to add a shadow-catcher under the horse so that it will have a bit of shadow to connect it to the 'ground' (even though there's no real ground, in reality its just an hdri background that the horse is floating over). You can do this easily by the following:
Insert an infinite plane, you can either click on the 'Insert' and find Infinite Plane in the dropdown or click on the Infinite Plane symbol on the dropdown of primitives (it's right underneath the 'Insert' list, I think by default it shows a sphere as the topmost option, but if you click on the dropdown you'll see the symbol for infinite plane, click on it and click in your scene and it will place it). It will look like a standard plane in the assembly room, but it is actually infinite into the distance when rendered.
Next, with the infinite plane selected in the instances tab, click on the paintbrush-looking symbol at the top right area of the screne, which will take you into the texture room. The infinite plane only has one texture, which is by default gray. On the topmost list of the shaders present, for Top Shader where it is by default a Multi-Channel shader, click on that to change it and in the dropdown select 'Lighting Models' and then for the submenu select 'Shadow Catcher'. In the options you may want to also check 'Catch Global Illumination'. And that's it, takes 4 seconds or so and now when you render you're horse will cast shadows onto the infinite plane, the infinite plane itself will be invisible but the shadows will be visible, and it will connect your horse to the 'ground' in the hdri background image.
Edited to add an example of a shadow catcher in action, the one on the left is just a sphere in the scene with hdri background, notice how it appears to 'float' above the ground, example 2 is with the shadow catcher in the scene.
Hi, Catherine3678ab , welcome to the Carrara forum. Thanks for all of your tutorials and resources in the freebies forum.
I usually shy away from threads that are clearly about installation, file references, etc. However, given that you are firing up Carrara and just giving it a whirl, may I suggest a different test project? I have a thread that is focused on building a first scene from resources that are supposed to come with Carrara. It addresses some common sources of frustration and introduces the interface location of some core functions such as figure shaders, "fit to" conforming clothes, dynamic hair, terrains, plants, multipass aids, sunlight, and realistic skies. You'll get a test render relatively quickly, admittedly not very realistic. You will also get introduced to where to look to pursue more advanced tinkering.
See the first page or two of - https://www.daz3d.com/forums/discussion/119181/no-one-asked-me-diomede-posts-screenshots-on-whatever/p1
Oh okay! I'll get there ... thank you. Oh yes, have several HDRI files, D/S uses them too. Lucked into a few sites that provided some nice ones for free.
Sounds like a good plan, play with shaders, yes!
In case you're wondering where my brain went, mom's in the hospital still. She fell awhile back and the leg bone is not healing very quickly at all.
I could load the horse by double-clicking, but not the poses or the mats. But I could drag the poses in to make pose the horse. It was loading the tail on a posed horse that gave an error message and basically froze the program. Had to crash it and start over. First load horse, then load tail, THEN pose horse.
Scenes ...
Top View? I must look for that. I did remember that "0" will target in on whatever one has selected, but nothing seems to load where I want it.
wow ... okay ... this I must experiment with, thank you :-)
Good to know about, thank you. Yes I will certainly look for this too.
That's a maybe next week ;-) I have a vague recollection that in Carrara one can make volcano eruptions and stuff like that.
And ... I DO want to learn about how Carrara's uvmapping room works. So that possibly means I should learn something about how it models as well. And/or if I can import an .obj made in Hexagon to uvmap it in Carrara.
i drag from the tab and drop it over in the instance tab.
shaders over the 'actor' line. poses over the figure name.
i drag clothes and hair to the scene line and conform after it loads.
especially if more than 1 figure in the scene. sometimes pants conform to the shirt. or the bird.
I've lost patience with manually installing about a computer build ago. DIM shines so brightly for this stuff! Just click - done!
...and I can even mass/select as many items as I want, uninstall and then reinstall to an entirely different location without having to think! :)