Max and Matt: Picture in the ad versus my feeble attempts at duplicating the look and feel
 rnollman
Posts: 310
rnollman
Posts: 310
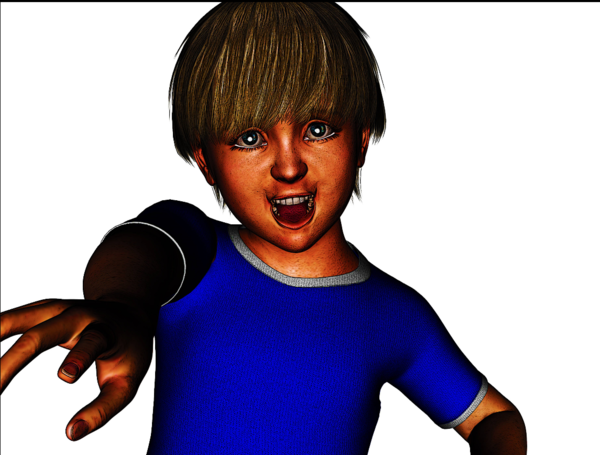
I am creating a character for a set of children's book illustrations and found the ad picts (attached) for Max and Matt of Max (or is it Matt?), one just a closeup of his face and the other with a wagon. I even bought the wagon object. I have attached a third picture with some photoshop post work that I did to make the image more stylized and over-saturated.
But my biggest question is why are the lips on my image so weird looking? I also was not able to recreate the subtle texture of the face, so I compensated by making the image more cartoonlike and more line oriented.

Daz 3D is part of 
Connect
DAZ Productions, Inc.
7533 S Center View Ct #4664
West Jordan, UT 84084
Licensing Agreement | Terms of Service | Privacy Policy | EULA
© 2025 Daz Productions Inc. All Rights Reserved.
Comments
Hi,
somehow I only see two pictures.
So the last one seems to be way over saturated. And the general look depends on your light setup.
The resultant look of the lips mostly depends on the morphs you applied. First as you created the character (shaping) and second the expression morphs. Some combinations don't work well.
Andy
One important thing is lights and render settings.
Check out: http://www.daz3d.com/forums/discussion/16085/
http://www.daz3d.com/forums/discussion/14536/
The sample image most likely used Ueberlight as light source.
It looks as if your light source is angled wrong. It should come from above, but it eems to come from below?
In "light", select your light source in the display window (were you usually select between different cameras). Then, you will see through the "eyes" of the light source, and can direct it very good to get a better angle.
Be careful with the shaping/morphs you use. :-)
Can you perhaps share your light and render settings with us?
I am starting to understand lighting a bit better. And I am having much better success with things like lips with V6. I will revisit the child object again. I think I overmorphed it. I am getting better results, but I have to try other light sources. I will do some experimentation and come back to this thread when I know what I don't know (if you know what I mean).
I bought the Advanced Ambient Daz Studio light bundle and am working my way through it.
I will take a look at your suggested links, Lee, and get back to this thread. I am beginning to see the light (pardon the pun) at the end of this dark tunnel. but I am encouraged. The learning curve is steep and I keep having to learn other aspects of DS also to make things more complicated. Thanks everyone for the help so far.
i am about at the point where i am ready to give up. I see the preset pictures in Advanced Lighting for DAZ Studio product of a ball illuminated by a spotlight. Looks pretty cool, but I cannot get it to work. The Documentation is terrible. I know writing, I am a technical writer by trade dealing with complex systems everyday. I have no idea what I am supposed to do to create an image of a figure under a spotlight.
If someone could just walk me through opening up DAZ and creating a ball under a spotlight like the Gobo image I have attached from the Advanced Lighting for DAZ Studio product, I would appreciate it. Here, I will even help you to get started:
Step 1: Open up DAZ
Step 2: Go to Content Library, find a figure, click on actor
Step 3. Go to Lighting and create a point light
Step 4: Go to Content Library and click on Gobo preset
Step 5: And so on...
It cannot be that hard. Do I need a ground plane and a wall to bounce the light off? How do I do that? What steps am I missing?
Thanks in advance for any help...
Rich
Please have a look at these two.
http://youtu.be/zOBX7wcvGpQ
http://youtu.be/OgDmM-YFPmY
Jabba101 will guide you step by step through the process.
(Other than that, I can' help you wih the problem, as I am not at my PC at the moment, sorry. :-( )
But to answer your question, yes you need a ground surface if you want to cast shadows on it.
Okay... Back at my PC. :-)
I only realized when reading your post again that you meant the Point light, not the Ambient light. Very sorry!
A word of warning, since I have set up my DS to fit my individual needs, your "workplace" set up might look somewhat different. I am using the "Self Serf" layout and have docked some panes I often use to the sides, to improve workflow.
Here we go:
1. Open your DAz Studio, set up your figure and pose it. :-)
2. Go to DAZ Studio Formats --> My DAZ3D Library --> Light Presets --> Age of Amour --> Advanced Spotlight
3. Select the AoA Advanced Spotlight (marked as "1") with a double click.
4. The light will load, but in "Standard position", which is in the center of the world on floor level (marked as "2"). (Whn you render now, you will get black eagle on black ground. ;-))
5. Move the light into position. The easiest way to do that is selecting the light in the View pane. (marked as "3").
6. You will now see the world through the eyes of the light. Move the light into position by using the camera view manipulators (marked as "4"). Since the light most likely loads on the same spot as your character, it's best to move backwards first, until you start seeing your character.
7. Move the light until the little circle points at the chest of your character, rather than he face. That way, it will get proper light without being overexposed. A good angle is 45° from top, 45° from the side, but you best experiment a bit with this, as each set has slightly different requirements.
8. Change over to the Lighting/Cameras pane (marked with "5").
9. in the "Lights" tab (marked as "6"), select the Advanced spot light.
10. You can change the settings here. In "Light" (marked as "7"), the Spread Angel is usefull, as it will increase or narrow the "falloff" angle of your light. You can also do this with your regular spotlight, but the AoA spotlight also gives you the option ti manipulate the innter circle, which gets the 100% light strength.
It's best if you experiment a bit with the settings. Also, try the shadow settings, and make sure you are rendering through a camera, and not he viewport. :-)
I hope this helps a bit. I'm not very good at a explaining, so if I have explained something in a weird way, just let me know.
Here's a test render using the settings made earlier.
As you can see, the lights still need improving, as the picture is very dark.
For the second picture, I added the Advanced Ambient Lights. Now you have shadows and overall lights. With the default strength of both the ambient and spot lights combined making it almost a bit overexposed, it would be best to tune down either the ambient or the spot light down a little bit, until optiml lighting is achieved.
In the third picture, I removed the ambient light and used a regular distant light, with no shadows set, at a strength of 70%. The effect is very different from the AoA ambent light. :-)
The final one is the same as the third, but here i have turned the shadows on.
Hey, these videos are really helpful and created some new ideas.
Andy