Some help with a strange problem modeling in Carrara
 MysticWings
Posts: 226
MysticWings
Posts: 226
Hello.
I'm starting my modeling learning and doing my first prop. I'm using Carrara 8.5 pro.
But one thing is happening that I have no idea why or how to solve it. So please, some help. Would like to avoid create everything again.
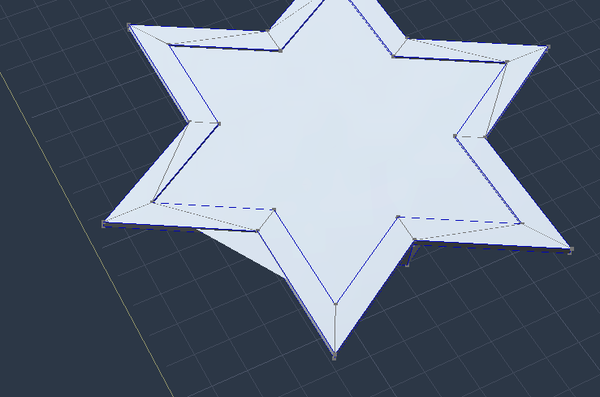
As you can see in the image, there's a kind of surface that comes out of the star. But in hireframe it just doesn't exist, so it's not actually a polygon and so I don't know how to correct.
The more strange part is, when I saved the file, it wasn't there. Today I opened the file again to continue my work and it was simply there. When I select the image and move it disappears, and then it appears again while I'm working.
And if I export an obj and open in daz studio more of this appear, even that in carrara is just on one side.
I already accepted that probably will have to do this part again and then align it with the other parts again, but would really like to understand what's happening so it doesn't happen again.

Daz 3D is part of 
Connect
DAZ Productions, Inc.
7533 S Center View Ct #4664
West Jordan, UT 84084
Licensing Agreement | Terms of Service | Privacy Policy | EULA
© 2025 Daz Productions Inc. All Rights Reserved.
Comments
I believe, according to your screen shot, that there is perhaps inconsistency in the extrusion of star and the graphics card does not follow… There is some time of the files which it is necessary to start again since the last good version.
It was not an extrusion... but a boleean.
But the logic is the same...
In this case, really have to model all over again... or almost all. Have to start make things in different documents and keep them there until it's over I see... :(
Thank you for your answer. At least now I can understand why this happen.
Maybe instead of a boolean, which can cause issues with the geometry, you could use the empty polygon command under the Construct menu if you're trying to make a hole.
Well, I don't know about all situations, but in this one, you just saved me lots of time. Huge thanks to you :)
I used empty polygon just in the part that is having the problem, the inner most lower polygon of the star and everything disappears. Then I just created a new polygon (which does not need to be perfectly aligned) and used it to make the part I deleted with empty polygon. So, no need to remodel everything again.
But I don't see how can I use it to substitute boolean since it just vanishes all the surface.
In these case I had the form of the star, then I copied it and made it smaller, put it in the place (the high I wanted) and used the boolean to make this down part at the center. If I used empty polygon on the star surface wouldn't that just take out all the upper surface?
You would need an inner shape to define the edges, otherwise the whole surface will be emptied.
The other possibility is the spline modeler. It excels at this sort of thing.
Insert a spline model.
Change the view to front.
Use the pen tool to make points in the desired shape. You can select the points individually to move them.
When the shape is the way you want, drag the selector over the shape to select all the points and then copy and paste the shape.
This next part may require a little trial and error. Select the scale tool and place the cursor over one of the lines (not a point), and shift-drag inward to scale the pasted shape smaller, or drag out to make the shape larger.
Adjust the points on the pasted shape to fine tune the position if you want.
Use the selector tool to drag-select both sets of shapes and then under the Arrange menu, combine as compound.
You can select the end of the extrusion path (pink line) and drag it to lengthen or shorten the path.
Are you trying to do something like this...where the star has a lowered section in the middle?
I did this in the vertex modeler by making the star with a polyline.
Then I filled the polyline, then added thickness.
To make the lowered area in the middle, I used dynamic extrusion to make a smaller star in the middle, then extruded again to make the smaller star have a lowered section.
( it helps to have two views open....a directors view to do the extrusions, and a side view to help see the height of the extrusions.)
I can reproduce exactly what the OP sees. When you scale the star shape in the modeler, it will show extra sides(polygons) that blink in and out of view. I'll do some more testing, but this appears to be a bug. I'm using C8.1 Pro 64-bit. Workarounds can be what EP or McGuiver show.
update: The star shape I used was an N-Gon(a polygon with more than four sides). I saved the scene when the star shape looked OK. Then when I loaded the scene back, some extra sides(polygons) show up. Triangulating the star shape fixes the n-gon issue, but this is probably still a bug that needs reporting.
Forum ate my rather lengthy response and I don't have the energy to retype the whole thing. Here's the gist.
Not a bug in Carrara but a problem with your geometry. Possibly introduced with the Boolean operation. Fixable. Entirely avoidable as you gain experience with the vertex modeler.
Here's my method for creating this object.
Draw Star Shape
Add thickness
select top face and use the Extract Along Edge tool to create inner star shape
Select newly created inner star shape and use Dynamic Extrusion Tool (with CTRL or CMD held down) to push shape down
Move camera to view bottom of shape
Use the Link Vertex tool to connect the inner vertices of the bottom star shape.
Use the Dynamic Extrusion tool to pull down center bottom shape.
P
Waw.... Many thanks to all of you!! :)
You really gave me lots of alternatives to boolean when it comes to more complex geometries that can create problems! I will try them all so that I can learn them by practicing! :) Think is the only way I really understand how they work and by that know what's the best solution to each situation.
Really love this forum!! Learn so much in here with all of you! Very grateful!!
Can I make one more question. It's not very important for now but would like to have an idea about the subject.
This star is part of the middle altar of a kind of temple I'm creating. As you can see in the image, it has a lot os steps and each one of them is a separated part (I selected one for you to see the form of each step). The form is just that, there is nothing more that goes inside the shape. So I have lots of these steps. For now is good that they are separated as I work, but is there a way of in the end I join them all in one shape (besides boolean that I believe it can create geometry problems)? Or is it the best choice, or is better to keep them just as they are even when is all done?
In your opinion, what's the best choice regarding exporting, uv maps, textures, daz using....
If you want to make only one part, you must select all and go in “Model/Weld” in the modeling room.
You can then create shader domains for textures.
If it is the good choice?. , it is a question of personal preference and that depends on the complexity of the model, but I prefer all welded…
Thanks!!! :)
Had already heard about weld tool and by the name I thought it should be a way of doing these, but didn't really tried the tool yet!
Thanks Tania,
You've managed to pull out an Carrara All-Star Modelers response! Looks very cool!
Glad to see all of you 'round these parts again! :)
For uv mapping, you will need the geometry to be a vertex object......(this is why I do everything but clouds and particles with the vertex modeler).
You can convert your model to a vertex object by clicking on the "wrench" (model room) icon. there you can convert to another modeler.
Lolol. I just asked... ;)
Found that, after learning in tutorials and apply what I learn, always something "strange" happen, something that it was not on the tutorial and that I have no idea how to deal with. That's the time I come here... And believe me... I learn soooo much, but so so much in this forum.... There's a lot of great artists/teachers here!
Feel really gratefull to all the people in daz community that help me!
And I love 3d and want to learn more and more every day!!! :) Still very new at 3d, but always working so I get better and better!
In these case everything is in vertex object. But thanks, didn't knew that tool yet. Believe it may be very handy :)
I didn't get into uv map learning yet. I know what it is, more or less how it works and in daz sometimes I take the texture maps to make some changes in photoshop, but that's all.
As I'm learning so many things at the same time right now, I prefer to go step by step in all of them, always doing in practice what I'm learning before I do the next step. I learn better in these way. Really like to know the basics before going into more advanced things. Of course sometimes there are things that you find out it would be better to do in another way when you go to the next step of the project, but those are the learnings we never forget... ;)
@ Mac GUIVER,
I would be happy that you open new a topic on UV mapping because it is something which I do not manage to control…
And @ Tania, I also learn something almost the every day on this forum!
Lolol. I just asked... ;)
Found that, after learning in tutorials and apply what I learn, always something "strange" happen, something that it was not on the tutorial and that I have no idea how to deal with. That's the time I come here... And believe me... I learn soooo much, but so so much in this forum.... There's a lot of great artists/teachers here!
Feel really gratefull to all the people in daz community that help me!
And I love 3d and want to learn more and more every day!!! :) Still very new at 3d, but always working so I get better and better!Me too... Very grateful! All of these folks that replied to your question have helped me considerably over the past few years.
I was fairly comfortable with 3d modeling before getting Carrara, but it's this community that really got me on track.
UV Mapping
This is a process that 'maps' how the polygons face on the projection used to shader (texture) it. It, too, takes practice.
It becomes very necessary for objects that require texture maps because there's really no other way for the software to know what it should do with our model. So before mapping, a polygons map might be applied to a single line - so no matter what you do, it will look impossibly stretched and distorted - because the image map is being squished down to the width or height of a single line.
Luckily, Carrara has a decent set of tools to help us map out our UVs.
Advanced Carrara Techniques, taught by our very own, Phil Wilkes, realizes the importance of UV Mapping to a 3d modeler right from the start, and shows us various techniques on how to do it in Carrara, including even the process of 'unwrapping'.
Carrara Modeling Tutorials, by our very own Mike Moir, has some UV advice as well. While not as in depth as the larger learning course, this set of tutorials is very useful in adding to our working knowledge of Carrara.
No matter how well it's explained, UV Mapping can get frustrating at times - other times it might go very smoothly and simple. Practice is what this process requires. I often use similar methods taught by Mike as a starting point, and then use some more of the in-depth methods taught by Phil. My biggest saving grace in UV Mapping has been the process of naming various parts of my models as separate shading domains. Carraras UV editor allows us to hide everything except the selected shading domain, allowing us to work on that domain alone, before moving on to the others, one at a time. This way I can either place each part of the model in different parts of the map, or to actually assign an entire map space to each (or just some) of the separate domains - making it easier to see how each polygon lays on the map.
A really important thing to do is to go through and start selecting one polygon at a time, while in UV editing mode. What we're looking for is to see a shape of the selected polygon instead of a single line, or nothing at all. If you select a polygon and you only see a line, or just nothing, you know that you don't have good mapping yet.
This can be a whole study all in it's own, so I'll stop giving you a headache now! LOL
Just wanted to give you some food for thought, since that will be one of your next considerations if you wish to apply an image map to your models.
Another lucky circumstance that we have, as Carrara users, is the fact that Carrara comes complete with a whole pile of useful 'procedural' shaders, that apply a certain look across the model, no matter its UV Mapping. You may still find anomalies in the appearance, if you have polygons mapped to a single line, as mentioned earlier, but these procedural shaders will be vastly more forgiving in that respect. Where you'll begin to notice the need for a good UV Map using procedural shaders is when you try applying effects like lines, squares, or other shapes that you want consistently placed along the mesh.
Okay Dartan, you're babbling... stop it! ;)
Cheers Tania, and much fun to you in your endeavors! :)
Thank you for the tutorials! :)
The first one I already had my eye on it :P Have to save some money since I've already invested some in other tutorials (mostly from Dreamlight). I just got Carrara 1 week ago so... They also have some free basic tutorials on Carrara on Infinite Skills site. Think is more about scene making and rendering, but is very cool anyway.
The second one didn't knew yet, but it may be very interesting for a newbie like me. :)
And about UV mapping... next step... so much to learn... 3d is really a big world. Thanks for the advices! :)