Bot Genesis problem
 Joepingleton
Posts: 746
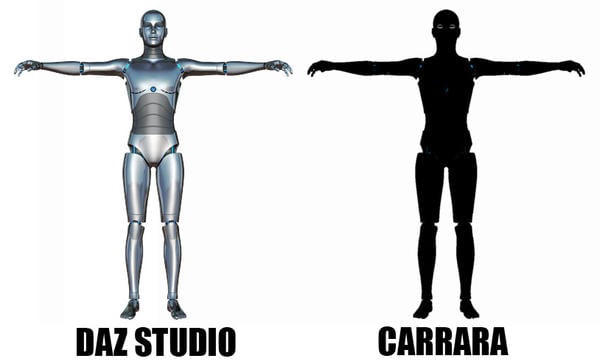
I have not been able to figure out how to get the Materials for Bot Genesis to work with Carrara. Attached is the difference between Daz Studio and Carrara. Is there a way to get Bot Genesis to work in Carrara?


botGenesis_problem.jpg
814 x 494 - 36K


Comments
I don't have the product so this is just a guess. Until someone who has BotGenesis comes along, I have a few suggestions.
1) Daz has been setting the default placement of some Genesis-related materials as a subfolder for the character. For example, in the attached pic, the materials for the Azumi character for Aiko 5 of Genesis is in a subfolder of the Azumi folder under Genesis under People in the "My Daz3d Library" folder. That is using default install, so if you do custom installation it would not apply. However, the materials will be wherever the creator put them, so they could be in a materials subfolder. In any case, explore your My Daz3D Library content folder.
2) Use Daz Studio as a plugin. Load the BotGenesis in Studio with the materials that you want, then in Daz Studio choose File / Save As then choose a character preset. You should have a "My Library" folder in your Carrara content browser with a subfolder called presets and a further subfolder for characters. try loading from there.
3) Dare you try the Smart Content tab? I never do, so that is just exploratory.
The other possibility is that the textures are not image map based for once, which would be weird for a DAZ Studio product. ;-)
Even still, you may find the same issue, simply as Carrara translates the DS materials to Carrara shaders.
Here are some things to check:
For efficiency sake and to save some headaches, after loading your materials, if you do, don't forget to consolidate duplicate shaders.
Now go in and look at the color channel first. There might be a nested routine going on in there that isn't necessary in Carrara. In that nest should likely be a texture map. Drag that map directly onto the color channel to get rid of the rest of the nest, leaving only the texture map.
This sort of thing can be found on the eyes, quite often, when converting from DS materials to Carrara shaders.
Look through each shader and all of the channels used for things like this. As a helpful hint, when things look 'black' but they shouldn't, look around in the shaders for something black that shouldn't be.
If that's not the thing, perhaps the material was relying on something other than the color channel to simulate the appearance. In this case, you might see "None" for the color.
If that's the case, try turning Shininess to 0.00 and then test render. Sometimes we use Highlight vs Shininess to let light create the color, rather than using the color channel at all.
Be aware that some such shaders will want to rely heavily on reflection, which can really tax your render times. A great question to ask yourself is this: Do I need to actually see reflections, or do I just want it to look shiny?
Often we can get great reflections with a very low value in the reflection channel itself, and simulating the rest with a brighter (higher value if a number) Highlight input, against a then finely adjusted Shininess value or map. To let light wrap farther around a surface, go closer to 0.00 and to tighten up the shine level, try going closer to 30, possibly 40 if you're rendering in very high resolution, but if you lose shininess, go back toward 18 and work it from there again.
In these kinds of shaders that rely not on a color channel, but the others, you'll need something for a background and a good lighting solution to actually tweak the shader. This could be simple, like adding a color in the Scene background effects, but not black or even too, too dark!
Sometimes we might just not like what we're getting form trying to tweak out DS materials that don't make use of any maps. Some DS materials are procedural. And if that's the case, you can always drag Carrara shaders onto the subject instead. I use Ringo's DP Shaders for this too. That's where I love having a huge shader collection :)
Hopefully some of that babble can help you on your way. If not, we can dig deeper ;)
did you try saving a DUF scene in DS
then make a new scene in C8.5
then import the DUF scene from DS .
Thanks for all the info. The sample was from loading a DAZ Studio file in carrara 8.5 Pro. I tried loading it from the content browser and tried the other suggestions. None of them worked. It may be that the shader is DAZ Studio only and I'll just have to add a metallic shader instead.
I have seen this happen on a few items in Carrara. For me, it was the shader setting.
See the screen capture. This is a Michael 5 character loaded into an empty scene. There are several "phillip" textures. The ones with facial hair all make the entire face black.
I can correct the issue by changing the shader, but I lose the hair (apparently the hair is created by some shader magic and not part of the actual texture map).
Take a look at the shader tree and see if it has extra "black" elements like the one shown here.
On the plus side, Carrara has some good metallic shaders and they are easy to adjust to get the effect you want.
I think I can explain some of what is going on...
The second element, in that shader looks to be either the displacement or specular map, when used in Studio. Both are greyscale maps, so it's hard to say without actually seeing it (but spec maps usually are much darker). And doing any sort of blending with one of those as a texture will definitely make grey...or black.
For the Phillip facial hair, it looks like they are alpha mapped png files to use in Studio's Layered Image Editor...so the Studio preset will load them to the LIE...
I think I can explain some of what is going on...
The second element, in that shader looks to be either the displacement or specular map, when used in Studio. Both are greyscale maps, so it's hard to say without actually seeing it (but spec maps usually are much darker). And doing any sort of blending with one of those as a texture will definitely make grey...or black.
For the Phillip facial hair, it looks like they are alpha mapped png files to use in Studio's Layered Image Editor...so the Studio preset will load them to the LIE...So with that, here's what you can do:
If you've consolidated shaders, select Actor and go to the texture room
Open the shader for the face and with it in the default Top Shader view, right-click in a part of the Top Shader channel in the left portion of the shader window and Copy it
Select the face domain's drop-down to the right and choose New Master Shader
Paste the previous Face shader into the top shader here
In the color channel, choose overlay and in the new Source 2 channel insert the texture map of the facial hair of choice, found in the DAZ > Characters > Genesis 2 Male > Base folder in the Textures folder.
Either use this or a add or multiply, whatever, in the Highlight and bump channels as well.
My specifics might be a little different... I am not at Carrara right now :( but after you start layering textures and such in Carrara, it becomes rather amazing toward what you can do with shaders. Especially when you also realize that any of these maps can be animation files... really neat!
Pick one of the most visible domains from the list on the right and double-click it to open it
Look carefully at the color channel. Is there a texture map in there? If so, is it all by itself or are there more Sources in the channel? If it is not alone, make it alone by dragging just the texture map channel onto the color channel in the left portion of the shader window.
Look carefully at the Top Shader. Are there any functions added to any of the channels that might mess with it's appearance, like Alpha, Transparency, etc., For testing purposes, I'll often turn everything to None except for Color and Bump, perhaps Alpha if it's something like hair that requires it. Sometimes I'll leave value sliders in Highlight and shininess too.
I've just noticed nested image maps in Alpha channels and color... even in the bump channel.
Carefully comb through and just get a simple shader going and if no texture maps were applied in anything, look in the textures folder for the product. Notice which maps are there, so you can add them to your appropriate channels in Carrara:
Main Texture maps - Color Channel
Texture_B - Bump Channel
Texture_S - Highlight channel - often needs to have the Brightness slider under the thumbnail turned down some.
Some products come with normal maps and can be used in place of bump by changing the channel from texture map to normal map in the drop-down
I've been planning on experimenting more with using SSS maps in Carrara, but they don't translate directly into how Carrara handles SSS without the help of something like Enhance C, or is it one of the Shader Ops?
Thanks for the tips.
I just consolidated the shaders and applied a metallic shader for this experiment. Bot Genesis Animation.
I love the DAZ studio version's look and how fast it renders. But O have been so much happier animating in Carrara. I guess more experiments are needed to match the DAZ studio look.
Yeah Joe, man... you got it!
After that test, I can see that you've perfected your ability to shape the motions with the sound. Beautiful job.
So now it's just a matter of you applying your technique across whom ever your animating. Bravo! I really liked the experiment in there going from expression to neutral to expression... worked great without any mouth shape distortion. It really helps to show how different the effect can be depending upon the emotion. One of the things that really intrigues me about Mimic Pro within Carrara is that we can save as many NLA pieces to the character, and these can be layered in. Just cool. But I haven't gotten that far yet. Soon though.
Agreed - Carrara has some very cool features in the shader room. I am always finding new things and new ways to create effects.