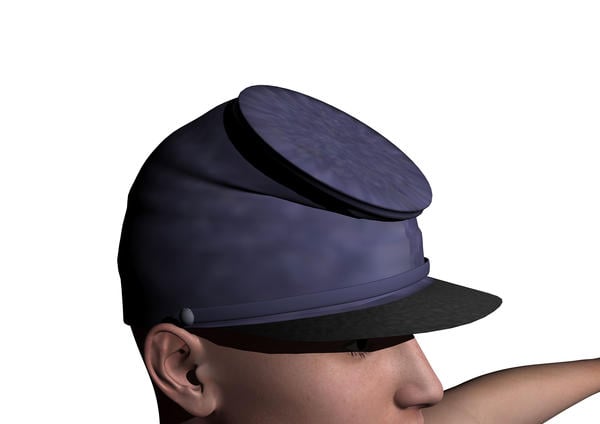
I am trying to add a wool texture map to my clothing figures, but it is too pixelated.
I am attempting to design 3D military uniforms for DAZ figures, BUT the fabric texture is far too pixelated and blurry in my renders. How do I fix this problem? The surface detail is, for all practical purposes, non-existent.


foragecapRenderDAZforum.jpg
2000 x 1414 - 480K


Comments
If you use a fractal noise, increases contrast, if it is cellular, increase the intensity.
Make a Copy of the color channel and paste it in the Bump channel.
If it is an image in your channel color, its size is too small…
When I do the texture maps in Hexagon, they're too small. Most of the image files I'm trying to use are 2048 x 2048 pixels.
I think, best is to optimize the texture within that program you render with.
Are you making the uvmaps in Hexagon? The islands normally have to be resized and/or repositioned and a new .obj then exported of course. After the uvmap is fixed, then I too use an image editor to make the textures and apply them in the staging programs.
HI WolfmanJack1959 :)
If you're using a texture map that's 2048, then it should be reasonably detailed, but the image you've posted looks extremely blurry, (at first, I though it was a fractal noise (procedural) in carrara,) rather than an image.
First,..
Check your UV Mapping in Carrara's vertex modeller / UV Mapping area.
if that's fine,..
Check your shader settings,.
Any screengrabs you can post of the shader settings, or UV mapping would be helpful
here's a quick test, using a 600x600 wool texture map, on a simple cap thing. (just to show it works)
it's been simply / quickly UV unwrapped in carrara
Probably too low in resolution to truly use, but here's a sample map I made in a few seconds in Howler. Feel free to use it however you like, if it works for you.
As in other suggestions, but also try adding this same map in both the Bump and Highlight channels, except in the highlight channel, use the slider directly under the image to bring the 'Brightness' down to 5 or 6, somewhere really low like that combined with a really low Shininess value, like 0.00 or 3, perhaps 4 or 5, but I wouldn't go higher. Try Shininess of 0.00 at first.
For all of them, you may want a tiling effect to make the grain smaller. If this is the case, since this is not a tiling texture, use the "Seamless" check box and start with a low tiling setting at first and work up from there as per your needs. Like 2x2, then 3x3, etc.,
If you tile one of the channels, you'll need to carry that through in all three; Color, Highlight, and Bump.
An easy way to do that is to first set up the color channel to get the proper grain.
Now use Ctrl and, on the left side of the shader window, Ctrl + Drag the texture map into the other channels, Highlight and Bump.
Don't be afraid to try cranking up the bump value for tests. And don't forget to now go into the Highlight channel and bring that brightness way down :)
Just in case you want to add some color to the texture, after you have the image set up how you like it in the color channel, go to the drop-down for the color channel and select Operations > Multiply
This will place the image map in one of two Sources within the color channel. Now change the other Source to Color and then set the color in the color chip.
Alternatively, instead of Operators > Multiply, you could use Color Gradient, which will use your map settings as the controlling shader for the gradient. Now set up your colors in the gradient.
Carrara shaders are fun to optimize once you get the hang of it. There is a lot to it, so it could take a lifetime or more to truly master, but getting good results will happen fairly quickly as you get used to setting up just the right channels that you need.
As others have mentioned, we often don't even need texture maps for such effects. Like fractal noise or other noise functions.
The deal is, for something like wool on that cap, it likely won't look right until it has some bump to it.
I have a few texture maps that I've made to universally help me in times that I need quick results. In particular leather and cloth. They are just simple maps like I've uploaded above, but I went the extra mile to make them seamless, so they tile without any extra effort. So something that cover the whole body, like a body suit, might look best with a 3 x 3 titling, perhaps even 4 or 5.
Same with wool. It shouldn't really require the detail of a 2048 x 2048 map, unless it is truly a major focus of the shot.
Give these tips a try... I think you'll have a lot of fun getting different results :)