Problem with Projection Mapping
What am I doing wrong?
I'm try to create a page in a book that turns to reveal the next page in the book. Each page will have an image that is moving video surrounded by text.
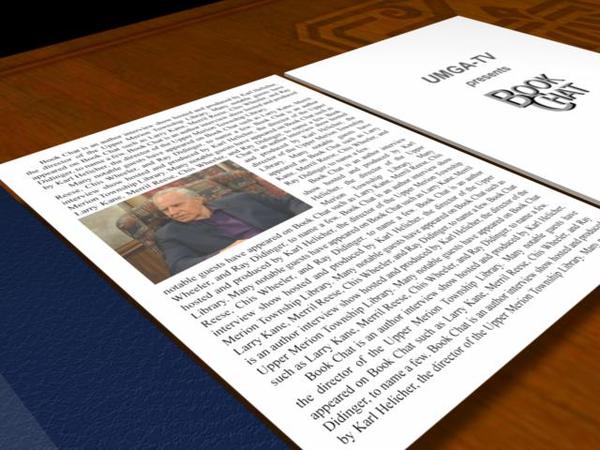
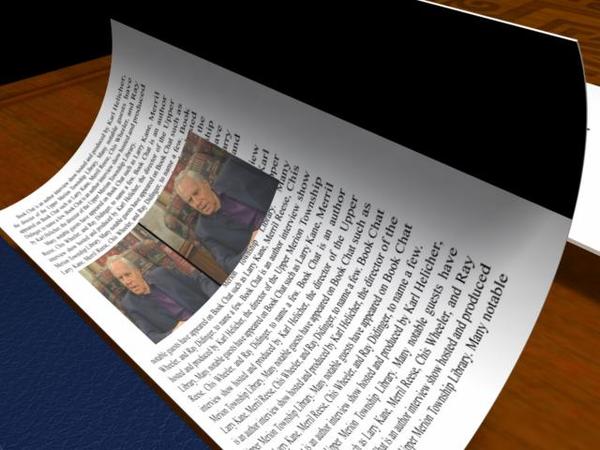
I made a vertex object with two domain sections on the front. One is for the video and the other is for the text. I applied projection mapping and flat mapping. Laying flat the page looks fine but when it turns it gets misaligned and distorted which can be seen in the attached images.
How should I be setting this up?


Page_FLAT.jpg
640 x 480 - 58K


Page_TURN.jpg
640 x 480 - 49K


Comments
Inthis example you want to use UV MAPPING, not Projection Mapping. A projection map is like a texture "projected" from a slide or video projector. The shape might bend (like paper or cloth under the projection) but the texture does not.
In the modelling room (vertice modeler) are controls for UV mapping. On such a simple model as a page, it should not be difficult to get the results you want....
Thank you for your input. It has helped to put me on the right path but UV mapping still eludes me.
I have now created a simple cube that is nearly flat so it looks like a page in a book. Each side of the cube is a 4-sided rectangular polygon.
I mapped 3 domains. The TOP polygon of the cube is Page Front. The BOTTOM is Page Back. The four sides are one domain named Edges.
In Adobe Illustrator I have created a JPG image of text on a page. The JPG is the same aspect ratio as the Page Front domain on the cube.
Then I placed a copy of the default shader onto the Page Front of the cube. I applied the JPG as a texture map (not a projection) to the shader. In the shader tree Top Shader is set to Multi Channel and Color is Texture Map.
The UV setting was on Spherical so I changed it to Custom. Now it seems the JPG image is extremely magnified and "Fit UV's" is not changing it. I don't understand what the other settings in UV Editing do.
I have read the DAZ manual (what there is available anyway), I have reviewed Mark Bremmer's online tutorial and I have Phil Wilkes' Infinite Skills tutorials. It seems that UV mapping and I are not meant to be. I am still waiting for the AHA moment.
the easiest way to texture a plane is with flat mapping
you can do this in the modelling room or in the texture room
in the vertex room you can choose which axis to project it on, pick the one that places the whole plane surface flat over the uv square
in the texture room you have a series of cubes shown, you pick the one which has a face corresponding to the projection of your plane and choose whole object if one surface otherwise the surface you wish to map the image to, you can in fact use multiple uv's on different surfaces this way.
Thank you for your reply.
Flat mapping is a function of projection mapping, correct? I tried that approach with little success (please see the sample images above). The surface I am mapping to needs to bend and rotate causing a projection map to get distorted and misaligned. Please let me know if you agree projection mapping is not the right approach for this project or if I am still missing something.
The task I am trying to complete seems so simple and straight forward yet the solution eludes me. I expect it is a basic setting that is not selected but which?
Thanks again for your input.
just wondering, not at my computer
did you by chance accidentally tick the global as opposed to the local option in the texture room?
I think what you need is a combination of different shading domains and a UV map. I was going to post a bunch of screen shots showing the process, but Carrara went into Zombie mode and I can't switch rooms. It happens very rarely for me, but when it does....
So anyway, I made a vertex grid, adjusted the scale to match the shape of a page, and then I added thickness. Basically this is a flattened cube, so when you're UV mapping, you will want the cube projection. I then selected polys for where a video would go. I did have to adjust some of the points and lines to get an approximate the proper aspect of the video. I then created a new shading domain by selecting the Global tab on the right side of the screen and choosing to create a new domain. Carrara asked if I wanted to use the selected polys or whatever, and I clicked okay. It's a good idea to name the domains.
Next I deselected the polys for the video domain and selected only the polys on the top of the page (surrounding the video domain) and went through the steps listed above to create a new shading domain. This is the domain where the text will get added.
I deselected all the polys and then selected just the polys on the bottom of the page and created a domain for that. If I wanted to, I could have created multiple domains for that as well.
The edges of the page will be under the first domain in the list. You can rename that one if you wish.
As I mentioned above, I used the box projection since it's basically a flattened cube. I selected the video domain and then with the UV tools I selected detach polygons and moved the domain for the video off to the side as shown in the attached image. I also had to adjust the aspect of the UV as it was a bit compressed. If you choose Fit UVs it will squeeze them all onto the "page". I also detached the front page text domain from the back to arrange it better.
The attached image is a test I did to see how well the UV map exported. I went back and rotated the UV maps around and did some fine tuning when Carrara went into Zombie mode. You can see from the screen shot I reoriented the text UV and the video UV. To do so, select the rotation tool and with the domain you want rotated already selected, click and drag on the UV grid for the domain. If you hold the shift key it constrains the angle so that it's straight. You can also scale UVs this way by using the scale tool.
HI HeavyD
Starting out by using a cube, can be a quick way to visualise something simple, ..but for what you're trying to achieve, It's not the best way.
You'll find things will be easier if you create a vertex object, with more definition than the cube primitive, such as a vertex grid. (pic)
Then you'd choose a method of Projecting the texture of your page, onto the model (UV Mapping)
lastly, you'd animate the model, either using modifiers, or by adding a few simple bones to allow you to control the model by hand animating at different points in time to create key-frames.
Save your scene.
Your new object can also be saved to the browser (My Objects) (the key-frame animation is also saved)
You can convert your (key-frame) animation, into a reusable NLA clip, and save that clip to your browser (My Clips)
That's how I do it too. Nice explanation, Andy!
Thanks everyone. I really appreciate the help. I hope I can put it to good use and make you all proud.
Wendy - Where is the Global vs Local setting you asked about? I looked but couldn't find it.
Evilproducer - Thank you for the extensive explanation. I will need to review it step by step to grasp it.
3dage - Sorry I failed to mention that my cube is a vertex object and of the simplest kind. Each side is not a grid but just single 4-sided polygons. Could that be part of the problem? I've decided to just work on getting the text mapped to the front and back of the page without the video section for a start and I am having trouble with just that. Is it possible my JPG text image is too big?
Thanks again.
The advantage being if you wanted to replicate a bunch of buildings, for one small example, and had some of the coloring was gradient and shaded globally, it would spead differently across your replicated buildings so they don't all look the same. But move one of them during an animation and it would look funny as the building moves but the shader doesn't.
The method I described above, which probably can be explained better by somebody else, ;-) creates a template that you can export, which is the white image I posted. If Carrara hadn't hung, I was going to show that if you open the template in an image editor such as Photoshop, you can fit your text into the grid for the front page domain and it would fit properly.
I was trying to tweak the the UV layout when Carrara hung, and since it was a simple project I hadn't bothered to save it, so all the other work was lost and I didn't have time to recreate it.
No worries evilproducer. I really appreciate what you did and I am sure it will help. My brain just seems not to be wired very well for UV mapping. Some things just click for me but not this. I'll keep plugging away until I get it because I hate throwing in the towel.
I restarted a new project from scratch.
I recreated the page in the same manner as before and recreated the shading domains the same way too.
The images attached show the JPEG file I am using as the texture map and the result when it is mapped to the domain named Front which is just the top of the cube.
Why is the texture so big on the page? It seems I should select "Fit UV's" in the UV editor, yes? Or why not?
Thanks again for helping me grasp this.
Fit UVs is for fitting the grids you get from UV mapping onto the main grid so that when it is exported they all show up on the page.
my method in the shader room on an un uv mapped prim works too
forgot to circle, chose the cube second to last with top shaded in first image for projection of flat map
whole object
the layer 0 (rectangular bit added) for second image (video)
you can put ellipses and drawn shapes on too will uv map to full size so use enable transfrom to scale it and move it
works on un uv mapped objects like metaballs
I was just playing around with that idea myself, but it's time for my bedtime.
See? I love this about this community. Always new ways of doing the same stuff - and mass inspiration for new stuff entirely! What fun!
Thanks to everyone who contributed to solving my problem.
I went away for a little while to try everyone's suggestions and see which approach would work best for me. I ended up creating two vertex cubes. I sized one to be the page and the other to be the video on the page (slightly above). I wanted to be able to move the video around to different locations on the page without having to redo the UV mapping for each page. I grouped the two vertex objects together and then applied to Bend modifier. That achieved the desired "page turn" effect I wanted but, after rendering, the video clip is playing in slow-mo.
Anyone have any ideas about what is causing that?
Thanks in advance for any suggestions you can offer.
If your Carrara scene is with 60fps and your video project with 30fps, your final footage is twice longer and will thus be slowed down 2x…
Also, by default "Skip Frames" is on in the timeline. Could that have causes confusion, perhaps?
Thank you Dart, it is very useful when one wants to see all the images of an animation in the timeline, I did'nt know that and that will avoid me some tests of render…
If I could leave that off in preferences, I would ;)
I don't like skipping frames, except on rare occasions.